Vulnerability Assessment and Penetration Testing is something that we perform frequently at Attify. We indulge best ideas and logical ways to make sure your app remains secure from every aspect.
One of the main focus of manual pentest is to check how an Android App behaves to changes inhibited by an attacker.
The key aspect to perform this is reversing the app and analyzing the smali.
Well, this always remains the best practice when things are working fine statically. When it comes to dynamic aspect, nothing can be better than Android Hooking.
This post discusses how to use Xposed framework to implement Android Hooking.
Depending on the scenario, We generally prefer either of the two famous frameworks :
- Xposed Framework, or
- Cydia Substrate.
Today we would like to discuss some insights about Android Hooking with Xposed framework and how to exhibit this functionality.
People generally tend to argue similarities in both frameworks.
Upto some extent it is correct, but Xposed and Cydia, definitely hold some differences with both having their strong aspects depending on the scenario.
This post is divided in to two parts.
- First part explains the insights of Xposed, and
- Second part discusses how to hook methods using Xposed.
Xposed is a framework which allows to develop third party add-ons (popularly known as modules). With the help of Xposed Framework, we get the power to make changes to individual elements of the OS or any app we wish to test without even requiring the source code.
Xposed in itself is a vast area to explore. We will be only focusing on hooking android apps. More information on Xposed can be found here.
Before we get started with hooking, it’s important to understand the insights of Xposed Framework.
Xposed is a base-system that allows you to download modules, which can make one or more changes to the User experience. For example – adding 3dot menu to every app, or enabling full 20MP sensor for Superior Auto in Sony Camera. Xposed functionality solely depends on its modules.
Xposed Framework
Xposed framework allows you to build modules which exhibit tweaks one wants to see in their Android device. Nice example regarding this can be found here.
Xposed : Behind the scenes
Xposed gets into the roots of Android system and performs its magic with Zygote. Zygote is considered as the heart of Android runtime. It is a process which is responsible for running all other Android apps that you see or run. Android apps can be considered as copy of Zygote.
Zygote is started by /init.rc script when the phone is booted.
The process (zygote process) start is done with /system/bin/app_process executable, which loads the required classes and invokes the initialization methods.
At this instance, Xposed comes into the picture. When Xposed framework is installed (we will discuss this in a moment), an extended app_process executable is copied to /system/bin/replacing the original one. This extended app_process adds an additional jar to the classpath tricking Android to load it. This jar file is located at /data/data/de.robv.android.xposed.installer/bin/XposedBridge.jar
The app_process allows method calls from there at certain places like when VM has been created, or even before the main method of zygote has been called. Inside these methods , we are part of Zygote and can act in its context.
Making of Hooking Module And Execution
Pre-requisites :
- Rooted Device / Emulator
- Xposed Installer (found here)
- Testing Android App
Installing Xposed on Android emulator (same steps for Android Device)
After download of Xposed Installer, install it in the emulator using adb
adb install
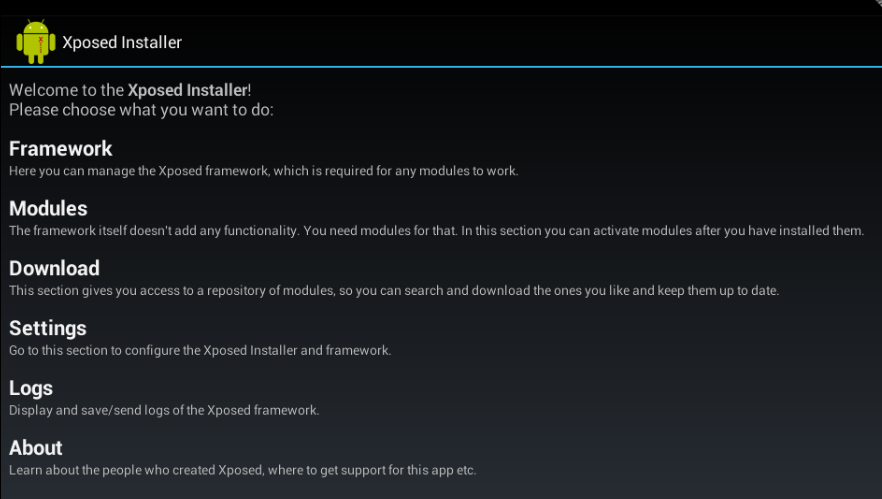
The Xposed Installer app looks like this.
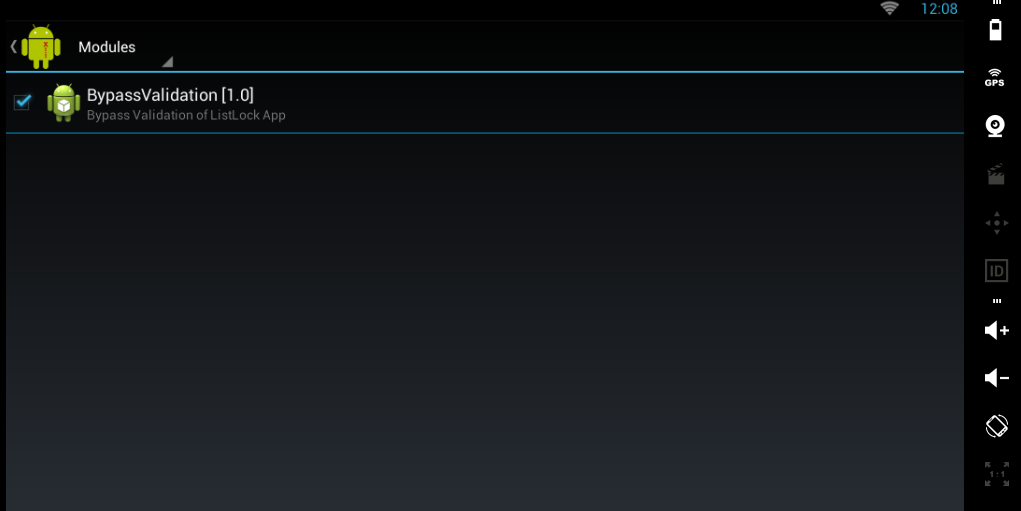
The modules that we will now create will be visible under Modules option as seen in the screenshot above. Once Xposed is installed on the emulator, it needs modules to run. Let’s make a module which performs hooking.
**Creating an Android Project **
Xposed’s Module is nothing but an Android app without any activities. Create an Android project with no activities. In our case, the package name is com.bypass.validation
Module Description
It is necessary to provide some information for the Module. For doing so, we need to include 3 key things in AndroidManifest.xml using the meta-data tags
- Module name
- Module Description
- Module Minimum Version
Final manifest file will look like below:
The three meta-data tags are seen with their name-value pair. xposedminversion value depends on the version of XposedBridge library used. XposedBridgeAPI library is explained in next topic.
Xposed Library (XposedBridgeAPI Library)
We need to make Android aware about Xposed framework. For doing so, we will need XposedBridgeApi
Important : Copy this jar file in a directory named lib , please notice, it is lib and not the default libs directory. This is done to avoid the inclusion of xposed’s library API classes by Eclipse. We only want to reference the API classes.
Right-Click the jar file --> Build Path --> Add to Build Path
** Module Logic**
The core hooking logic behind the xposed module needs to be defined in a java class. As we created the app without even a single activity, we won’t get any ready made java class by Eclipse.
Create a new java file by right clicking
It will be without any implementation initially. Hooking implementation will be defined here.
Module Identification
Inorder to make this app an Xposed Module, we need to mark it explicitly as a module. This can be done by adding a file named xposed_init under assets directory.
This file consists of a single line and the line simply states the pacakge name of this android project along with the class name which performs the hooking. This file helps Xposed installer on the emulator, to identify app as its module.
 Before implementing the hooking, its necessary to know about what needs to be hooked.
So let’s take our attention away from Eclipse for a while and concentrate on the app that needs to be hooked.
**Vulnerable Android App **
We will consider Attify’s Vulnerable App (VulnWatch) for bypassing first level using Xposed hooking.
Important task for implementing hooking methodology is to identify the method to be hooked. This may be tricky but not impossible. Method can be found with ease by reversing the app. We won’t get into reverse engineering here as we have the source code ready with us.
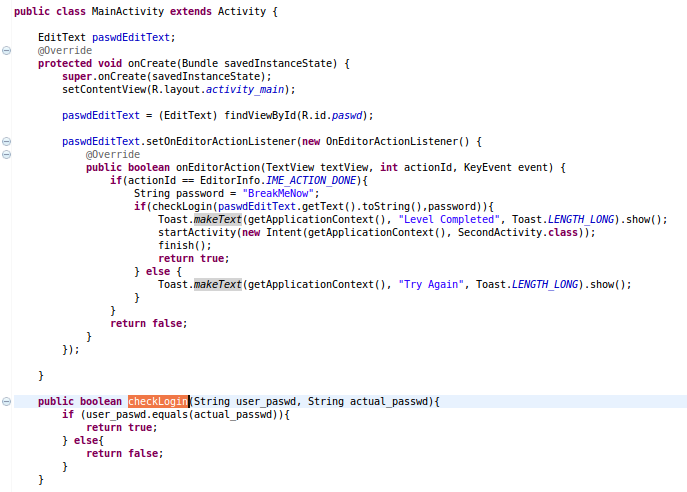
We will target the validation functionality as shown below.
As can be seen from the functionality, it accepts password from the user and returns either true if user password matches the actual password or else returns false.
The easiest way to bypass this functionality is to force the method checkLogin to return true somehow. We can now get back to Eclipse where hooking module is waiting for us.
Back to Module Creation
The hooking implementation takes place in following manner.
- Implement IXposedHookLoadPackage
- Handle the packages that loads
- Acts if desired package is encountered
- Find and Hook required method
- Define pre-method and post-method implementation
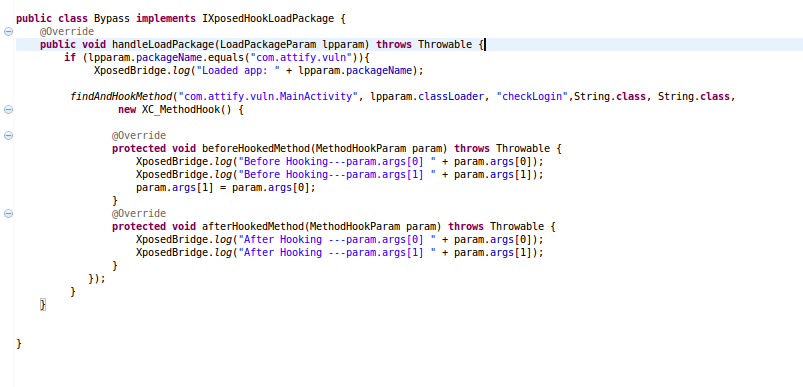
Below screenshot depicts the hooking implementation needed to hook method and bypass validation of VulnWatch
Package name for VulnWatch is com.attify.vuln . We only want the xposed module to act if desired package name is encountered, hence forth if(lpparam.packageName.equals(“com.attify.vuln”)) is specified.
Once package name is encountered, findAndHookMethod from de.robv.android.xposed.XposedHelpers is called. This method hooks the method and provides new implementation for the hooked method.
pre-method implementation is performed by beforeHookedMethod and post-method by afterHookedMethod
We bypass the validation functionality by making both the strings as equivalent before entering the checkLogin method. As a result, the equals check in the function will always return true as both the strings now being passed to this method are same. Voila! Few more steps and we will accomplish the target of hooking.
Once the hooking functionality is at its place, build and run the Module as a regular Android app.
As soon as the module is installed on the device/emulator, it will be visible under Module option of Xposed Installer.
Select the module visible here and reboot the device/emulator.
Once reboot is complete, run the target App (VulnWatch ) and type any dummy text in password.
Due to the hooking implementation at its place, Xposed will hook the method, do its job as mentioned previously and make both strings as same.
param.args[1] = param.args[0];
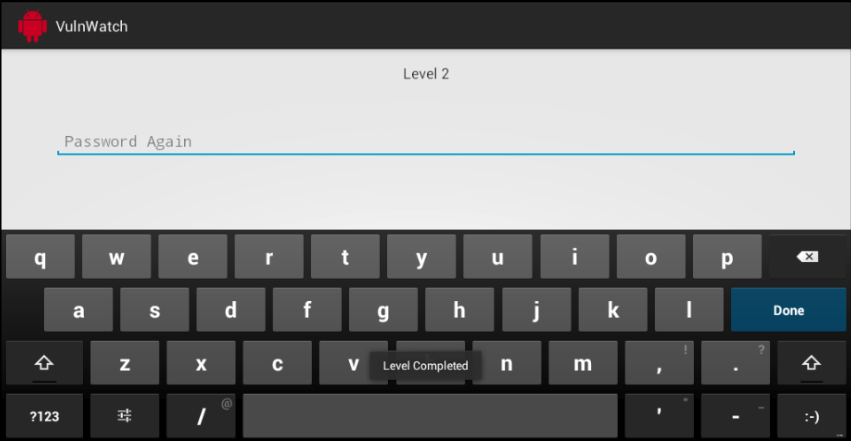
Following screenshot shows successful login despite of wrong password and leads to next level ie Level 2.
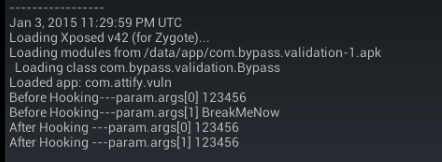
The before and after status of method can be observed in Xposed logs. Xposed logs can be found under Logs option in the Xposed Installer app.
As seen above, before hooking, the user password and actual password were different but we made it similar by hooking the required method.
That’s all for now.Feel free to get in touch with us if you would like your application audited or would like to have a training on Android and iOS Hands-on Exploitation.
Hope you will like the tutorial. If you have anything to discuss I would love to hear it. We are available @attifyme.


