American fuzzy lop is a security-oriented fuzzer that employs a novel type of compile-time instrumentation and genetic algorithms to automatically discover clean, interesting test cases that trigger new internal states in the targeted binary. This substantially improves the functional coverage for the fuzzed code.
AFL lives at https://lcamtuf.coredump.cx/afl/. It hasn't been updated in a while. While AFL still works fine, there's a new project AFL++, a fork of AFL with lots of improvements and new features. AFL++ can be found at https://aflplus.plus/ with its source on GitHub. In this article, we will look at using AFL++ to fuzz IoT binaries.
Fuzzing works best when we have the source code of the binary in question. Unfortunately for IoT binaries, this is often not the case. AFL++ (and AFL) ships with a companion tool (afl-gcc, afl-clang etc) that works as a drop-in replacement to gcc, clang, or any other standard build tool. The tool is used to inject instrumentation in the generated binaries while compiling the source code. The instrumented binaries can then be fuzzed using afl-fuzz.
Fuzzing closed source applications is tricky. For fuzzing such binaries, AFL++ can use Qemu, unicorn, or Frida and are named as qemu mode, unicorn mode, and Frida mode respectively. These are binary-only instrumentation modes and are not as efficient as the source code instrumentation modes. We will be using Qemu mode in this article.
In Qemu mode, AFL++ uses qemu user mode emulation to run the binary. It uses a modified version of Qemu which instruments the basic blocks as the program executes. The instrumentation information thus generated is used to generate new test cases which trigger different code paths improving code coverage. AFL++ in qemu mode can also be used to instrument foreign arch binaries (like an arm binary on an x86_64 host). This is extremely useful for fuzzing IoT firmware binaries which are usually of ARM or MIPS architecture.
An important point to note is that AFL++ and similar fuzzers (AFL, hongfuzz, radamsa[test case generator only]) only work with file inputs That is the program must only receive the fuzzed input from a file. Programs that take in input from a socket are not supported.
For fuzzing socket-based programs we can take either of the following approaches:
- If the source code of the application is available, rewrite the application to accept input from a file. Most of the time rewriting the entire application isn’t necessary. We can code in a small test function that reads in a file and uses the data to call another function that we want to fuzz.
- For closed source apps, rewriting the source isn’t an option. In such cases, there are hacks to convert a socket’ed binary to use files instead. These methods usually use LD_PRELOAD to override socket functions and make them read/write from a file instead. Preeny and desockmulti are two such desocketing tools. However, these may not always work out of the box.
Compiling AFL++
AFL++ can be compiled on any Linux system. Here we are using an Ubuntu 20.04 LXD container. The steps are as follows:
$ sudo apt update
$ sudo apt install git make build-essential clang ninja-build pkg-config libglib2.0-dev libpixman-1-dev
$ git clone https://github.com/AFLplusplus/AFLplusplus
$ cd AFLplusplus/
$ make all
$ cd qemu_mode
$ CPU_TARGET=arm ./build_qemu_support.sh
Fuzzing simple IoT binaries
We will be using a firmware for the Cisco RV130 VPN router which can be downloaded from https://software.cisco.com/download/home/285026141/type/282465789/release/1.0.3.55?i=!pp. The file is named RV130X_FW_1.0.3.55.bin
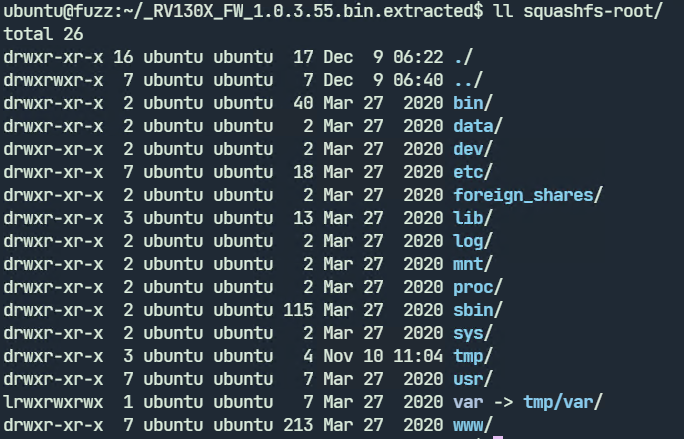
After extracting the binary using binwalk the extracted file system looks like
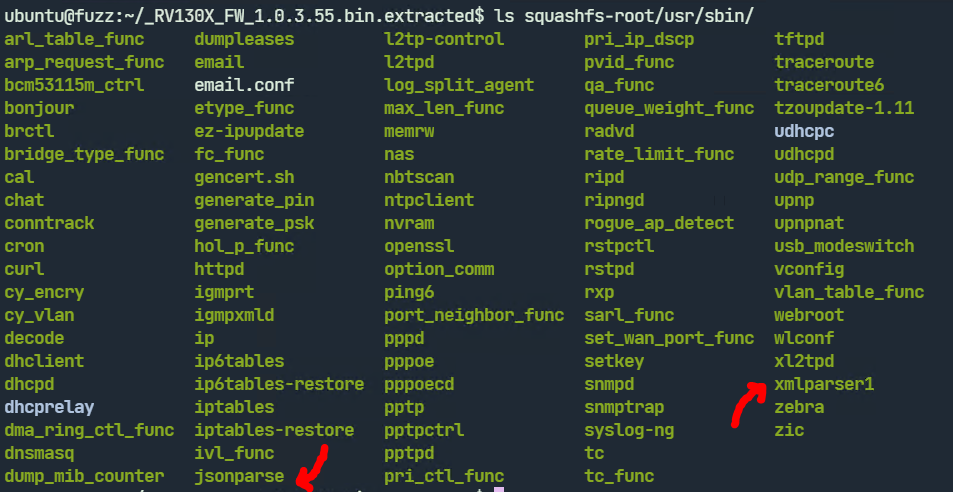
We will be looking at fuzzing the jsonparse and xmlparser1 binary in /usr/sbin/. These programs accept input from a file and are ideal for fuzzing. We don’t have the source available so we have to use Qemu mode.
Fuzzing xmlparser1
Before fuzzing we need to know how the program accepts input. Running xmlparser1 with qemu-arm-static with the –help parameter shows the usage. It accepts a filename with the -f parameter. The -d parameter stands for debug.

We can create a test XML file and run xmlparser1.
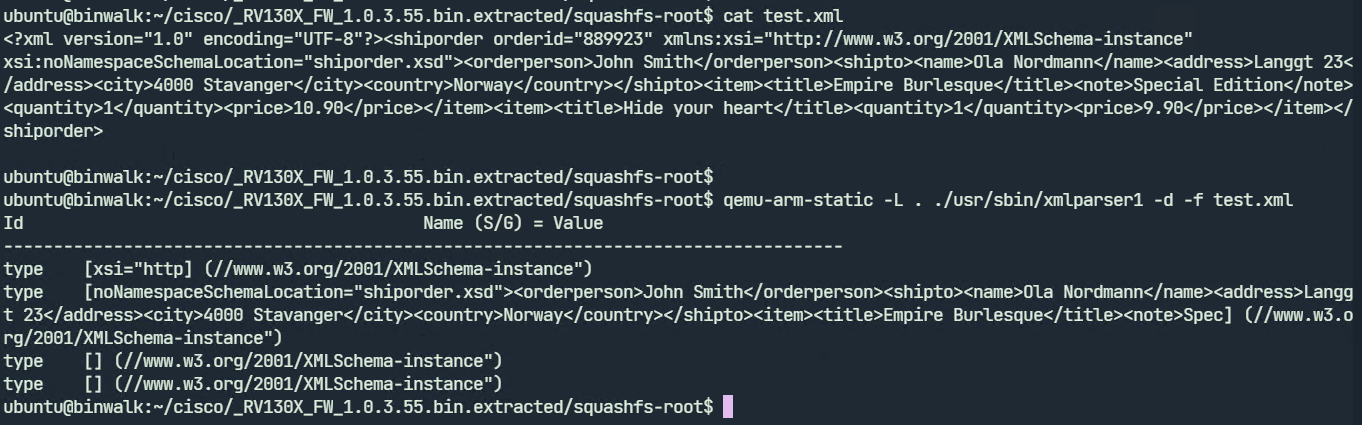
xmlparser1 displays the parsed contents of the test.xml file. We may now proceed to fuzzing. To run the fuzzer we need to give an input file which the fuzzer will use to generate further test cases. We will specify test.xml as our input file.
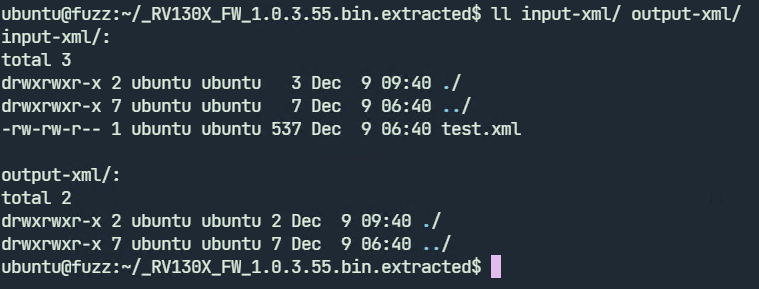
Create two directories input-xml and output-xml and move the test.xml file to input-xml as shown.
We can now launch afl-fuzz

$ QEMU_LD_PREFIX=./squashfs-root/ ../AFLplusplus/afl-fuzz \
            -Q \
            -i input-xml/ \
            -o output-xml/ \
            -- ./squashfs-root/usr/sbin/xmlparser1 -f @@
The options are explained below:
- -Q: Use AFL++ in Qemu mode
- -i: The path to the input directory
- -o: The path to the output directory. This directory will contain files that trigger an interesting behavior on the binary such as a crash or hang
Everything after the double hyphen (--) specifies the target program to run along with its arguments. The @@ parameter stands for the filename. At runtime, AFL++ will replace the @@ parameter with the name of the input file.
The fuzzing session starts as shown below. We can press Ctrl+C anytime to exit.
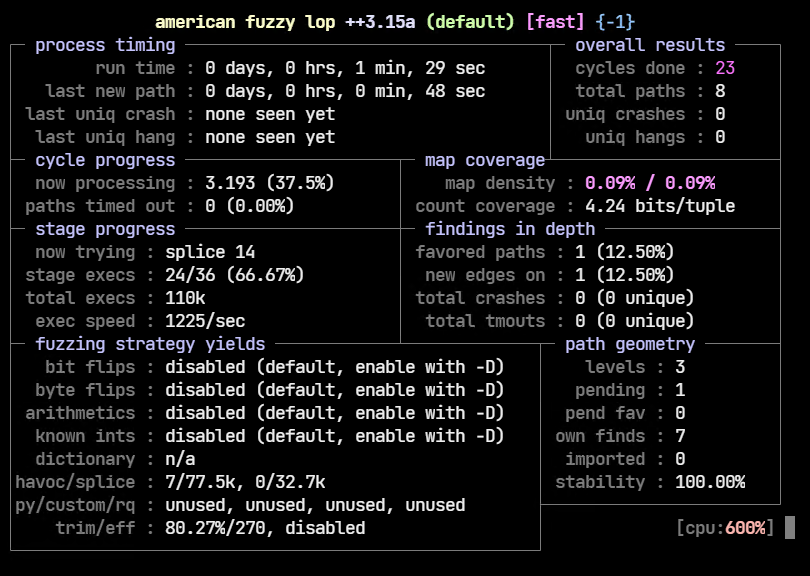
In our brief test, AFL++ wasn’t able to crash the application.
Fuzzing jsonparse
Jsonparse is a similar binary but it parses JSON files instead of XML. Running the program without any arguments displays its usage.

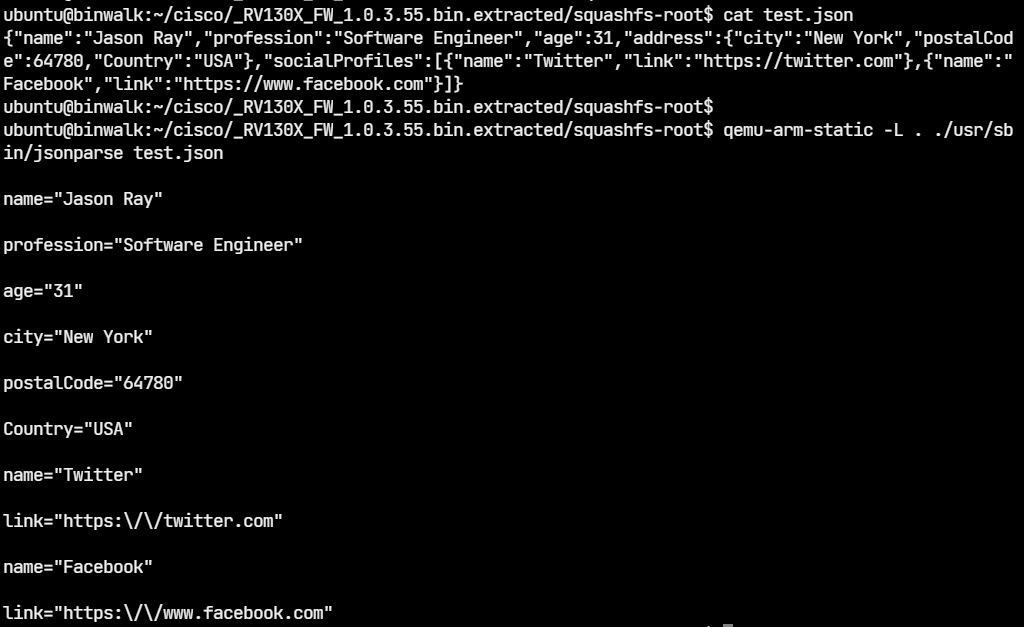
We can create a test JSON file and run jsonparser on it.
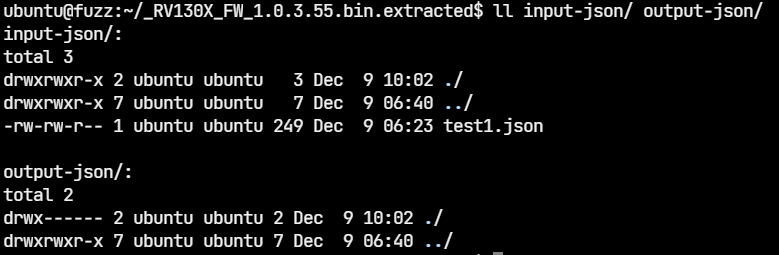
We can use the same test.json file as input to the fuzzer. In a similar way, create two directories named input-json and output-json with test.json in directory input-json.
We can run the fuzzer as shown:

$ QEMU_LD_PREFIX=./squashfs-root/ ../AFLplusplus/afl-fuzz \
-Q \
-i input-json / \
-o output-json / \
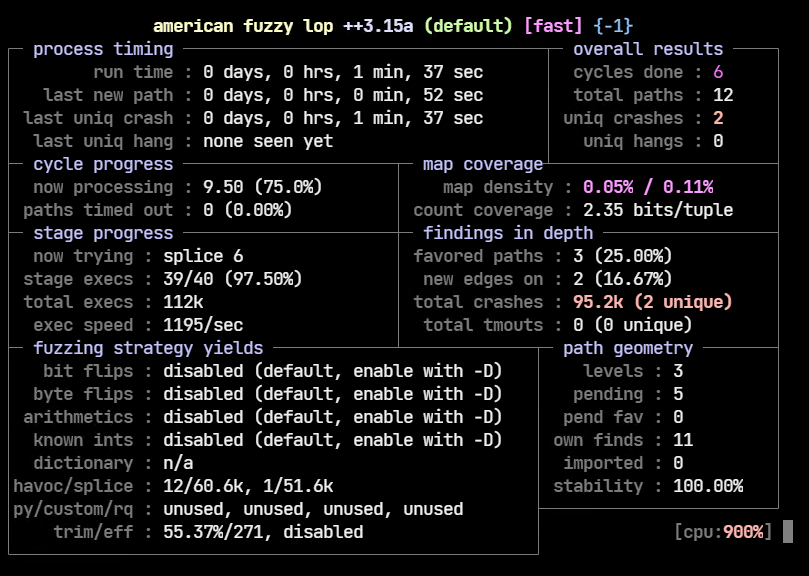
-- ./squashfs-root/usr/sbin/jsonparser @After fuzzing for a couple of minutes, there are two unique crashes already.
Let’s explore the output-json directory to have a look at the files which crashed jsonparser.
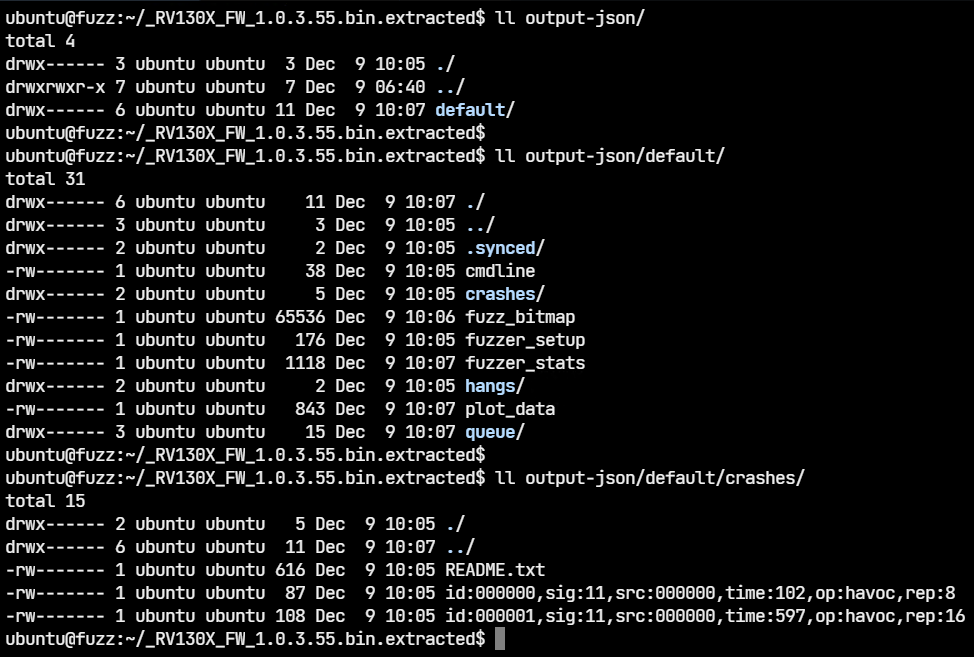
The two files which triggered the crashes are in the output-json/default/crashes directory.


To cross-check, we can run jsonparser with one of the generated files.

Jsonparser indeed crashes with a segfault. From here on, the next steps are to identify the root cause of the bug and check if it's exploitable. Not all crashes are exploitable. Triaging the crash is out of the scope of this post.
In the next part, we will be looking at how to fuzz socketed binaries. These programs accept input over the network and not from a regular file. For any comments or suggestions feel free to leave a comment below.
