Welcome to the new blog post by Attify. In this blog post, we will introduce our newest creation – Attify Badge, something which we use in order to perform hardware exploitation and to** hack IoT devices**.
This is also covered extensively in our training course “Offensive IoT Exploitation”, where we teach attendees on how to exploit the smart devices. We use this to perform UART sniffing, root over serial, JTAG debugging, dumping memory and so on.
History
In case you have been involved in electronics, you might be familiar with FT232R. The Attify badge makes use of FT232H, which is the bigger and powerful version of the FT232R, a USB to UART adapter. FT232H series supports several serial protocols and is also found to be widely used in a number of JTAG adapters. Another notable difference in the badge and FT232R is there is a Multi-Protocol Synchronous Serial Engine (MPSSE) in the badge. You can read more about FTDI’s MPSSE here – http://www.ftdichip.com/Support/Documents/AppNotes/AN_135_MPSSE_Basics.pdf.
The badge is capable of interacting with numerous protocols including UART, I2C, SPI and JTAG among many others. It also has a number of GPIO pins which can be customized and used for various purposes imaginable.
Pinouts
If you were able to get hold of a badge by ordering online, or during our training, or from one of our team members, you would need to have the pin out with you below.
![]()
Hacking IoT Embedded devices with Attify
Identifying UART pins
Attify badge can be used in order to perform UART sniffing and getting root access over UART, depending on the device.
In case you are not familiar with how to identify UART pinouts, below is a quick step-by-step way on identifying Tx, Rx, Vcc and GND for UART :
Follow the steps below to exploit a device over UART:
(Note : Below is a common way to identify the pinouts. Depending on the device, the steps might vary due to things like protection, scattered UART pins etc.)
-
Look for a 4 or 3 pins or pads which are in a block together.
-
In order to perform UART based exploitation, we need to correctly identify four pins namely – Tx, Rx, GND and Vcc.
-
To identify the individual pins, a multi-meter is required. Start off by connecting the black probe and the red probe of the multimeter to the device GND and the ground pin of Attify badge respectively. Reiterate till you hear a beep sound.
-
VCC can be ignored for our case, since it is not needed for a UART based exploitation.
-
By using a multimeter as ohmmeter, an infinite resistance between the TX and VCC pin will be noticed. This can also be determined by a huge variation or fluctuation in the voltage as soon as we power on the device.
-
Rx can be determined by the pin having the lowest voltage during the entire process, with having the black probe connected to the GND of the Attify badge.
In case you are interested, I have also put down a short video of the same embedded below:
SPI Dumping
Since our Attify badge can speak a number of different protocols, you could also use it to dump contents from an SPI flash as shown below. Simply make the necessary connections as mentioned in the pinout above, identify the name of the chip and you’re all set.
 ]
]
SPI memory dumping on IoT device
JTAG exploitation:
We won’t go much in-depth into the basics of JTAG over here, maybe we will do that in another blog post. Stay tuned for future blog updates. 🙂
One of the first steps in JTAG exploitation is identifying the pinouts for JTAG. This could be done in different ways – either you could use JTAGulator (the recommended and reliable method), or use something like Arduino loaded up with JTAGenum.
Once you have identified the JTAG pinouts, you can then go ahead and start debugging using OpenOCD and JTAG (something which we will cover in upcoming posts) – some screenshots below.
 ]
]
Custom challenge password authentication to be hacked
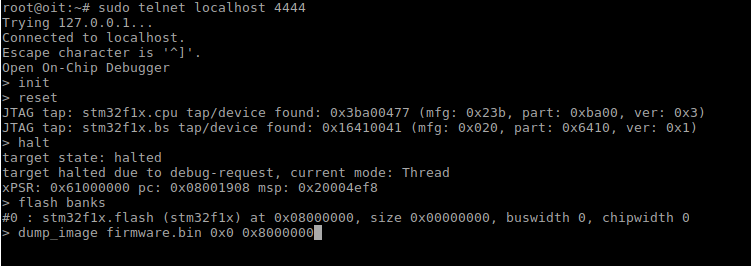
Dump images using JTAG for IoT devices
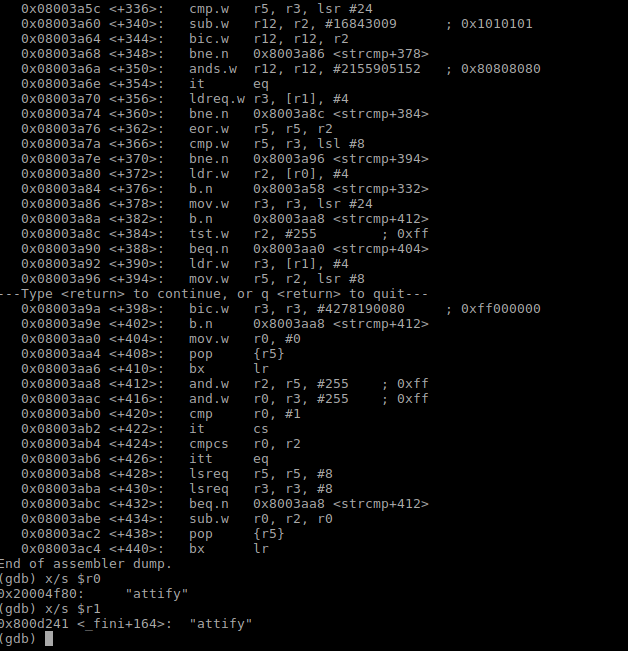
Exploiting password verification using GDB over JTAG via OpenOCD
So this is how you could use Attify Badge in order to exploit IoT devices. We will be writing further blog posts on more detailed step-by-step guides of exploiting various interfaces and protocols.
We are proud to announce that we are now able to offer the Attify Badge to public.
In case you would like to attend our live training by scheduling one at your organisation, feel free to reach out to us at using the form here.
