This is part 8 of the Flare-On 5 CTF writeup series.
11. malware skillz
We captured some malware traffic, and the malware we think was responsible. You know the drill, if you reverse engineer and decode everything appropriately you will reveal a hidden message. This challenge thinks its the 9th but it turned out too hard, so we made it the 11th.
Challenge 11 consists of two files - a 32-bit Delphi binary LaunchAccelerator.exe and a packet capture pcap.pcap. As the name of the challenge suggests this is a malware reversing challenge.
Opening the PCAP in Wireshark we can see there are several DNS TXT queries for the domain name of the form ???.asdflkjsadf.notatallsuspicio.us.
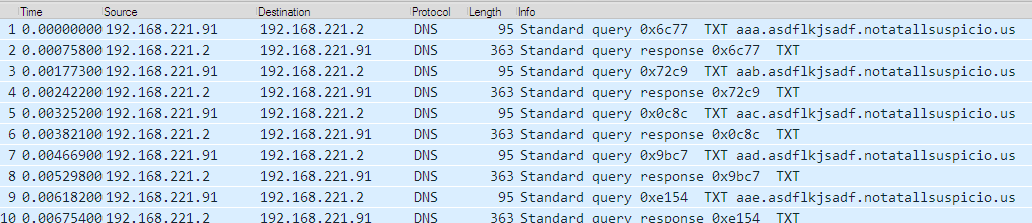
The TXT record is normally used to provide comments about a name and is limited to 255 characters. The information is in the form of key=value and can include arbitrary text
For the domain aaa.asdflkjsadf.notatallsuspicio.us the following TXT record is returned which looks like a piece of base64 encoded data.

Decoding the data doesn't give promising results which suggest that perhaps it might be encrypted. To find out how to decrypt the data we need to analyze the other file coolprogram.exe. As already mentioned, this is a Delphi binary. The best tool for reversing Delphi programs is Interactive Delphi Reconstructor. It can automatically identify statically linked library functions. We can use IDR to generate a MAP file/IDC script containing the symbol names it identified. Importing this file in x64dbg/IDA we can port all of that information.
The malware binary is obfuscated. To speed up reversing we will debug directly and skip static analysis. Initially, it creates a mutex named LAUNCHASSIST_MUTEX. The name of the mutex is XOR encrypted and decrypted at runtime. This evades it from simple string scanning tools. If the mutex already exists it quits which is to ensure that only a single copy is running at a given time.

Next, it copies itself to the special folder CSIDL_LOCAL_APPDATA


and adds the path to the list of startup applications in the Registry.
Stepping through the execution we reach a point where it uses the DnsQuery_A to perform a DNS TXT request for the name aaa.asdflkjsadf.notatallsuspicio.us.

At this point, it is necessary to set up our own DNS server so that we can respond appropriately to the requests.
Setting up a DNS proxy
DNSChef is a handy tool which allows us to set up a proxy DNS server to respond to the requests made by the malware. It's configurable using an INI file.
First, we need to extract the responses for the DNS TXT queries from the PCAP. This can be done using tshark the command line tool included with Wireshark.
tshark -r pcap.pcap -T fields -e dns.txt -Y dns.resp.type==16 > dns-resp.txt
To generate the INI file we can write a python script.
def get_next_hostname():
    for c1 in xrange(97, 123):
        for c2 in xrange(97, 123):
            for c3 in xrange(97, 123):
                yield chr(c1)+chr(c2)+chr(c3)

hn = get_next_hostname()

for txt_record in  open('dns-resp.txt', 'r').readlines():
    domain_name = hn.next() + '.asdflkjsadf.notatallsuspicio.us'
    print '%s=%s' %(domain_name, txt_record.rstrip())
DNSchef config file:
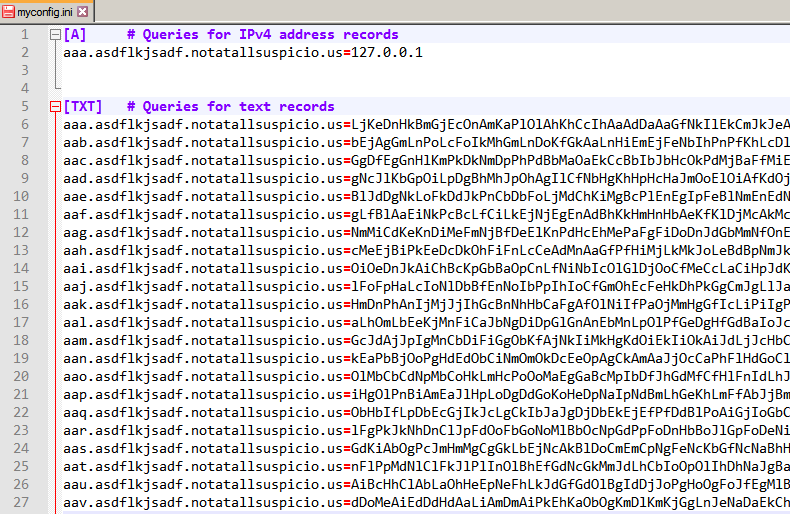
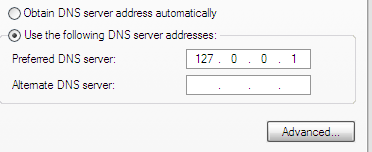
We change our DNS server to 127.0.0.1.
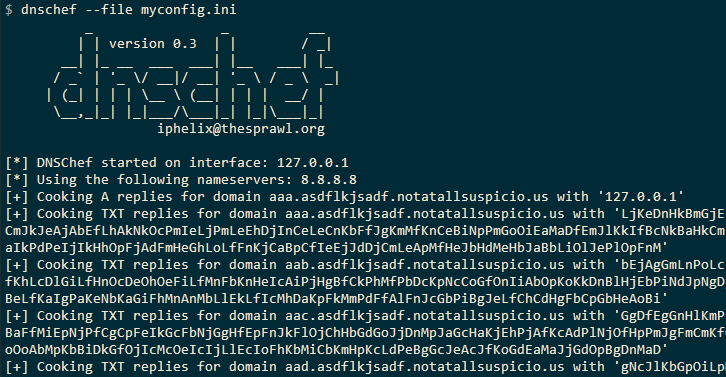
Finally, starting DNSchef we can respond to the requests.
We let the malware run with DNSchef responding to the DNS queries. Eventually, after 1639 TXT queries it concatenates and decrypts them the contents of which looks to be a PE.
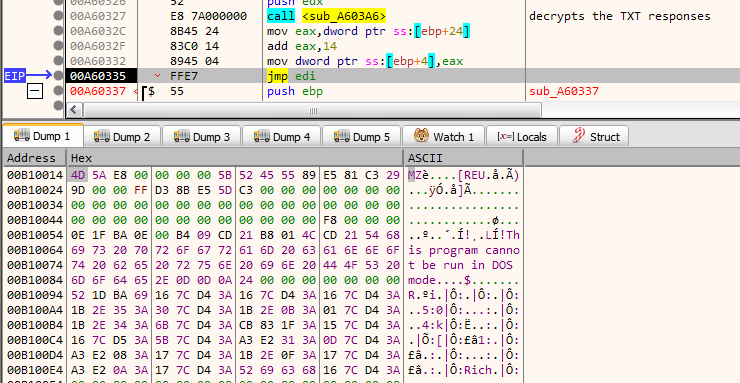
Interestingly it jumps right into the PE header and starts executing from offset 0x14. Dumping the PE we come to know it's actually a DLL.
Analyzing the DLL
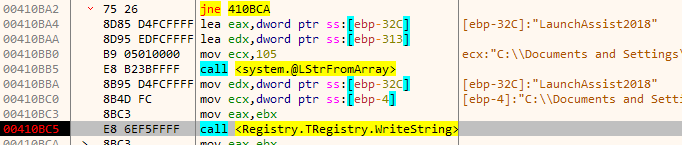
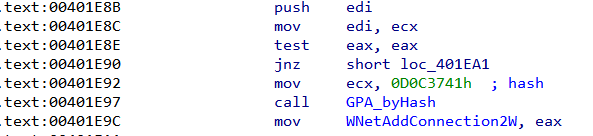
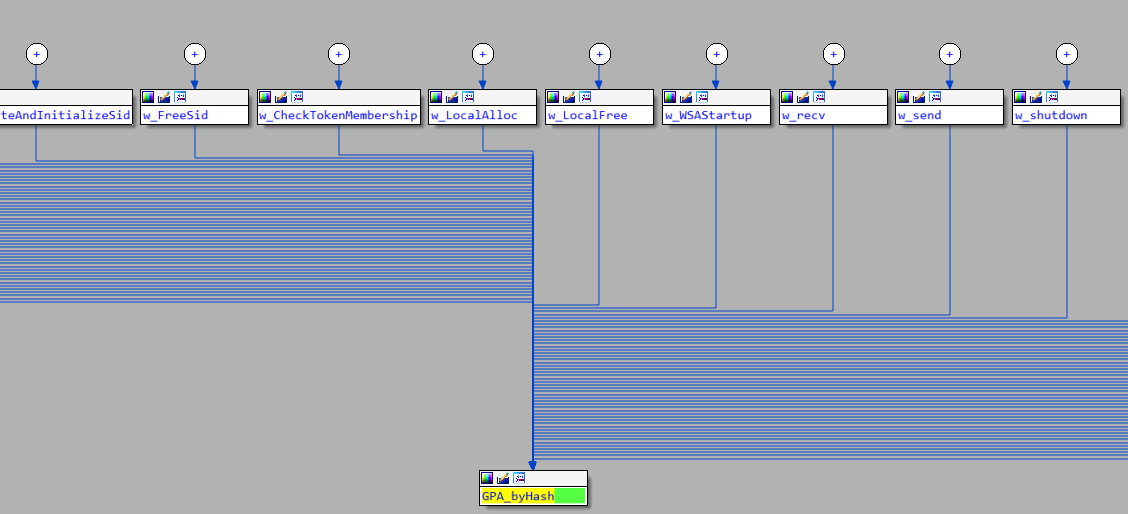
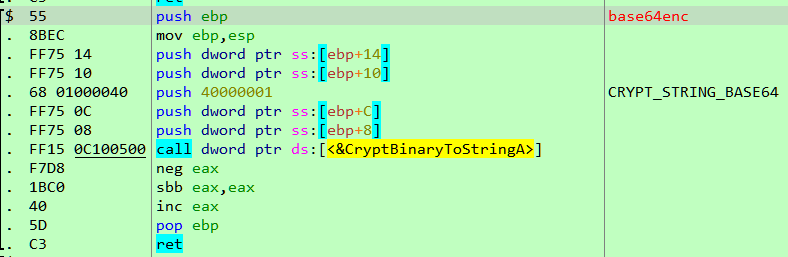
Let's perform a quick analysis of the DLL. To thwart inspection, all WinAPI functions are imported by hash, that is to say instead of using the standard GetProcAddress to resolve a name it uses something like GetProcAddress_byHash(0x1234) where 0x1234 is the hash value of the function it wants to import.
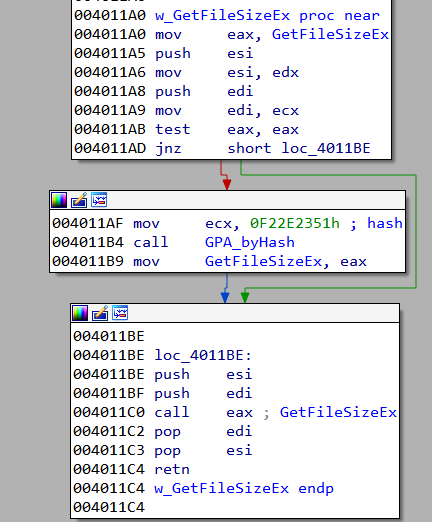
A point worth noticing is that the imported functions are resolved lazily i.e they are resolved only when called for the first time. For example, if we look at the code for w_GetFileSizeEx, note that it first checks if the pointer GetFileSizeEx is already resolved by comparing it to zero and only calls GPA_byHash if it isn't.
One way to resolve the API names is to run the DLL and note the functions as they are resolved by their hash values. Yet another way is to write a script which implements the hashing logic as shown below.
#resolve-hash.py
import sys
import lief

def ror(value, nbits):
    return ((value >> nbits) | (value << (32 - nbits))) & 0xFFFFFFFF

def export_hash(nm):
    name = bytearray(nm + '\x00')
    eax = name[0]
    for ch in name[1:]:
        eax = ror(eax, 0xD)
        eax += ch
    return eax

def name_hash(name):
    esi = 0
    ecx = len(name)

    for ch in name:
        eax = ch
        esi = ror(esi, 0xD)
        if eax >= 97:
            esi -= 32
        ecx = (ecx + 0xFFFF) & 0xFFFFFFFF
        esi += eax
        if ecx & 0xFFFF == 0:
            break

    return esi

def find(dlls, target_hash):
    for dll in dlls:
        pe = lief.parse(dll)
        dll_name = bytearray(pe.name, 'unicode_internal') + '\x00\x00'
        dll_name_hash = name_hash(dll_name)

        for function_name in pe.exported_functions:
            dll_function_hash = export_hash(function_name.encode('ascii'))
            final_hash = (dll_function_hash + dll_name_hash) & 0xFFFFFFFF

            if final_hash == target_hash:
                print 'Hash: 0x%08X' %target_hash
                print 'DLL:', pe.name
                print 'API:', function_name
                return


if __name__ == '__main__':
    dlls_to_search = [
        r'C:\Windows\System32\kernel32.dll',
        r'C:\Windows\System32\advapi32.dll',
        r'C:\Windows\System32\ws2_32.dll',
        r'C:\Windows\System32\ntdll.dll',
        r'C:\Windows\System32\user32.dll',
        r'C:\Windows\System32\msctf.dll',
        r'C:\Windows\System32\shell32.dll',
        r'C:\Windows\System32\Mpr.dll'
        ]

    find(dlls_to_search, int(sys.argv[1], 16))
For the hash 0xD0C3741 shown in the screenshot above, the script returns
$ python resolve-hash.py D0C3741
Hash: 0x0D0C3741
DLL: Mpr.dll
API: WNetAddConnection2W
Using the script we can resolve all the names of the imported functions statically.
Analyzing the disassembly now becomes easier.
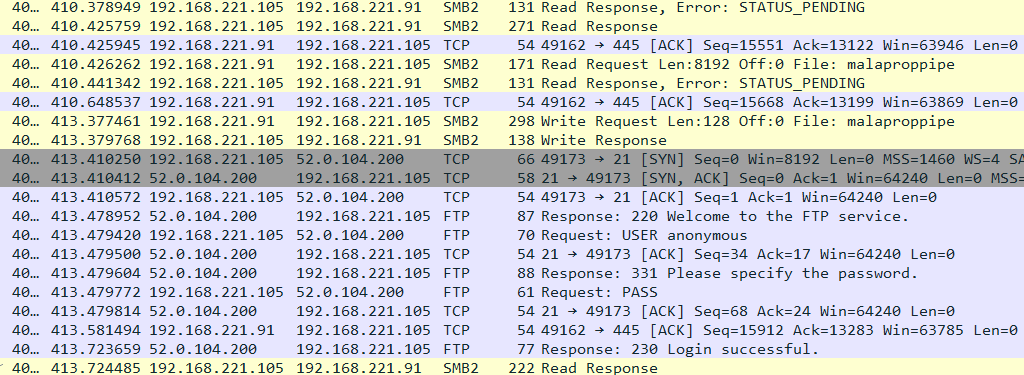
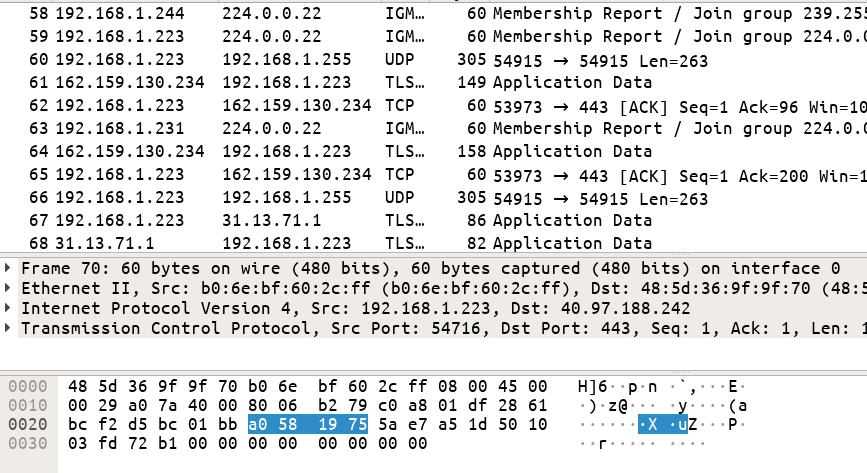
Summarizing the network activity
Let's examine the remainder of the network traffic. This will provide us with a high-level overview from which we can base further analysis. In total there are 6 different IP addresses in the PCAP. We can obtain this information by going to Statistics -> Endpoints
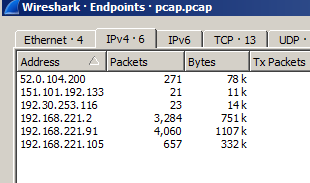
Going through the rest of the PCAP we can identify the IP addresses as follows:
- 192.168.221.2 => DNS server
- 192.168.221.91 => System A (initial system where LaunchAccelerator.exe ran)
- 52.0.104.200 =>
analytics.notatallsuspicio.us - 192.168.221.105 => System B (
JOHNJACKSON-PC) - 192.30.253.116 =>
api.github.com - 151.101.192.133 =>
raw.githubusercontent.com
Let's summarize the network activity. For brevity, the analysis is not presented line by line, rather a broad overview is provided.
-
System A performs DNS TXT queries for
???.asdflkjsadf.notatallsuspicio.us. Decrypts the responses to obtain a DLL payload. -
System A performs DNS A query for
analytics.notatallsuspicio.us. (52.0.104.200) -
System A sends 48 random bytes to
52.0.104.200:9443.0B 7D BE 80 E7 B8 44 1F F3 05 5C E8 D0 75 7B CB F4 82 41 7F 0D 62 1A AC 87 11 05 49 10 22 12 5D A9 A2 E4 74 EB 8F E6 BA 96 41 B2 00 30 E8 A8 63In response
52.0.104.200sends 48 random bytes back.C3 95 08 1D E5 A3 F2 E5 44 E8 18 AE 75 80 D4 D3 3C 6A F7 E2 98 3C DA 6E 47 F6 DA A5 06 CA 6A 92 A8 48 99 77 B5 5F CE 0F F4 55 67 98 A6 35 80 E7Further messages between these two hosts are encrypted using the above session key.
-
System A connects to System B via SMB and performs the following operations on the remote system:
- Creates a file named launchaccelerator.exe (same as dropped.dll)
- Opens a handle to svcctl (Service Control Manager Remote Protocol)
- Opens ServiceManager
- Tries to open a service named launchaccelerator => Operation fails
- Create service named launchaccelerator (
%SystemRoot%\launchaccelerator.exe -service) => Operation succeeds - Starts service launchaccelerator
- Closes service handles
- Logs off SMB session
-
System A exchanges some TCP traffic with
52.0.104.200 -
System A reconnects to System B via SMB and performs the following operations:
- Opens a pipe named
malaproppipe - Sends commands and reads response via the named pipe.
- Further communications between A and B occurs over the pipe.
System A sends 48 random bytes to B.
In response B sends 48 random bytes back to A.E7 66 E6 5A E8 50 9D 68 33 D7 3A 37 D1 EC 4A D8 18 99 19 A5 40 2F 80 15 31 E9 36 D1 32 E5 DF 42 F2 2F 99 C8 DB 9F FE 67 3A 03 52 C5 8D 79 99 C45F A5 29 40 57 65 44 D4 4D 01 FA 2A 37 F4 9F C4 A0 5A D6 BF E0 DF B9 DB 93 F3 89 EA 2D E1 E0 E6 A3 F9 91 FB E1 E3 B7 A5 54 1F 21 A2 7A 59 BF 0D
- Opens a pipe named
-
System B performs DNS A queries for
api.github.com(192.30.253.116) -
System B exchanges data over
TLS v1.2withapi.github.com -
System B performs DNS A query for
raw.githubusercontent.com(151.101.192.133) -
System B downloads something from
raw.githubusercontent.comover TLS v1.2 -
System A sends commands and reads the response from B over SMB. Messages are encrypted using the session key specified in step 6.
-
System B connects to
analytics.notatallsuspicio.usover FTP.- Type I (binary)
- Passive mode
- Uploads file with name
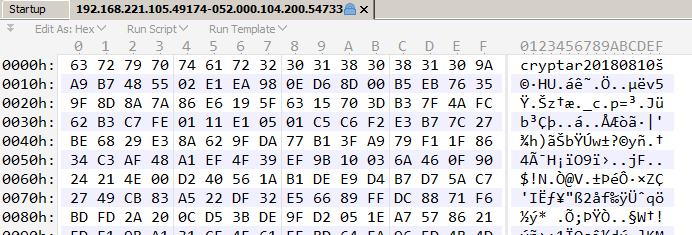
/upload/level9.crypt - Uploaded file contents starts with
cryptar20180810
-
System A sends commands and reads the response from B over SMB.
-
System A closes SMB Tree and Pipe.
The way the malware is operating is very similar to Challenge 12 from Flare-On 5 CTF the difference being this time there are no plugins involved. It turned out that the techniques we developed while solving last years challenge can be reused.
Reconstructing the messages from the PCAP
A single TCP stream is comprised of multiple packets. Wireshark shows the individual packets by default. For easier analysis, we need the final TCP streams and not the individual packets. We can use a tool like tcpflow to parse the PCAP and reconstruct the TCP streams.
$ tcpflow -r pcap.pcap
$ ls -1 -d !(*.pcap|*.txt|*.xml)
052.000.104.200.00021-192.168.221.105.49173
052.000.104.200.09443-192.168.221.091.49157
151.101.192.133.00443-192.168.221.105.49172
192.030.253.116.00443-192.168.221.105.49171
192.168.221.091.49157-052.000.104.200.09443
192.168.221.091.49159-192.168.221.105.00445
192.168.221.091.49162-192.168.221.105.00445
192.168.221.105.00445-192.168.221.091.49159
192.168.221.105.00445-192.168.221.091.49162
192.168.221.105.49171-192.030.253.116.00443
192.168.221.105.49172-151.101.192.133.00443
192.168.221.105.49173-052.000.104.200.00021
192.168.221.105.49174-052.000.104.200.54733
We get 13 flows in total. The flow 192.168.221.105.49174-052.000.104.200.54733 contains the cryptar20180810 file.
Decrypting encrypted messages
Analyzing the flows in a hex editor it can be deduced that the messages are encrypted. It turns out that its possible to decode them without needing to know the actual decryption process. The idea is that the malware at some point must decrypt themselves for its own use. That's the time when we can grab the decrypted messages from memory.
From the network activity, we already know the malware connects to analytics.notatallsuspicio.us over port 9443. Using DNSchef we can fake the IP address to 127.0.0.1. Starting a web server at 127.0.0.1:9443 and replaying back the messages in the PCAP we can force the malware to decrypt the messages for us. However, we need to keep one thing in mind. The malware generates a new random key (first 48 bytes) for every session. We have to ensure it uses the same session key as was found in the PCAP. This can be done easily by changing the bytes returned from Advapi32::CryptGenRandom or simply by patching the buffer used in Ws2_32::send during the initial key exchange phase. Similarly, the web server we had set up at 127.0.0.1:9443 must also respond with the corresponding session key found in the PCAP. An example is shown below.
Suppose we want to decrypt the messages sent from analytics.notatallsuspicio.us to System A that is the flow 52.0.104.200:09443-192.168.221.091.49157. The session keys involved are:
- From System A to
analytics.notatallsuspicio.us. Let's call thisSESSION_KEY10B 7D BE 80 E7 B8 44 1F F3 05 5C E8 D0 75 7B CB F4 82 41 7F 0D 62 1A AC 87 11 05 49 10 22 12 5D A9 A2 E4 74 EB 8F E6 BA 96 41 B2 00 30 E8 A8 63 - From
analytics.notatallsuspicio.usto System A. Let's call thisSESSION_KEY2C3 95 08 1D E5 A3 F2 E5 44 E8 18 AE 75 80 D4 D3 3C 6A F7 E2 98 3C DA 6E 47 F6 DA A5 06 CA 6A 92 A8 48 99 77 B5 5F CE 0F F4 55 67 98 A6 35 80 E7
-
Make sure DNSChef is running and the IP address of
analytics.notatallsuspicio.usis proxied to127.0.0.1. -
Start a web server (in Python) listening on
127.0.0.1:9443and wait for the malware to connect. -
Load the DLL in x64dbg. Set a breakpoint on
w_sendand then resume.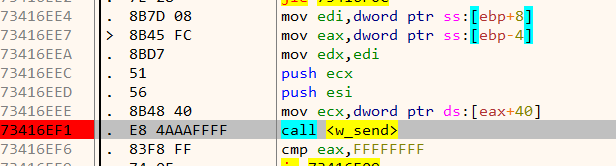
-
When the breakpoint hits the first time, it's the key exchange phase. Change the 48 bytes in the buffer to
sendto that ofSESSION_KEY1. -
Back in our python web server respond with
SESSION_KEY2followed by the remainder of the message.from socket import * s = socket(AF_INET, SOCK_STREAM) host, port = '127.0.0.1', 9443 s.bind((host, port)) s.listen(1) conn, addr = s.accept() SESSION_KEY = 'C395081DE5A3F2E544E818AE7580D4D33C6AF7E2983CDA6E47F6DAA506CA6A92A8489977B55FCE0FF4556798A63580E7' conn.sendall(SESSION_KEY.decode('hex')) f = open('52.0.104.200:09443-192.168.221.091.49157', 'rb') session_key = f.seek(48) conn.sendall(f.read()) -
The malware decrypts the received message followed by performing a CRC32 checksum to verify its correctness. If we set a breakpoint at the CRC32 function we can obtain the decrypted message in the memory dump window. The CRC32 function can be easily identified using tools such as IDA Signsrch and Findcrypt
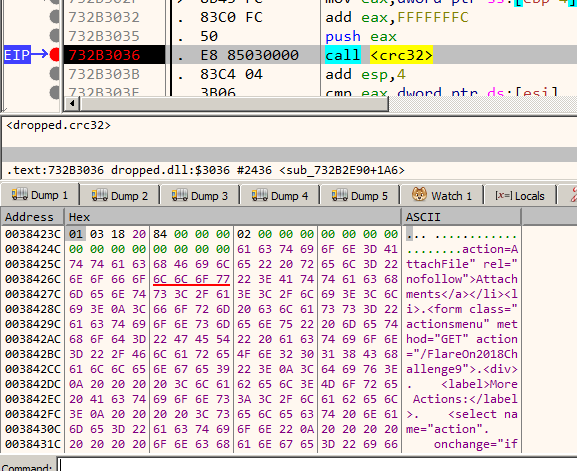
-
Save the decrypted contents to disk for later analysis.
In this way, we can decrypt the messages one way. For the other flow i.e. 192.168.221.091.49157-052.000.104.200.09443 reverse the session keys used. SESSION_KEY1 becomes SESSION_KEY2 and vice-versa.
Decrypting messages tunnelled through SMB
Decoding messages which were passed over SMB (malaproppipe) between System A and System B (JOHNJACKSON-PC) is almost similar. Since SMB is an application layer protocol, the flows which we obtained also contain the SMB header which must be stripped before we can replay the traffic.
We can export the malaproppipe traffic (both directions) sans the SMB header using Tshark.
$ tshark -r pcap.pcap -T fields -e data -Y "smb2 && data &&  ip.src==192.168.221.91 && frame.number>=3793" > "192.168.221.91-SMB-192.168.221.105.hexencoded"

$ tshark -r pcap.pcap -T fields -e data -Y "smb2 && data && ip.src==192.168.221.105" > "192.168.221.105-SMB-192.168.221.91.hexencoded"
This gives us the raw data hex-encoded and can be decoded in Python using binascii.unhexlify. The hex-decoded data can then be replayed the same way. Decrypting the network traffic we retrieve a .NET file cryptor.exe
Analysis of cryptor.exe
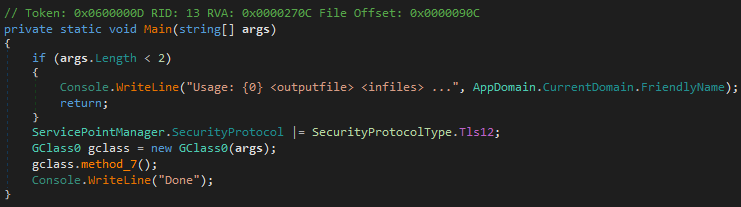
cryptor.exe is a .NET binary obfuscated using ConfuserEx. De4dot successfully deobfuscates it making it fit for analysis in dnSpy.
Cryptor.exe takes in one output file and multiple input file names as command line arguments. All the input files are combined and encrypted to a single output file.
The input files are AES encrypted. The encryption key and the Initial Vector (IV) are not hardcoded but rather obtained from a GitHub repository https://github.com/johnsmith2121/react/blob/master/README.md
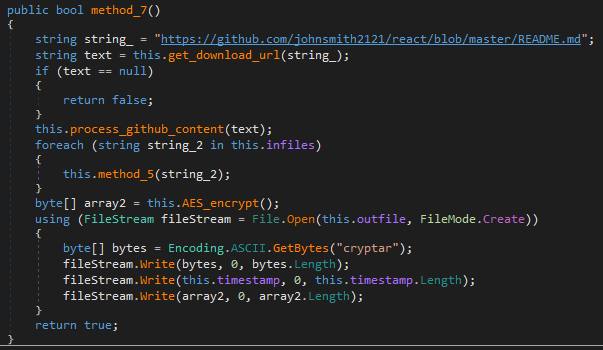
It uses the GitHub API to fetch the README.md file
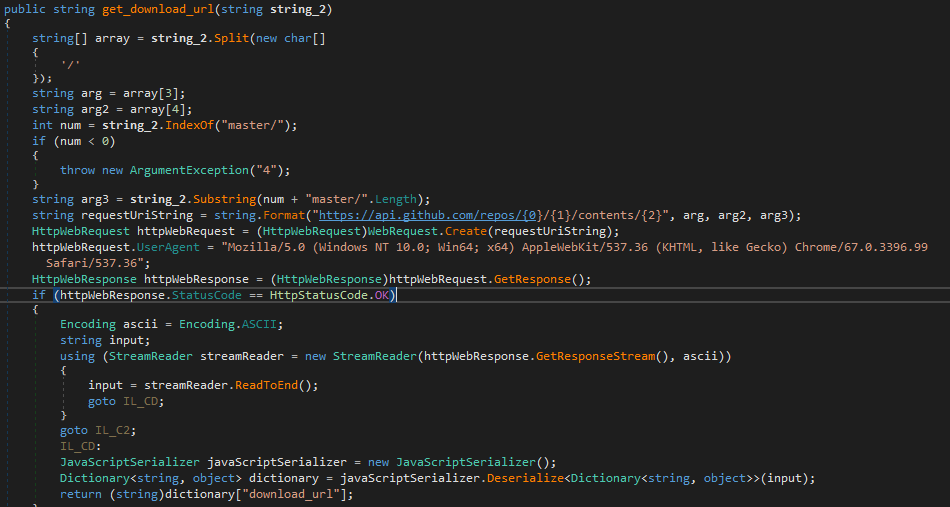
The contents of README.md are then parsed to extract the AES key and IV.
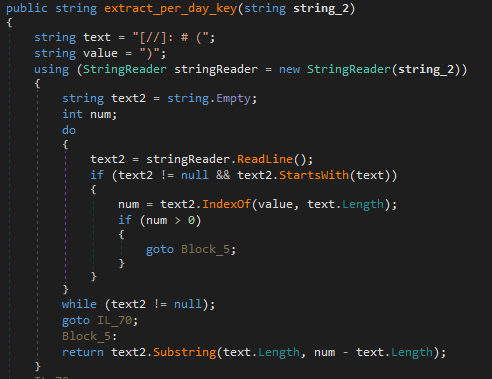
Finally using the obtained key and IV it encrypts all the input files to a single output file which begins with the signature cryptar.
If we navigate to the GitHub repository we can notice README.md has been modified many times.
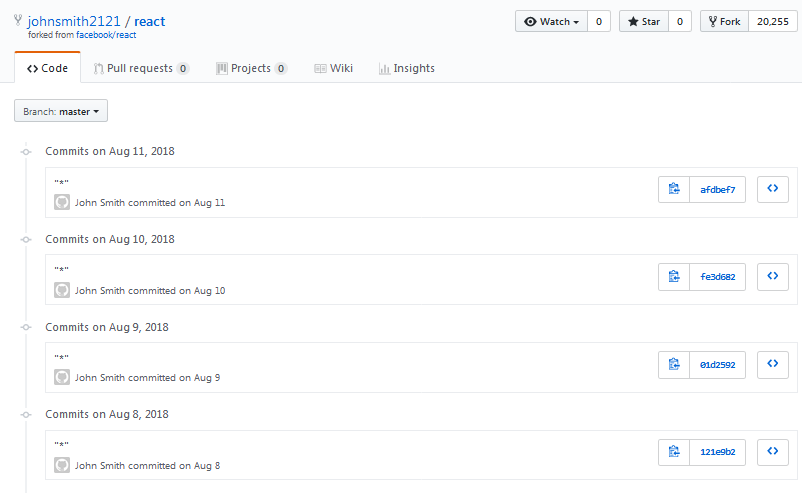
This implies the current state of the file in the repo is not the one used for extracting the key and IV. The Wireshark PCAP suggests August 10, 2018, as the date.

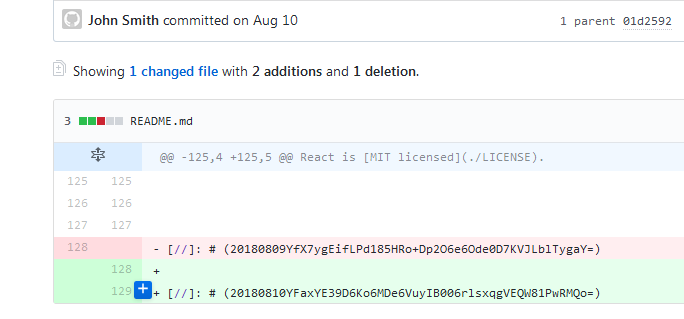
Navigating to this point in the history of the repo we can obtain the text that was used to extract the key and IV.
With all of the above information, we can develop a decrypter.
using System;
using System.Text;
using System.IO;
using System.Diagnostics;
using System.Security.Cryptography;

namespace flare11_decrypter
{
    class Program
    {
        static void Main(string[] args)
        {
            FileStream f = File.OpenRead("level9.cryptar");
            byte[] magic = new byte[8];
            f.Read(magic, 0, 7);
            byte[] timestamp = new byte[8];
            f.Read(timestamp, 0, 8);
            int remaining = (int)(f.Length - f.Position);
            byte[] ciphertext = new byte[remaining];
            f.Read(ciphertext, 0, remaining);
            f.Close();

            string day_key = "20180810YFaxYE39D6Ko6MDe6VuyIB006rlsxqgVEQW81PwRMQo=";
            byte[] array = Convert.FromBase64String(day_key.Substring(8));
            byte[] key = new byte[16];
            byte[] IV = new byte[16];
            Array.Copy(array, 0, key, 0, 16);
            Array.Copy(array, 16, IV, 0, 16);
            byte[] plaintext;

            using (Aes aes = Aes.Create())
            {
                aes.KeySize = 256;
                aes.Key = key;
                aes.IV = IV;
                aes.Padding = PaddingMode.PKCS7;
                aes.Mode = CipherMode.CBC;
                ICryptoTransform transform = aes.CreateDecryptor();

                using (MemoryStream ms = new MemoryStream())
                {
                    using (CryptoStream cs = new CryptoStream(ms, transform, CryptoStreamMode.Write))
                    {
                        cs.Write(ciphertext, 0, ciphertext.Length);
                    }
                    plaintext = ms.ToArray();
                }
            }
            File.WriteAllBytes("level9.zip", plaintext);
        }
    }
}
Running our decrypter we obtain a ZIP file which can be identified by its signature PK. The ZIP contains two files level.exe and level9.png and is additionally password protected.
$ zipinfo level9.zip
Archive:  level9.zip
Zip file size: 10223 bytes, number of entries: 2
-rwxrwxrwx  3.0 unx     6656 BX defN 18-Jul-20 02:54 level9.exe
-rwxrwxr-x  3.0 unx    14502 BX defN 18-Aug-10 20:05 level9.png
2 files, 21158 bytes uncompressed, 9849 bytes compressed:  53.5%

$ unzip level9.zip
Archive:  level9.zip
[level9.zip] level9.exe password:
Finding the password to the ZIP
We need to find the correct password to extract the ZIP. The password is present in the decrypted flow 192.168.221.091.49157-052.000.104.200.09443 within an HTML file.
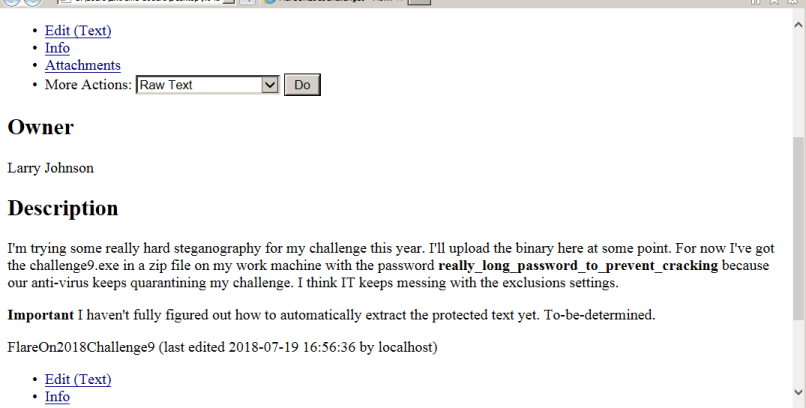
Providing the password really_long_password_to_prevent_cracking we extract the zip.
Getting the flag
At a first glance, level9.png looks to be a blank image. This is not surprising considering the HTML file from where we obtained the ZIP password mentioned of a steganography challenge.

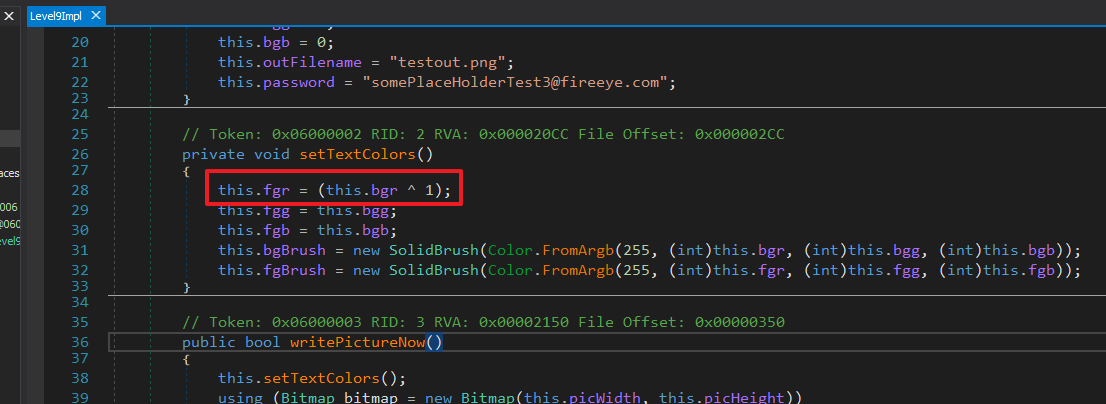
level9.exe is again a .NET binary. Its purpose is to write some piece of text to an image such that it's not visible ordinarily. Inspecting the method which writes the text we can see the foreground RED colour value of the text is obtained by XORing the background RED colour with 1. As the colours are so close they are invisible.
Opening the image in Photoshop and using the Levels tool to constrain the input levels the flag reveals itself.
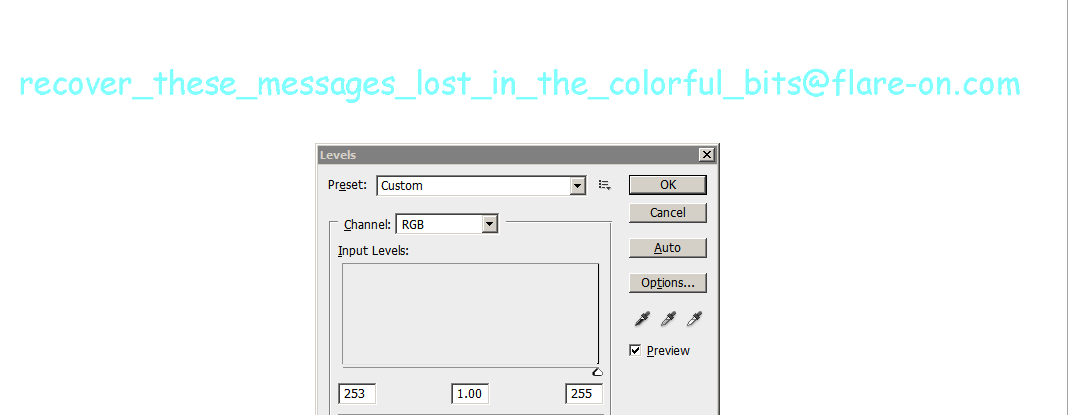
FLAG: recover_these_messages_lost_in_the_colorful_bits@flare-on.com
Continue to the next part: Flare-on 5 CTF Write-up (Part 9)

)
)
)
)