This is the final part of the Flare-On 5 CTF writeup series.
12. Suspicious Floppy Disk
Now for the final test of your focus and dedication. We found a floppy disk that was given to spies to trans secret messages. The spies were also given the password, we don't have that information, but see if you can figure out the message anyway. You are saving lives.
The final challenge awaits us. Let's pull it off. This is easier said than done. After all, this is the last challenge and won't give way without a fight as we will soon see.
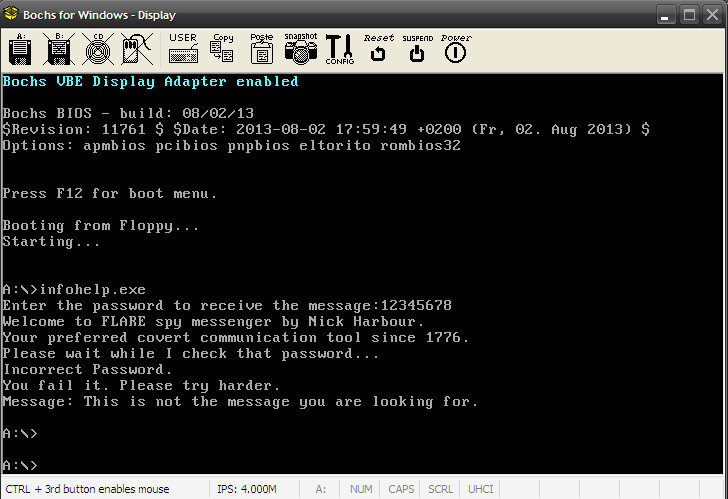
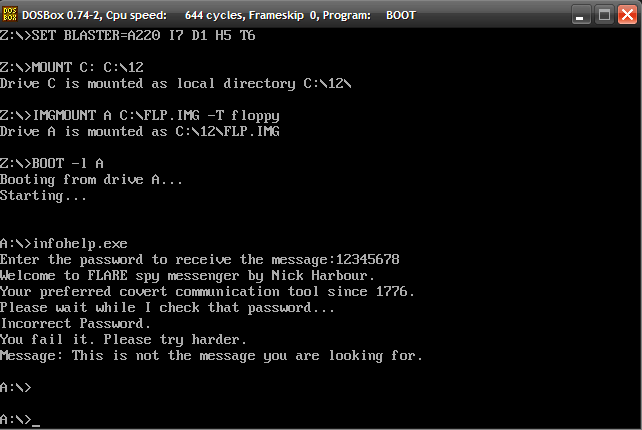
The file for our pursual is a floppy disk image - suspicious_floppy_v1.0.img. We can run it in Bochs emulator. It requests a password and takes nearly about five good minutes to check and print the failed message.
While it's true that emulation will be some order of magnitudes slower than native execution but our binary was taking too much time to even to print the message. Clearly, this means the logic is way too complex and several millions of instructions are executed even for simple tasks like printing a string.
Analyzing infohelp.exe
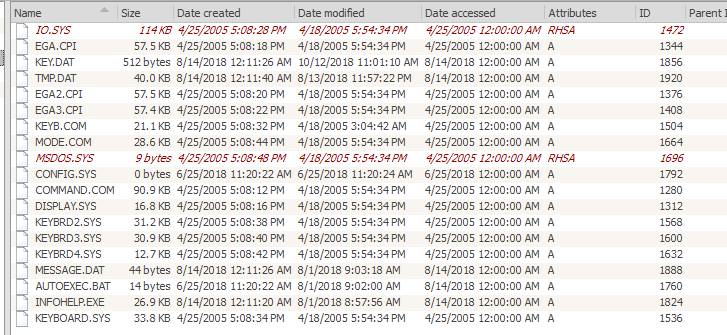
We can use Active@ Disk Editor to open the disk image and extract infohelp.exe
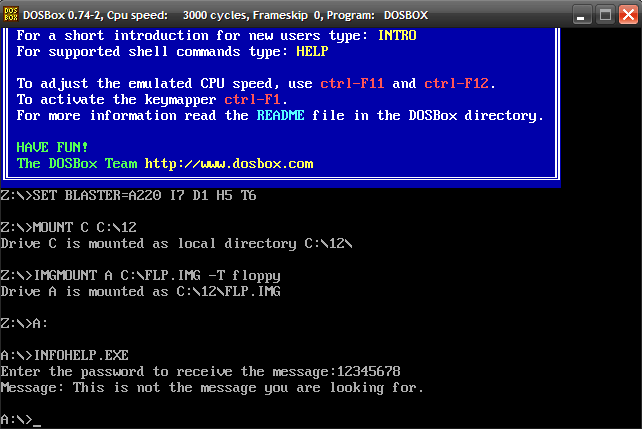
The binary is a 16-bit New Executable(NE). Running a strings scan reveal that the binary was compiled with Open Watcom. Mounting the IMG in DOSBox and running INFOHELP as a standalone application we notice a different behaviour.
The binary asks for the password but doesn't perform the check and quits immediately. Interestingly, booting from the IMG in DOSBox we get the same behaviour as in Bochs.
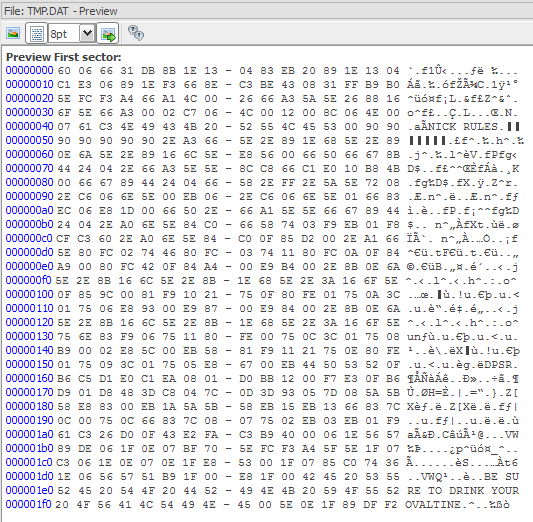
The behaviour differs depending on whether we boot the floppy image or not. It's possible some code is running at boot and changing the way the program is working. There are two other interesting files in the floppy image - KEY.DAT and TMP.DAT. The former contains our the password we input while the latter contains some interesting strings.
Getting to the heart of the challenge
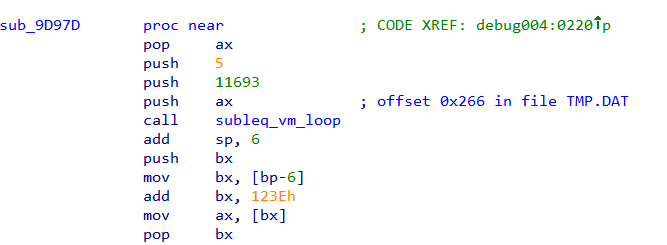
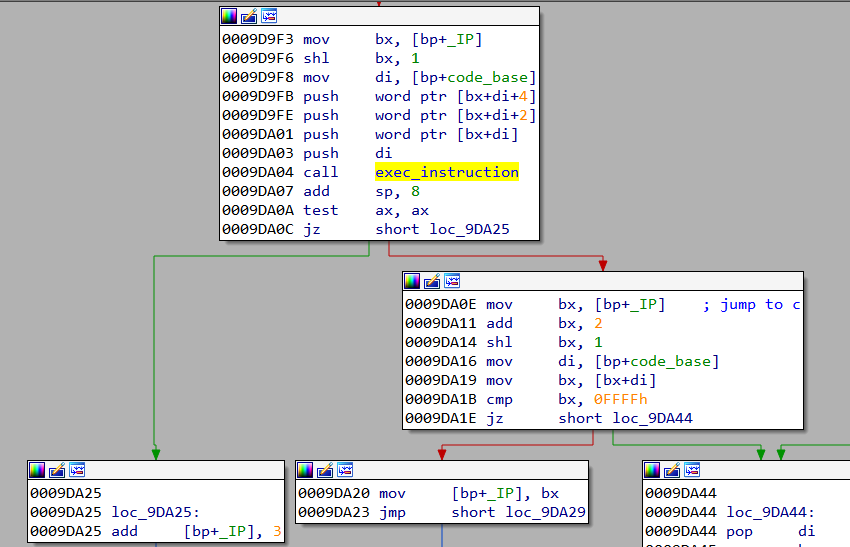
We need to figure out the code which is checking the password. We can take a shortcut without going around the houses. As we observed, the password checking logic is quite slow. We can enter a password and while it's checking we can interrupt the process. From there, we can step around and should be able to locate the relevant code we're after. For debugging the challenge, we can use Bochs the same way we did in Challenge #8 - Doogie Hacker. In this way can identify the function which implements the logic of the challenge.
From experience, this very much looks like an implementation of the Subleq OISC. This is not surprising considering the last challenge of Flare-On 2017 was a Subleq challenge.
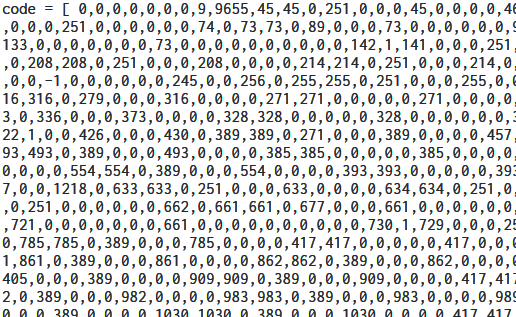
The bytecode for the VM is a part of the file TMP.DAT starting at offset 0x266.
Developing a Subleq Emulator
Developing a proper Subleq emulator is critical in solving this challenge. Once we have the emulator ready we can perform all sort of tests on the emulator without needing to run the challenge binary.
Emulating using Unicorn engine
Our first attempt would be to emulate the Subleq VM using unicorn engine. This is the safest approach free from many side-effects as we are executing the original code.
#uni-emu.py
import sys
from unicorn import *
from unicorn.x86_const import *

# code to be emulated
X86_CODE16 = bytearray(open('TMP.DAT', 'rb').read())

print 'Enter the password to receive the message:',
if len(sys.argv) == 1:
    password = raw_input()
else:
    password = sys.argv[1]
    print password

assert ' ' not in password
assert len(password) <= 32

for i, ch in enumerate(password):
    X86_CODE16[0x146e + (i*2)] = ch

def hook_int(uc, int_num, user_data):
    r_al = mu.reg_read(UC_X86_REG_AL)
    sys.stdout.write(chr(r_al))
    sys.stdout.flush()

# memory address where emulation starts
ADDRESS = 0x1000

# Initialize emulator in X86-16bit mode
mu = Uc(UC_ARCH_X86, UC_MODE_16)

# map 40KB memory for this emulation
mu.mem_map(ADDRESS, 40 * 1024)

# write machine code to be emulated to memory
mu.mem_write(ADDRESS, str(X86_CODE16))

# set CPU registers
mu.reg_write(UC_X86_REG_AX, ADDRESS + 0x266)
mu.reg_write(UC_X86_REG_SP, ADDRESS+(39*1024))

# Handle INT 10h hook
mu.hook_add(UC_HOOK_INTR, hook_int, None, 1, 0)

# emulate code in infinite time & unlimited instructions
mu.emu_start(ADDRESS + 0x5d7e + 67, ADDRESS + 0x5d87 + 67)
Running, we're able to replicate the exact behaviour we obtained in Bochs. As an added bonus, the entire process takes just a few seconds.
Emulating in pure Python
We can improve our emulator and remove the Unicorn dependency altogether by implementing the entire logic in Python. The key points to note are the word size of the Subleq VM is 2 bytes, the input password is stored starting from offset 2308 in the bytecode, the maximum size of the password can be 32 characters.
#py-emu.py
import sys
import  struct
from vmcode import code

def exec_instruction(code, a, b, c):
    code[b] -= code[a]
    if c != 0:
        return code[b] <= 0
    else:
        return False

def vm_loop(code, start_ip):
    ip = start_ip
    while ip + 3 <= 11693:
        if exec_instruction(code, code[ip], code[ip+1], code[ip+2]):
            if code[ip+2] == -1:
                return
            ip = code[ip+2]
        else:
            ip += 3

        if code[4] == 1:
            sys.stdout.write(chr(code[2]))
            sys.stdout.flush()
            code[2] = code[4] = 0

def main():
    print 'Enter the password to receive the message:',
    if len(sys.argv) == 1:
        password = raw_input()
    else:
        password = sys.argv[1]
        print password
    assert len(password) <= 32

    for i, ch in enumerate(password):
        code[2308 + i] = ord(ch)
    vm_loop(code, 5)

if __name__ == '__main__':
    main()
vmcode.py contains the bytecode extracted from TMP.DAT
Side channel attack on the Subleq VM
The Subleq VM is quite resistant to side channel attacks. For example, counting the number of executed instructions as we vary the password doesn't reveal any useful information. Here are some trial runs
$ ./inscount 1
Total instructions executed: 31551132
$ ./inscount 2
Total instructions executed: 31551132
$ ./inscount A
Total instructions executed: 31621609
$ ./inscount B
Total instructions executed: 31621389
$ ./inscount C
Total instructions executed: 31621389
$ ./inscount 123456789
Total instructions executed: 33810580
$ ./inscount abcdefghijklmnopqrst
Total instructions executed: 38314101
Plotting the instruction pointer as the VM executes yields a solid graph.
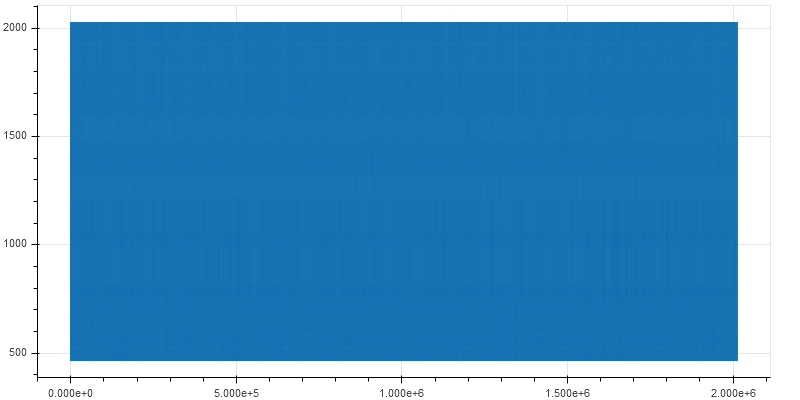
Zooming in close reveals fine lines
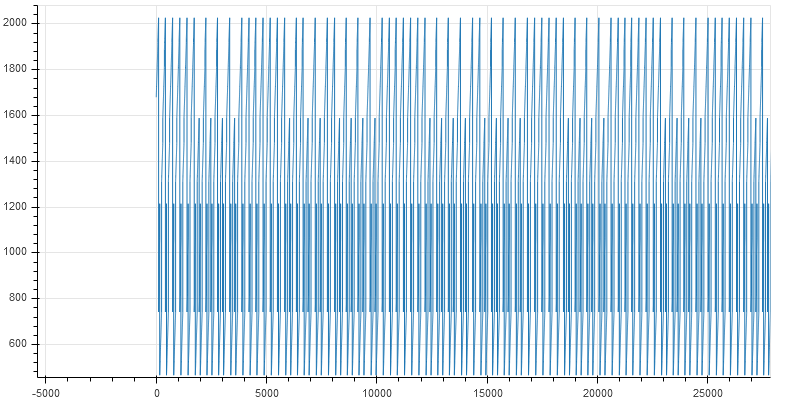
The key points for takeaway are:
- The bytecode consists of mostly data as opposed to code. The range of the instruction pointer varies from 0 to 2000 when the total size of the bytecode is 11693.
- The pattern of execution is the same throughout. Generally, a piece of code is comprised of multiple blocks/functions each having a specific purpose. Different functions are located at different addresses and plotting the instruction pointer would result in an irregular graph. In our Subleq VM, this is not the case.
The second point implies the Subleq code has just a single function acting as a sort of wrapper to execute another function which does the actual check. This is very similar to virtualization based code obfuscation.
Reversing the Subleq bytecode
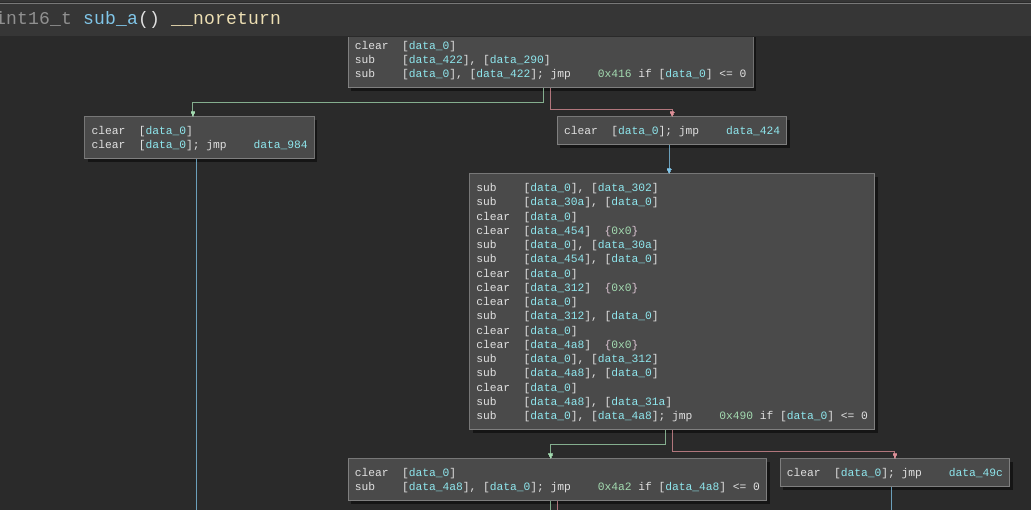
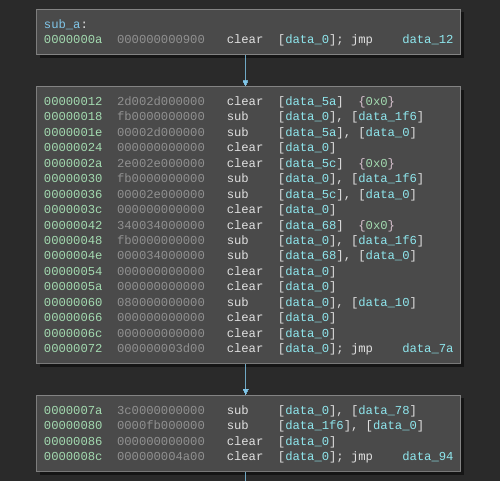
With no other way in sight, the remaining approach is to reverse the Subleq bytecode. This is in no way a simple task considering there are little to almost no tools to deal with Subleq. Luckily RET2 Systems had developed a Subleq architecture plugin for Binary Ninja for the solving the last challenge of Flare-On 2017. With a few modifications like changing the word size to two, we are able to disassemble the Subleq bytecode.
Implementing common high-level constructs in Subleq
The Subleq OISC contains just a single instruction - Subtract and Branch if less than or equal to zero. An instruction consists of three operands and is of the form:
A, B, C
The memory cell at location A is subtracted from that at address B with the result being stored at B. If the result is less than or equal to zero execution jumps to C else it proceeds to the next instruction. Using just this single instruction it's possible to implement any other operation.
Our Subleq VM implements three basic high-level operations -
+-----------+-----------+-------------------------------------------+
| Operation | Notation  | Description                               |
+-----------+-----------+-------------------------------------------+
| MOV A, B  | A = B     | Moves (copies) the value from cell B to A |
+-----------+-----------+-------------------------------------------+
| SUB A, B  | A = A - B | Subtracts B from A. Result stored in A    |
+-----------+-----------+-------------------------------------------+
| ADD A, B  | A = A + B | Adds A and B. Result stored in A          |
+-----------+-----------+-------------------------------------------+
Z is a special memory cell in Subleq. Its value should always be zero. A high-level operation like MOV is comprised of multiple Subleq instructions. Every high-level operation should ensure the value of Z is zero after its done executing.
Implementing MOV
MOV A, B can be implemented in Subleq through the following four Subleq instructions.
subleq A, A, 0      ; A = A - A = 0
subleq B, Z, 0      ; Z = Z - B = -B
subleq Z, A, 0      ; A = A - Z = 0 -(-B) = B
subleq Z, Z, 0      ; Z = Z - Z = 0
The instruction subleq A, A, 0 essentially clearing the value in A and can be written as clear A. Similarly subleq Z, Z, 0 can be written as clear Z. The value of C in each of the instructions are 0 and can be omitted. Hence MOV A, B can be represented as the following series of pseudo x86 instructions. Note that sub Z, B means Z = Z-B.
clear A
sub Z, B
sub A, Z
clear Z
Implementing SUB
SUB A, B is simply implemented as
subleq B, A, 0 ; A = A - B
or as pseudo x86 instructions
sub A, B
Implementing ADD
ADD A, B is implemented as
subleq B, Z, 0     ; Z = Z - B = -B
subleq Z, A, 0     ; A = A - Z = A - (-B) = A + B
subleq Z, Z, 0     ; Z = Z - Z = 0
or as pseudo x86 instructions
sub Z, B
sub A, Z
clear Z
Translating the bytecode to C
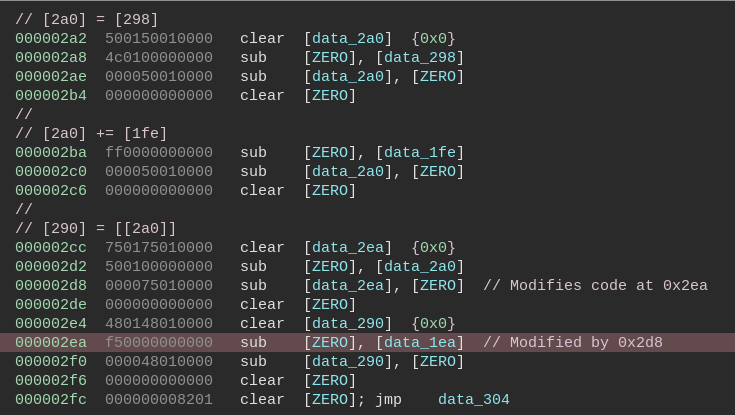
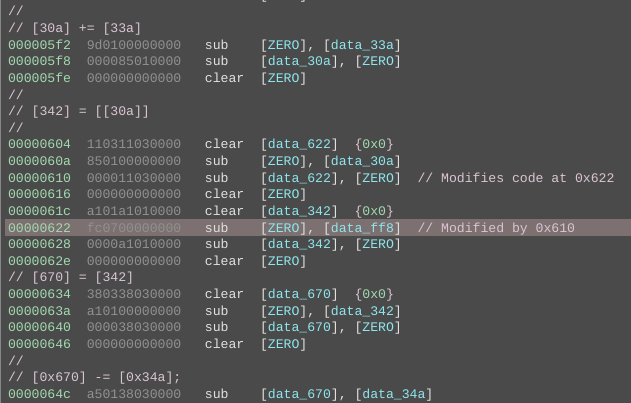
Using the patterns listed above we can manually translate the bytecode to C. Self modifying code is common in Subleq and we need to take it into account as well while translating. The Subleq architecture plugin for Binary Ninja can automatically detect self-modifying code and mark it in the disassembly.
We need to translate all of the basic blocks to C code using the patterns. This is a time taking process as it's done manually.
Once we have annotated the disassembly with the C translations we can write a rough Binary Ninja script to print the basic blocks by addresses along with all comments.
Optimizing the translated C code
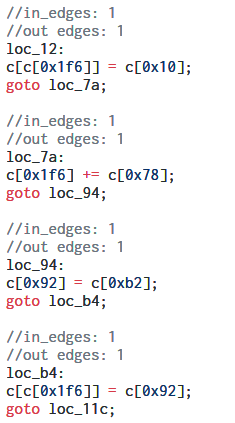
Removing the Subleq instructions from the script output, the translated C code at this point looks something like
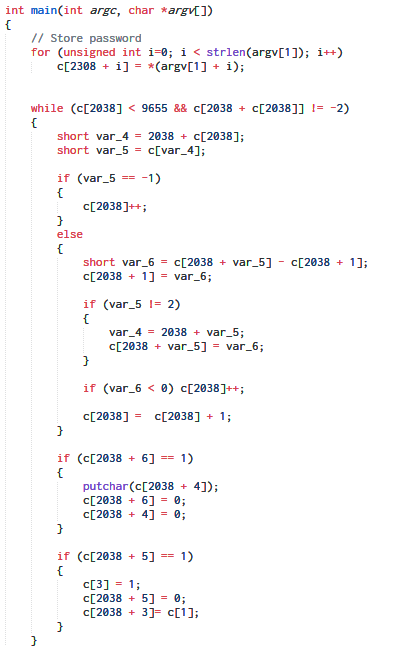
However, we are still far away from being able to understand what the code is actually doing. From here, we can optimize the C code by hand like merging basic blocks, introducing variables, identifying if statements and loops, removing redundant operations etc to reach
A RSSB VM inside!
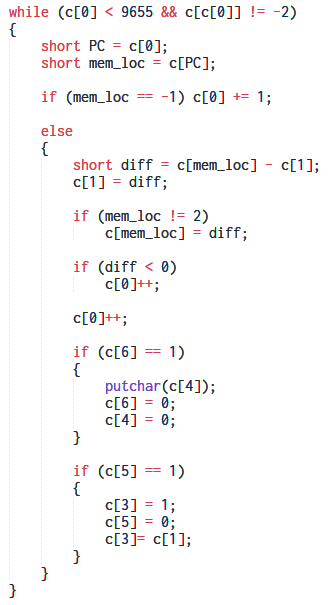
Tinkering with our hand-decompiled code further we obtain.
The snippet above is performing a subtraction between two memory cells. One of the cells is fixed to be 1. After a few Google about different types of OISC it revealed that the logic implemented is that of RSSB (Reverse Subtract and Skip if Borrow). This an extreme form of OISC where the instructions have just a single operand without any opcode.
So essentially the RSSB VM is implemented in Subleq which in turn was implemented in 16 bit x86.
An attempt using guided symbolic execution
Decompiling RSSB bytecode by hand is not something we fancy. As an alternative approach lets try symbolic execution. In this method, we represent external input as symbolic variables as opposed to concrete values. We execute the program normally until we reach a conditional jump that depends on the value of the symbolic variable itself. In such a case we can either ask the user to choose a branch to explore while discarding the other or we can continue exploring both branches. The latter is a better approach but it can lead to path explosion. Hence the author decided to go with the first technique.
The idea behind trying symbolic execution was that the behaviour of the code depends on the input password. If we model the password as symbolic we should be able to identify the key conditional branches which decide the program output.
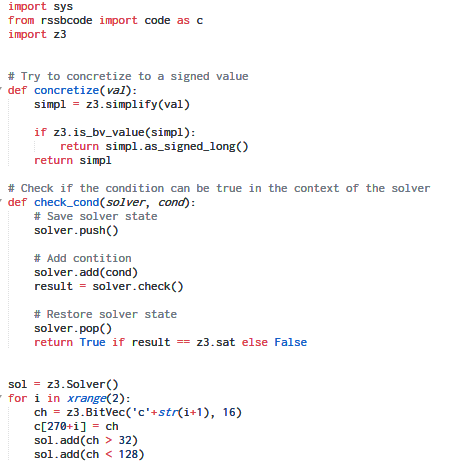
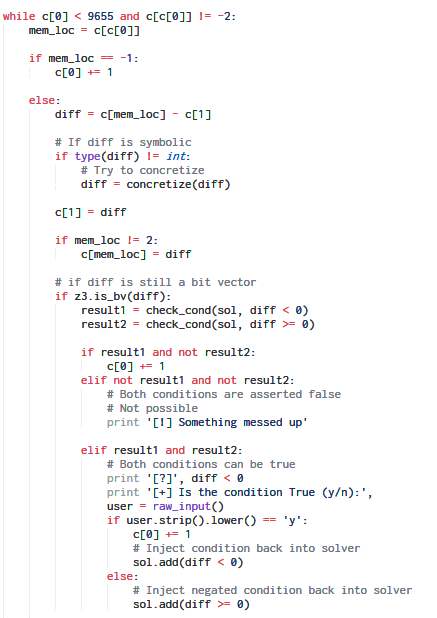
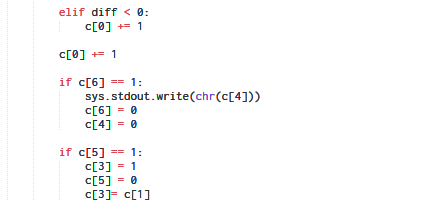
Using the Z3 SMT solver the code for our symbolic execution tool looks like:
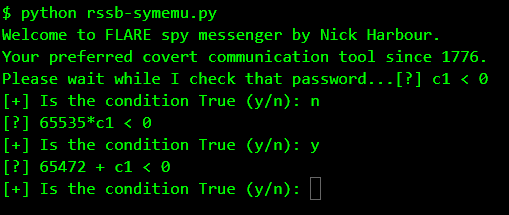
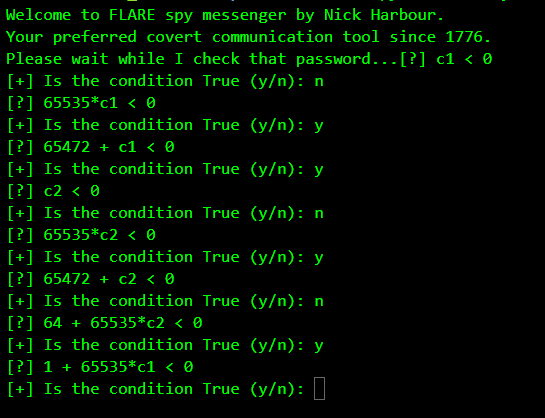
Running our tool, it asks for our opinion whenever it encounters a conditional branch which depends directly on the symbolic input i.e. the password.
The first question it asks is whether c1 < 0.
c1 stands the first character of the password. Essentially this means the program behaves differently depending on whether the first byte of the password was negative. Since we know it cannot be negative, we answer n and it discards this branch and explores the other.
The next question: 65535*c1 < 0.
65535 should be considered as a signed 16 bit value which means is -1 * c1 < 0 or is c1 > 0. We know c1 has to be positive so we answer y.
Indirectly, by the combination of these two checks, it's actually checking is c1 == 0.
So far so good. But what about the third question. 65472 is -64 when treated as a signed 16-bit value. So the question is -64 + c1 < 0 or is c1 < 64 ? This implies there's some check involving the @ character which has the ASCII value 64. This behaviour is also evident when we do an instruction count.
$ ./inscount @
Total instructions executed: 154796621
$ ./inscount a
Total instructions executed: 31621389
$ ./inscount A
Total instructions executed: 31621609
As shown above, using the @ character leads to a significantly higher instruction count. This behaviour coupled with our symbolic execution tool implies that the @ character may be a part of the password. We already know the flag ends with @flare-on.com. It looks like that the flag itself is the password. Going this way our symbolic execution tool discovers others constraints which decide the program flow.
The author did not further experiment with the symbolic execution tool due to lack of time. The author believes enhancing the tool with features like exploring all paths instead of depending on the user to choose one like angr may help to solve the challenge in a semi-automatic way.
Tracking data flow using taint analysis
Taint analysis is a technique frequently used to identify the root cause of a bug. Let's say we're fuzz testing a closed source application. Our fuzzer generates a test case which crashes the app overwriting PC. We are interested to know whether the bug is exploitable or not. This can be done using taint analysis where we track the flow of external input. If the input is copied to a memory location we mark the address as dirty (i.e. tainted) since the user input controls the value at that location. If the value from a tainted location is copied elsewhere the new location is tainted as well. In this way following program execution, we can eventually identify whether PC tainted which if true implies that PC is user controllable.
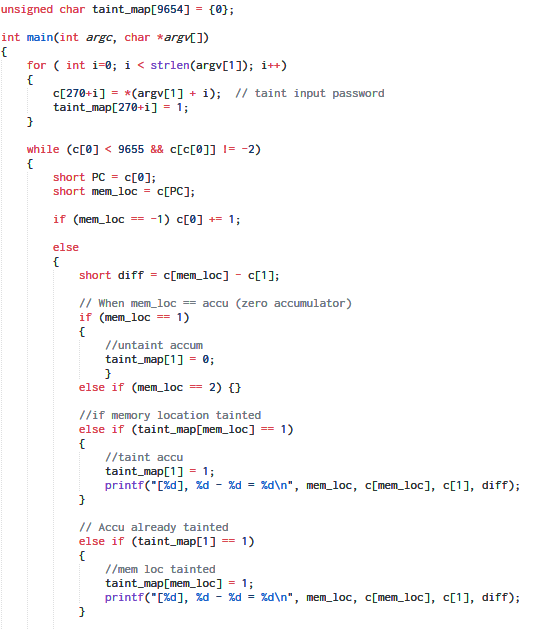
However for our purpose, we are not using taint analysis for finding bugs but rather for tracking the data flow. The idea is to mark the memory cells containing the password as tainted. As the RSSB VM executes, at some point of time it must access the memory cells containing the password, that is when we mark the new location as tainted as well.
taint_map is an array to store whether a particular address is tainted or not. Any operation involving a tainted address is logged.
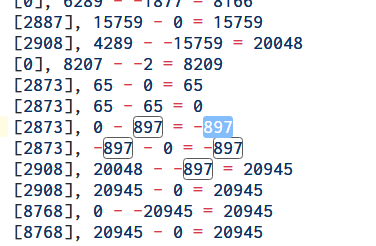
Examining the taint log we identify some constants which are used in comparison as shown in the image below.
Here 20048 is being compared to the constant 897. The value 20048 is calculated from the input password.
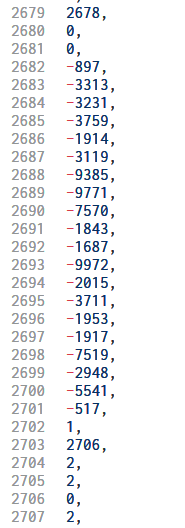
Interestingly searching for the constant 897 within the RSSB bytecode we locate other constants located immediately after.
The RSSB code calculates some values from the characters of our password which are then compared to the above constants. For success, the values must equal.
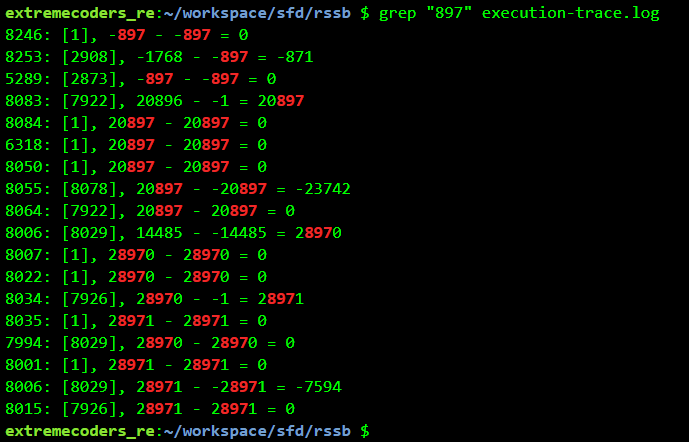
With this information we run a full execution trace, logging every operation, not just the tainted ones. Grepping for the constant "897" we get:
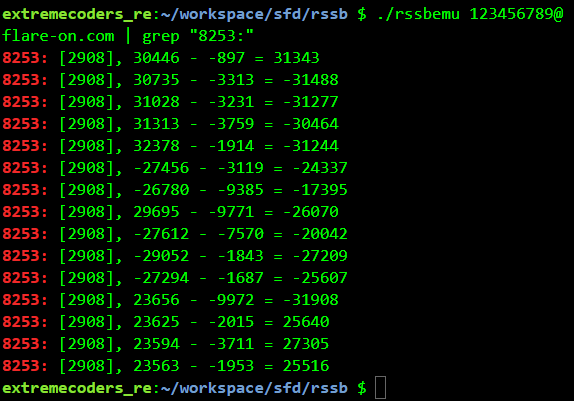
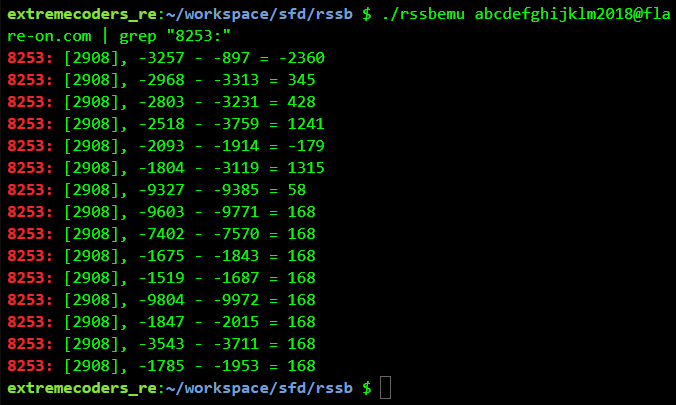
The instruction at address 8253 (second line) looks to be doing the comparison. Grepping for 8253 while using 123456789@flare-on.com as the password we get
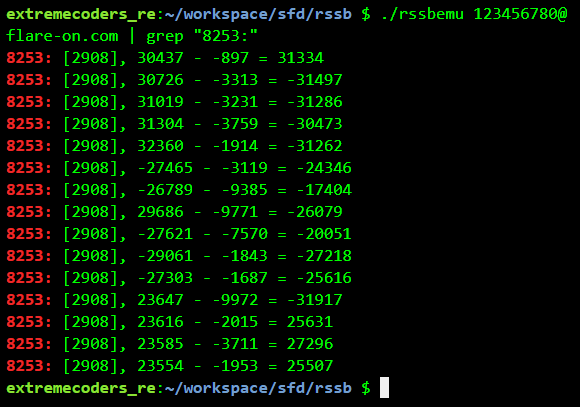
Changing the password slightly we get a different output
Bruteforcing the correct password
We have identified the instruction where the actual check is performed. We can try with different passwords by changing a few characters at a time till all the checks line-up. First, we need to figure out the password length which can have a maximum of 32 characters.
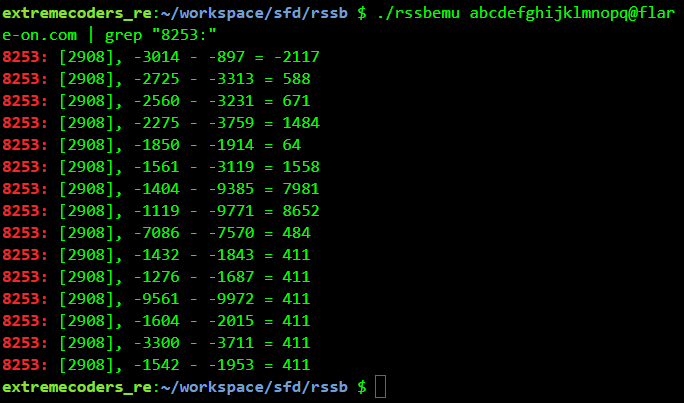
Using a 30 character password ending with @flare-on.com we get an interesting output. All of the last 6 checks have the same difference.
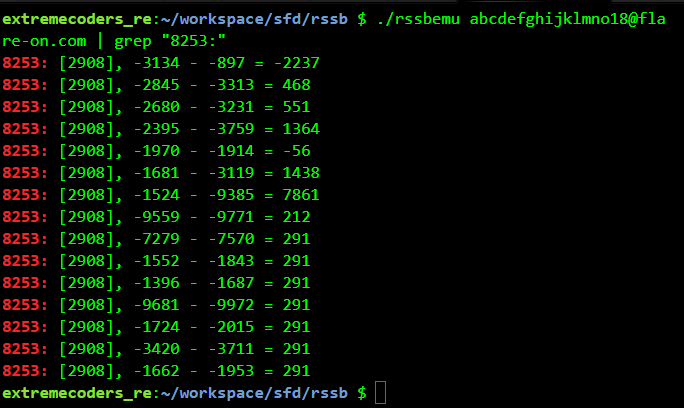
This means we need to brute-force the password backwards such that the difference of the checks equals. For example, using abcdefghijklmno18@flare-on.com as the password 7 check matches.
For abcdefghijklm2018@flare-on.com 8 check matches.
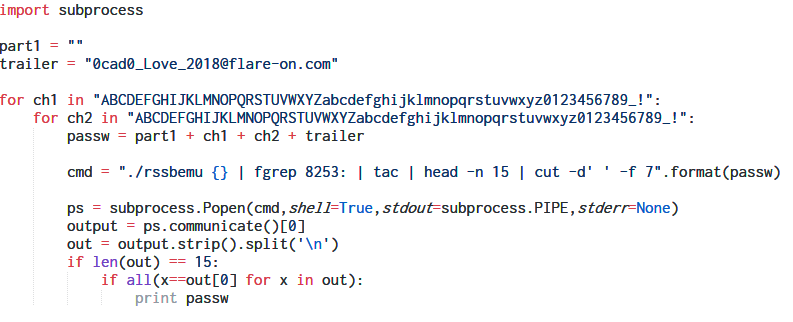
We can develop a small script in Python to brute-force the password one pair of characters at a time.
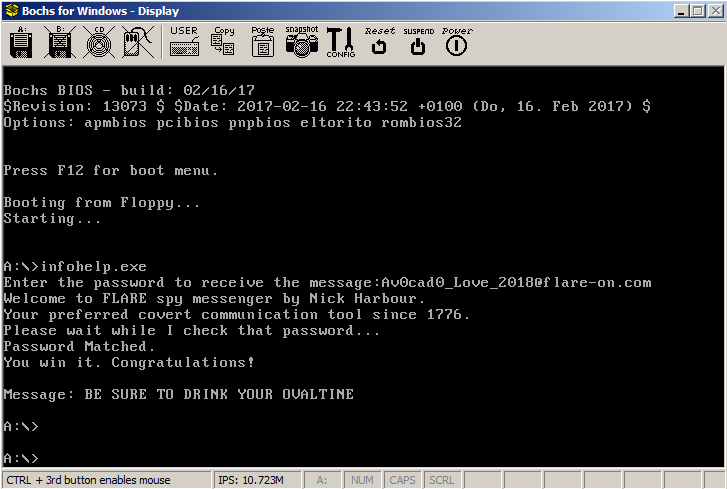
Bruteforcing all pairs we get the correct password which is also the flag.
FLAG: Av0cad0_Love_2018@flare-on.com
Mission Accomplished!
Closing Thoughts
With this, we come to the end of Flare-On 5 CTF write-up series. As Nick Harbour points out, this year's challenges were the most difficult. Challenge 12, in particular, deserves special mention and it required a herculean effort to overcome. The difficulty of the challenges sometimes makes it hard to maintain focus and sanity, but nevertheless they were interesting and innovative.
For any comments, suggestions or improvements feel free to share your thoughts below.

