#9 – remorse.ino.hex
We arrive at the ninth challenge, this one is a binary for an Arduino. The challenge description says
One of our computer scientists recently got an Arduino board. He disappeared for two days and then he went crazy. In his notebook he scrawled some insane jibberish that looks like HEX. We transcribed it, can you solve it?
The provided file remorse.ino.hex is in Intel HEX format. This format is used to represent to binary data in an ASCII text form. To convert this to binary we can use an online tool at matrixstorm. So far so good, but how do we proceed? Let’s take a quick look about Arduino.
A brief overview of Arduino
Arduino is an open-source electronics platform. It can be used for a variety of purposes ranging from controlling a LED to complex projects like a small scale robot. The Arduino consists of a programmable circuit board containing an Atmel AVR microcontroller. Programs written for Arduino are uploaded with the help of a software running on the user’s computer.
AVR is based on Modified Havard architecture with 16-bit instructions and 8-bit data. The instruction set is RISC in nature. There are 32 general purposes registers from R0 to R31. Similar to other RISC architectures only load and store instructions access memory. All calculations are done on registers. In addition to the 32 general purpose registers, there are a few other special purpose registers like the Program Counter (PC), Stack Pointer (SP) and Status Registers (SREG).
Initial triage
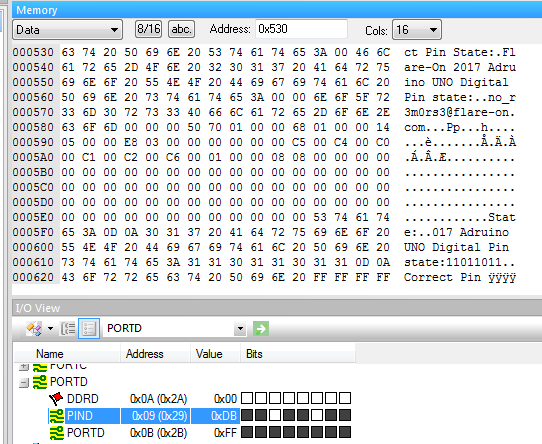
At first, let’s search for strings using the strings2 tool.
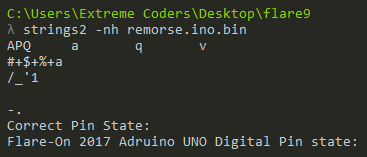
We can deduce two important pieces of information from the string scan. The line “Correct Pin State” suggests that perhaps the Arduino takes user input through the pins. The next line reveals the binary is for an Arduino UNO. The microcontroller used in the UNO is ATmega328.
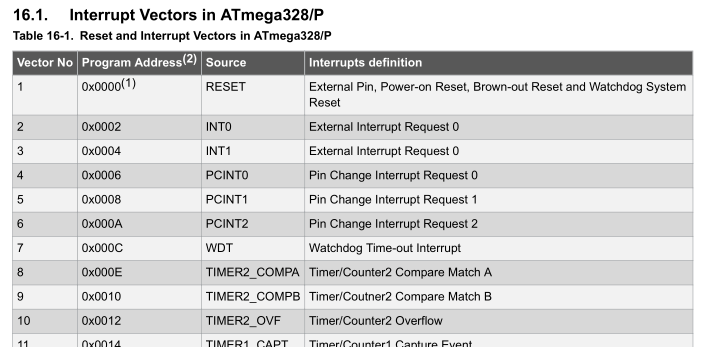
When reverse engineering binaries for microcontroller the best place to look for help is usually the datasheet for the device. The datasheet for the ATmega328 can be found here.
Analysing in IDA
IDA by default doesn’t have the specifications of ATmega328 necessary for analyzing Arduino UNO binaries. Luckily, we can find the required config file here. With this in place, we can load the binary in IDA, change processor type to AVR, device type to ATmega328 and finish the auto-analysis.
At the very beginning in the disassembly listing, we can find the table of interrupt handlers. An interrupt is an event that requires immediate attention. When an interrupt fires, the microcontroller pauses whatever it’s currently executing and services the interrupt by executing the relevant interrupt handler.
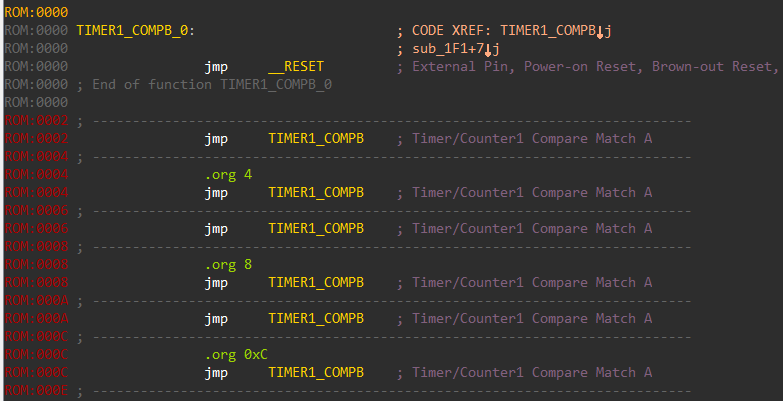
Although correctly identified the interrupt handler table, the names of the handler are not always correct. We can refer to the datasheet and rename the handlers appropriately.
Apart from the interrupt handlers, IDA also identified a lot of other functions. IDA uses a technology called FLIRT which automatically recognizes standard library functions. This cuts down greatly on the reversing time. However, this feature is not available for AVR binaries and hence IDA did not recognize any of the standard functions used from the standard c library.
Porting symbols using binary diffing
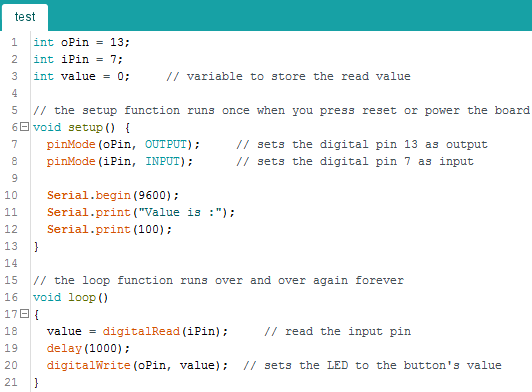
To port over names, we need an existing Arduino AVR binary with the symbols intact. The best way to do this is to compile one ourselves. We can compile the following sample code adapted from the provide examples in Arduino IDE.

Compiling this we obtain an ELF. The ELF contains the much needed debugging symbols which can be ported back to the original challenge binary. For diffing, I have used the Diaphora plugin for IDA. Directions on how to use the plugin are included with the tool. In short, diaphora exports the IDB to an SQLite database. The SQLite DB is then loaded into a second IDB to compare against. The first database containing the debugging symbols is called the primary. The other DB i.e the target where the symbols would be imported to is called the secondary. Diaphora shows a list of functions which match in both the databases. Using this approach, diaphora obtains the following list of functions.
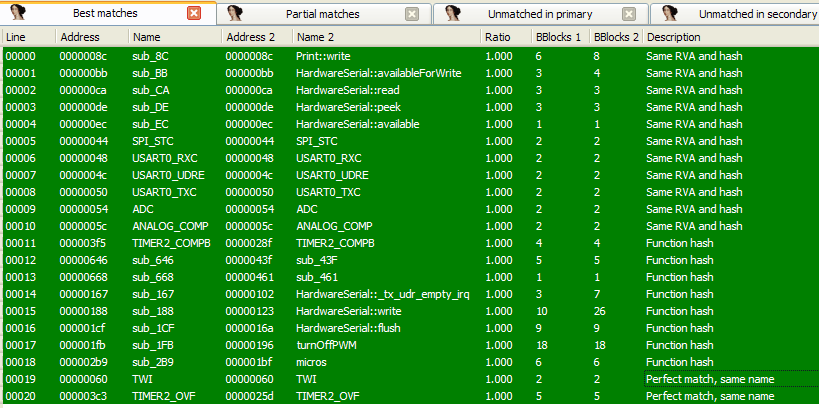
The names can be imported giving a much better disassembly. Apart from this symbols of few other functions like loop, pinMode, digitalRead, digitalWrite are not present. These can be imported manually by comparing the layout of the functions with the source code.
Simulating in AVR studio
Programs compiled for Arduino can be simulated using AVR Studio or the newer Atmel Studio. I have used the former along with hapsim. Hapsim works by hooking into AVR Studio and can simulate peripherals like the UART, LCD etc.
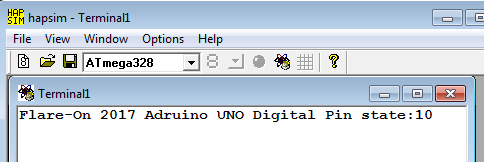
Simulating in AVR Studio, a message is printed on the hapsim terminal. It says something about the pin state. This probably means that the pins are used as an input. However, we need to know which pins.
A dive into AVR assembly
AVR is a RISC architecture with 32 registers from R0 to R31. The registers are 8-bit in width. The register pairs R27:R26, R29:R28 and R31:R30 have special names X, Y and Z respectively. Arguments to functions are passed left to right in registers R25 to R8. An 8-bit value is returned in R24, whereas a 16-bit value is returned in R25:R24. Refer to this page for more details.
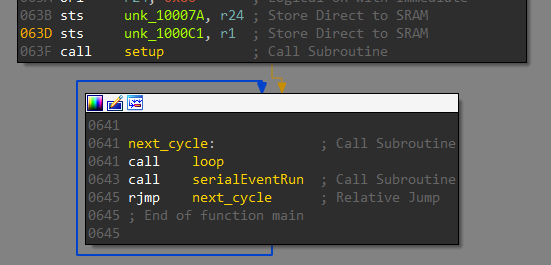
At a bare minimum, the code for an Arduino consists of a setup and a loop function. Setup is called once and is used to initialize variables, pin modes etc. The loop function is called repetitively and this is where we respond to events. The same structure can be seen in the disassembly.
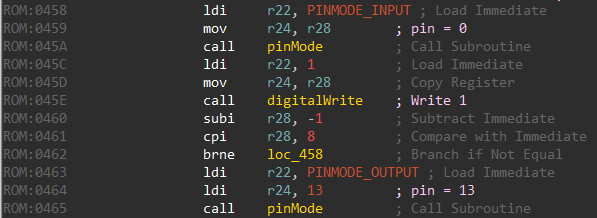
The setup function sets PIN 0 as an input pin and PIN 13 as an output pin. A pin configured as input is used to read in data whereas an output pin is used to send data.
The pin numbers above refers to Arduino pins. The microcontroller used in Arduino UNO is the ATmega328. To find the correspondence between the pin numbers used by Arduino and the actual pins on the ATmega we need to refer to the pin mapping diagram. For Arduino UNO it looks like the following image.

Arduino pins 0 and 13 correspond to PD0 and PB5 respectively. Coming back to the loop function there is a call to read_pin_d.
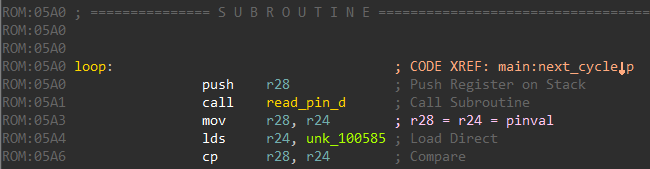
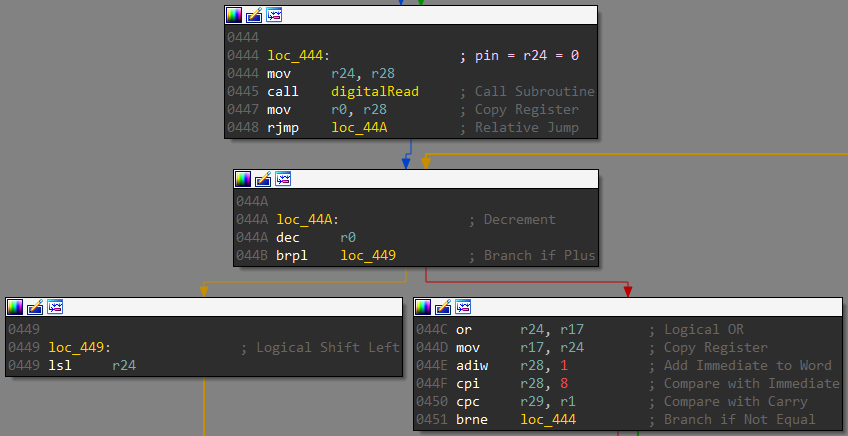
read_pin_d reads the state of Pin D as an 8-bit value and returns this in register R24.
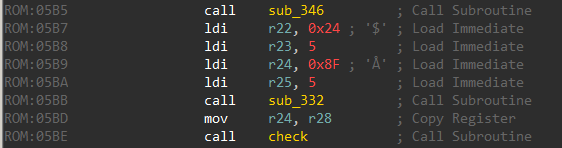
Going down in the loop function there’s a call to a function which I have named as check. The 8-bit value read is passed as an argument.
Obtaining the flag
The check function is interesting. It loads a series of 8-bit values on the stack.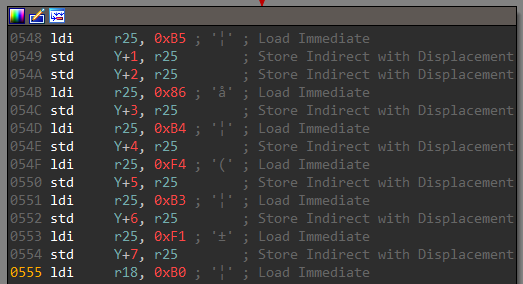
The list of bytes is then XORed with the input received from pin d.
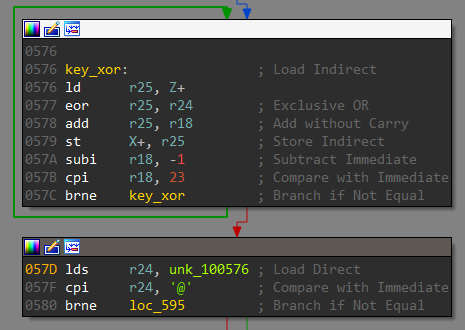
Finally, there is a check for the ‘@’ character in the XORed result. This @ character looks to be a part of the email. Thus we need to supply a single byte as the decryption key at Pin D. We can bruteforce the key in python.
li = [0xB5, 0xB5, 0x86, 0xB4, 0xF4, 0xB3, 0xF1, 0xB0, 0xB0, 0xF1, 0xED, 0x80, 0xBB, 0x8F, 0xBF, 0x8D, 0xC6, 0x85, 0x87, 0xC0, 0x94, 0x81, 0x8C] output = [0] * len(li) for k in xrange(255): for i in xrange(len(li)): v = (li[i]^k)+i if v > 255: v -= 256 output[i] = chr(v) if output[-3] == 'c' and output[-2] == 'o' and output[-1] == 'm': print 'Xor key=', hex(k) print ''.join(output) break
Running this we get both the decryption key and the flag. The decryption key is 0xdb. The flag is no_r3m0rs3@flare-on.com. We can simulate in AVR Studio with this value of Pin D to confirm our finding.
#10 – shell.php
The task description reads
We have tested you thoroughly on x86 reversing but we forgot to cover some of the basics of other systems. You will encounter many strange scripting languages on the Information Superhighway. I know that Interweb challenges are easy, but we just need you to complete this real quick for our records.
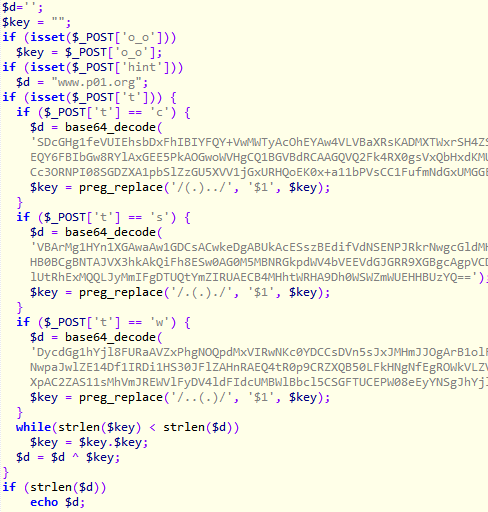
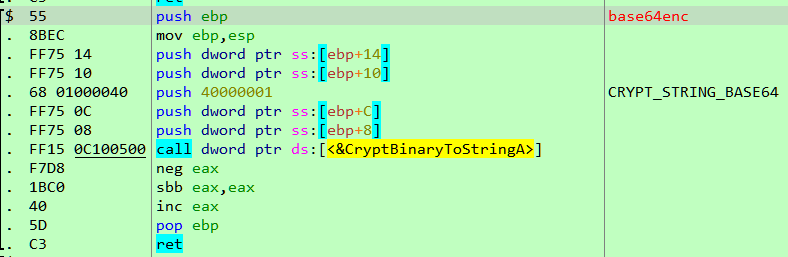
We are given a PHP file. At a first glance, it appears to be mildly obfuscated.
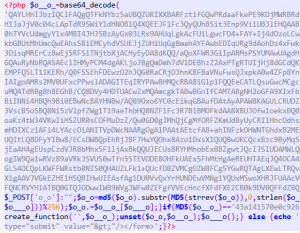
After cleaning it up and renaming the variables we get the following code.
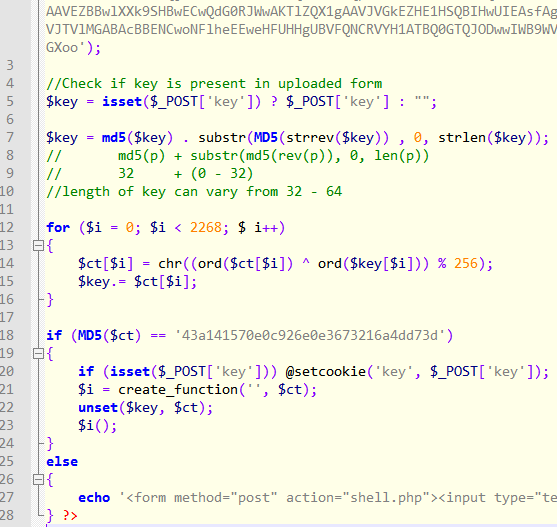
The snippet checks if the POST data contains the key variable. If so, it derives another composite key by appending it with the MD5 hash of the reversed key taking only the first strlen(key) characters. The length of the new key thus derived can vary from 32 to 64. This is used to decrypt a block of base64 encoded ciphertext. The plaintext thus obtained must have the corresponding MD5 hash (line 18) and also must be a valid PHP code (line 21).
Analyzing the crypto
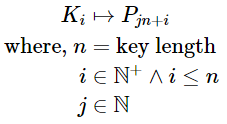
Let’s have a look at the decryption algorithm. Suppose the length of the key is n. This key is XORed with the first n bytes of the ciphertext to give back n bytes of plaintext. These n bytes of plaintext are then used as the xor key for the next n bytes of ciphertext. The process repeats for the whole length of the ciphertext. The logic can be represented by the following diagram.


where,
- n = length of key
- m = length of ciphertext = length of plaintext.
In pseudo code, this translates to
C1 ^ K1 = P1 C2 ^ K2 = P2 ... Cn ^ Kn = Pn Cn+1 ^ P1 = Pn+1 ... Cm ^ Pm-n = Pm
We know the length of the key can vary from 32 to 64. Additionally, the key only consists of the characters 0-9, a-f. Using this information it is possible to calculate the exact length of the key.
Let’s analyze the decryption algorithm once more.
K1 controls the value P1.
P1 in turn controls Pn+1.
Pn+1 controls P2n+1 so on.
Thus, we can say that Ki controls the values Pjn+i.
Finding the key length
The idea to find the key length is based on the fact that the plaintext must consist of only printable characters. Suppose, we fix the length of the key to be n. There must exist at least one character in the set {0-9, a-f} for each of the n positions in the key. Otherwise, the key length is not possible.
import string #Put the base64 blob here encoded = '' ct = map(ord, list(encoded.decode('base64'))) def is_char_possible(char, pos, keylen): char = ord(char) for elem in iter(ct[pos+keylen*i] for i in xrange(len(ct)/keylen)): char ^= elem if chr(char) not in string.printable: return False return True def is_keylen_possible(keylen): for pos in xrange(0, keylen): possible = False # Iterate over all possible characters for ch in '0123456789abcdef': if is_char_possible(ch, pos, keylen): # Char ch is possible at this position pos possible = True break # No printable char possible at position pos if not possible: return False # All position have possible printable characters return True def find_possible_key_lengths(): for keylen in xrange(32,65): if is_keylen_possible(keylen): print '[+] Possible key length =', keylen if name == 'main': find_possible_key_lengths()
We get the key length to be 64. This is one half of the problem. The other half is to find the key itself.
Finding the decryption key
We can find the key by tweaking the code above to print out the possible chars at each of the 64 positions.
import string #Put the base64 blob here encoded = '' ct = map(ord, list(encoded.decode('base64'))) def is_char_possible(char, pos, keylen): char = ord(char) for elem in iter(ct[pos+keylen*i] for i in xrange(len(ct)/keylen)): char ^= elem if chr(char) not in string.printable: return False return True def find_possible_key(keylen): for pos in xrange(0, keylen): print '[%d] -> ' %pos, # Iterate over all possible characters for ch in '0123456789abcdef': if is_char_possible(ch, pos, keylen): # Char ch is possible at this position pos print ch, print if name == 'main': find_possible_key(64)
Running, we get the following list of possible characters.
[0] -> c d e [1] -> a b c d e [2] -> 0 1 2 3 4 5 6 7 8 9 [3] -> 8 9 [4] -> 2 3 4 5 6 [5] -> 0 1 2 3 4 6 7 8 [6] -> b c d f [7] -> 8 9 [8] -> 0 2 4 5 [9] -> a b f [10] -> 0 2 3 4 5 6 7 8 9 [11] -> 0 1 2 3 4 5 6 7 8 9 [12] -> b c d [13] -> 8 9 [14] -> 0 2 3 5 [15] -> 0 1 2 3 4 5 6 7 8 9 [16] -> a b c d e [17] -> a b c d e f [18] -> b c d f [19] -> 2 3 4 5 7 [20] -> 2 3 7 [21] -> 5 6 7 [22] -> 0 1 2 4 5 6 7 8 9 [23] -> 0 1 5 6 7 [24] -> 8 9 [25] -> a b c d e f [26] -> a b c d e f [27] -> 0 1 2 3 4 6 7 8 9 [28] -> d e [29] -> 8 9 [30] -> 0 1 2 3 4 5 6 7 9 [31] -> a b c d e f [32] -> 0 1 2 3 5 6 7 8 9 [33] -> 0 1 2 3 4 5 6 7 9 [34] -> 0 1 3 6 7 [35] -> b c d e [36] -> d e f [37] -> 0 1 4 6 7 [38] -> 2 3 4 5 [39] -> 0 1 4 6 7 [40] -> 1 2 3 4 5 6 7 8 9 [41] -> 0 3 4 7 8 9 [42] -> a e [43] -> a f [44] -> b c [45] -> 0 1 3 6 7 [46] -> 8 9 [47] -> 1 2 3 5 6 7 8 9 [48] -> d e [49] -> 0 1 7 [50] -> 0 1 5 6 7 [51] -> 0 1 2 3 4 5 6 7 9 [52] -> a b c f [53] -> a b c d e f [54] -> a b c d f [55] -> a b c d e f [56] -> 0 1 2 3 5 6 7 8 9 [57] -> 0 1 3 6 7 [58] -> 8 9 [59] -> a e f [60] -> 0 1 2 3 6 7 [61] -> a b c e f [62] -> a e f [63] -> b c d
From the above list, we try the characters one by one at each of the 64 positions such that the resultant plaintext is valid PHP. Proceeding in this fashion we get the decryption key to be db6952b84a49b934acb436418ad9d93d237df05769afc796d067bccb379f2cac . Note that this is the composite key and not the actual key passed in the POST data.
Stage 2
The plaintext obtained is another piece of PHP code.
There are 3 base64 blobs which are encrypted using multibyte XOR. Besides, there is a hint “www.p01.org”. The XOR key used to encrypt these 3 blobs is constructed using a regex from the key received from the previous stage.
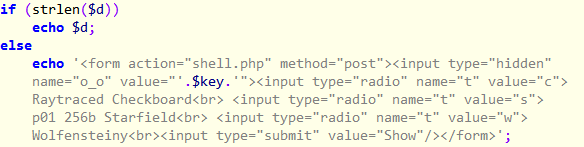
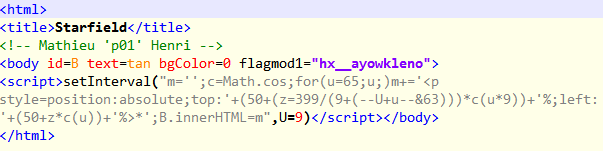
At the end of the PHP code, there are 3 interesting references to Raytraced checkerboard, 256b Starfield and Wolfensteiny. These are animations coded in Javascript which could be found in the p01 website. This probably means the three encrypted base64 blobs are the code for the JS animations.
The original length of the original key passed as a POST data to PHP can be brute-forced.
import string checkerboard = 'SDcGHg1feVUIEhsbDxFhIBIYFQY+VwMWTyAcOhEYAw4VLVBaXRsKADMXTWxrSH4ZS1IiAgA3GxYUQVMvBFdVTysRMQAaQUxZYTlsTg0MECZSGgVcNn9AAwobXgcxHQRBAxMcWwodHV5EfxQfAAYrMlsCQlJBAAAAAAAAAAAAAAAAAFZhf3ldEQY6FBIbGw8RYlAxGEE5PkAOGwoWVHgCQ1BGVBdRCAAGQVQ2Fk4RX0gsVxQbHxdKMU8ABBU9MUADABkCGHdQFQ4TXDEfW0VDCkk0XiNcRjJxaDocSFgdck9CTgpPDx9bIjQKUW1NWwhERnVeSxhEDVs0LBlIR0VlBjtbBV4fcBtIEU8dMVoDACc3ORNPI08SGDZXA1pbSlZzGU5XVV1jGxURHQoEK0x+a11bPVsCC1FufmNdGxUMGGE=' starfield = 'VBArMg1HYn1XGAwaAw1GDCsACwkeDgABUkAcESszBEdifVdNSENPJRkrNwgcGldMHFVfSEgwOjETEE9aRlJoZFMKFzsmQRALSilMEQsXHEUrPg9ZDRAoAwkBHVVIfzkNGAgaBAhUU00AAAAAAAAAAAAAAAAASkZSVV0KDAUCHBFQHA0MFjEVHB0BCgBNTAJVX3hkAkQiFh8ESw0AG0M5MBNRGkpdWV4bVEEVdGJGRR9XGBgcAgpVCDAsCA0GGAVWBAwcBxQqKwRCGxgbVkJFR11IdHcbRFxOUkNNV0RAVXIKSgxCWk1aVkdGQVI8dxRTVl5CR0JLVAQdOStbXkRfXlxOFEULUCp2SFJIUlVGQlUtRhExMQQLJyMmIFgDTUQtYmZIRUAECB4MHhtWRHA9Dh0WSWZmWUEHHBUzYQ==' wolfensteiny = 'DycdGg1hYjl8FURaAVZxPhgNOQpdMxVIRwNKc0YDCCsDVn5sJxJMHmJJOgArB1olFA0JHQN+TlcpOgFBKUEAA1M+RVUVDjsWEy8PQUEMV3IsSgJxCFY0IkJAGVY3HV9DbQsRaU1eSxl6IR0SEykOX2gnEAwZGHJHRU0OUn4hFUUADlw8UhRPNwpaJwlZE14Df1IRDi1HS30JFlZAHnRAEQ4tR0p9CRZXQB50LFkHNgNfEgROWkVLZV1bGHVbHyJMSRFZCQtGRU0bQAFpSEtBHxsLVEdaeEEUfCd2akdKYAFaJXBdT3BeHBRFV3IdXCV1PhsUXFUBBR5hXFwwdxsab1kECFoaM0FET2pEd2owBXpAC2ZAS11sMhVmJREWVlFyDV4ldFIdcUMBWlBbcl5CSGFTUCEPW08eEyYNSgJhYjl8Tk9BCUpvDxsAODBeLwUfE08AAAAAAAAAAAAAAAAAEXFkfV1wB0ctDRM=' def is_char_possible(char, pos, keylen, text_arr): ch = ord(char) while pos < len(text_arr): if chr(text_arr[pos] ^ ch) not in string.printable: return False pos += keylen return True def is_keylen_possible(keylen, text_arr): for pos in xrange(keylen): possible = False for ch in string.printable: if is_char_possible(ch, pos, keylen, text_arr): possible = True break if not possible: return False return True def find_possible_keylengths(): checkerboard_arr = map(ord, checkerboard.decode('base64')) starfield_arr = map(ord, starfield.decode('base64')) wolfensteiny_arr = map(ord, wolfensteiny.decode('base64')) for keylen in xrange(2, 65): if is_keylen_possible(keylen, checkerboard_arr) \ and is_keylen_possible(keylen, starfield_arr) \ and is_keylen_possible(keylen, wolfensteiny_arr): print keylen, def main(): find_possible_keylengths() if name == 'main': main()
We get multiple possible key lengths.
13 26 39 40 41 43 45 46 47 48 49 51 52 53 54 55 56 57 58 59 60 61 62 63 64
By intuition, we discard 13 and 26 as possible key lengths as it must be a multiple of 3. Thirty-nine looks to be the correct key length.
Armed with the knowledge that the key is 39 chars in length, the plaintext is similar to the JS code we can employ known plaintext attack. We need to find out the key for each of the base64 blobs separately. For example, for the first base64 blob we can find the possible key characters using the code below.
import string checkerboard = 'SDcGHg1feVUIEhsbDxFhIBIYFQY+VwMWTyAcOhEYAw4VLVBaXRsKADMXTWxrSH4ZS1IiAgA3GxYUQVMvBFdVTysRMQAaQUxZYTlsTg0MECZSGgVcNn9AAwobXgcxHQRBAxMcWwodHV5EfxQfAAYrMlsCQlJBAAAAAAAAAAAAAAAAAFZhf3ldEQY6FBIbGw8RYlAxGEE5PkAOGwoWVHgCQ1BGVBdRCAAGQVQ2Fk4RX0gsVxQbHxdKMU8ABBU9MUADABkCGHdQFQ4TXDEfW0VDCkk0XiNcRjJxaDocSFgdck9CTgpPDx9bIjQKUW1NWwhERnVeSxhEDVs0LBlIR0VlBjtbBV4fcBtIEU8dMVoDACc3ORNPI08SGDZXA1pbSlZzGU5XVV1jGxURHQoEK0x+a11bPVsCC1FufmNdGxUMGGE=' def is_char_possible(char, pos, keylen, text_arr): ch = ord(char) while pos < len(text_arr): if chr(text_arr[pos] ^ ch) not in string.printable: return False pos += keylen return True def find_possible_chars(pos, keylen): checkerboard_arr = map(ord, checkerboard.decode('base64')) possible = [] for ch in string.printable: if is_char_possible(ch, pos, keylen, checkerboard_arr): possible.append(ch) return possible if name == 'main': for pos in xrange(0, 13): print '[%d] -> %s' %(pos, find_possible_chars(pos,13))
Running we get the following list.
[0] -> ['0', '2', '3', '4', 'r', 's', 't', 'u', 'w'] [1] -> ['A', 'B', 'C', 'D', 'F', 'G', 'J', 'M', 'O', 'P', 'Q', 'R', 'S', 'U', 'V', 'W', 'X', 'Z', '@', '[', '\', ']', '^', ''] [2] -> ['r', 's', 't', 'u', 'v'] [3] -> ['r', 's', 't', 'u'] [4] -> ['2', '3', '4', '5', '6', '8', '9', 'a', 'f', '!', '$', '%', '&', "'", ')', '*', '+', ',', '-', '.', ':', ';', '<', '=', '?', '', ' '] [5] -> ['1', '2', '4', '5', '6', '7', 'a', 'b', 'f', 'g', '!', '$', '%', '&', "'", '(', ')', '+', ',', '-', '.', '/', ':', '<', '=', '?', ''] [6] -> ['p', 'r', 's', 't', 'u'] [7] -> ['X', 'Y', '\', '^', ''] [8] -> ['0', '2', '3', '4', '5', 'a', 'b', 'c', 'e'] [9] -> ['0', '1', '6', '7', 'a', 'e', 'f', 'g', ''] [10] -> ['a', 'e', 'f', 'h', 'j', 'k', 'l', 'm', 'o', 'p', 'q', 'r', 's', 'v', 'w', 'x', 'y', 'z', '(', ')', '+', '.', '/', '', '{', '|', '}', '~'] [11] -> ['a', 'c', 'e', 'g', 'h', 'i', 'j', 'k', 'l', 'm', 'n', 'o', 'p', 'q', 's', 't', 'v', 'w', 'x', '{', '|', '}', '~'] [12] -> ['b', 'c', 'd', 'e', 'g']
We need to construct the XOR key byte by byte such that the resulting plaintext is valid JS. This method is similar to what we did in the first stage.
Getting the flag
The three base64 blobs decrypts to three pieces of HTML with three corresponding keys
- t_rsaat_4froc
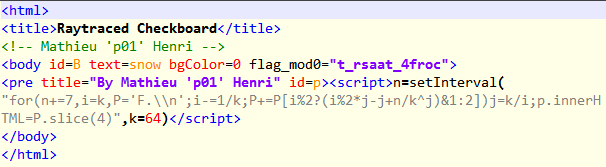
- hx__ayowkleno
- **3Oiwa_o3@a-.m
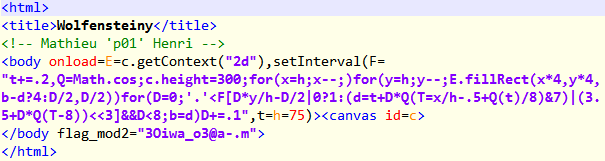
**
Combining the keys we recover the flag th3_xOr_is_waaaay_too_w34k@flare-on.com

)
)
)
)