This is part 7 of the Flare-On 5 CTF writeup series.
10. golf
How about a nice game of golf? Did you bring a visor? Just kidding, you're not going outside any time soon. You're going to be sitting at your computer all day trying to solve this.
A game of golf would be a welcome break that's hard to come by. The sarcastic tone of the challenge intro doesn't sound good. Let's have a look.
Does the word visor sound familiar? Yes, that refers to a hypervisor also known as a Virtual Machine Monitor (VMM). This challenge is about reversing a hypervisor.
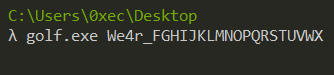
golf.exe is a PE32+ binary. main first checks if argc >= 2. If so, checks whether strlen(argv[1]) == 24.
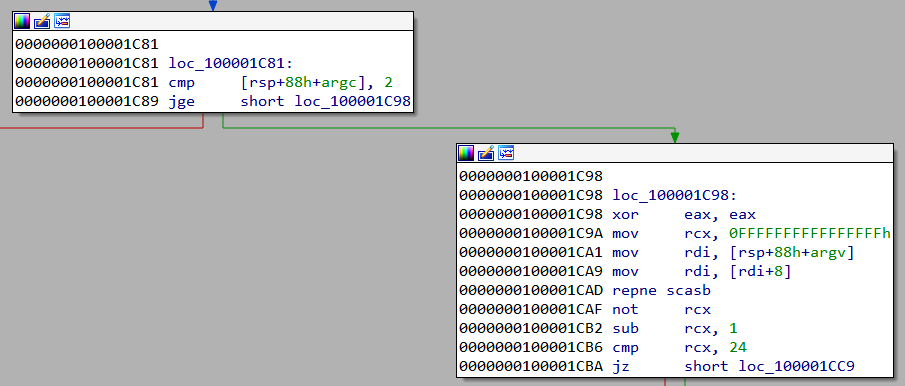
The binary requires one command line argument which must have a length of 24 characters. This command line argument is the flag which it's going to check.
Later main calls setup.
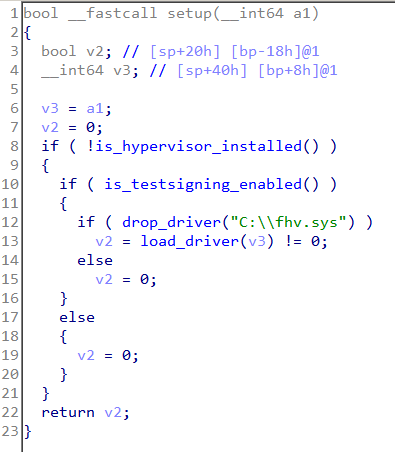
setup first calls is_hypervisor_installed. This function issues a CPUID instruction with EAX equal to 0x40000001.

The CPUID instruction is used to obtain processor information with EAX containing the type of information to retrieve. The Intel manual also says that EAX greater than 0x40000000 is invalid and not implemented by an Intel CPU. However, a hypervisor may choose to implement these ranges.

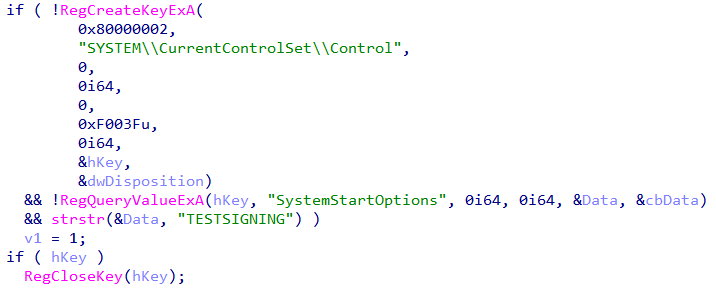
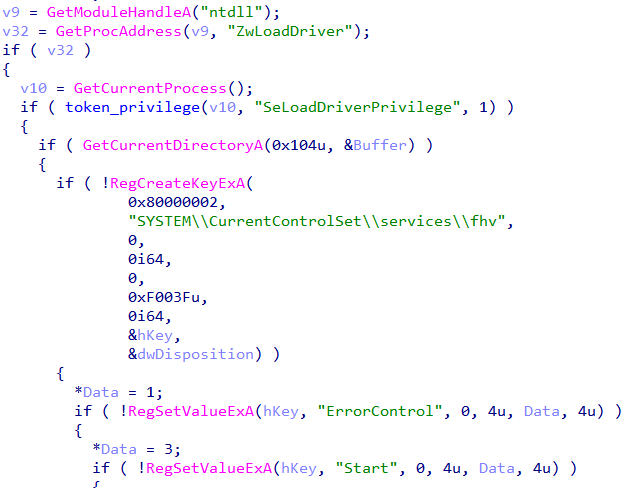
From this we can infer, the code is checking if the hypervisor is already loaded. Coming back to setup, the is_testsigning_enabled function checks and enables TESTSIGNING. This boot option is necessary to enable the loading of self-signed drivers.
We can also use the tool Driver Signature Enforcement Overrider to enable test signing. Lastly, main drops a file C:\fhv.sys and loads it. After the driver is loaded, its deleted. To obtain the driver, we can debug the binary and copy fhv.sys before its deleted.
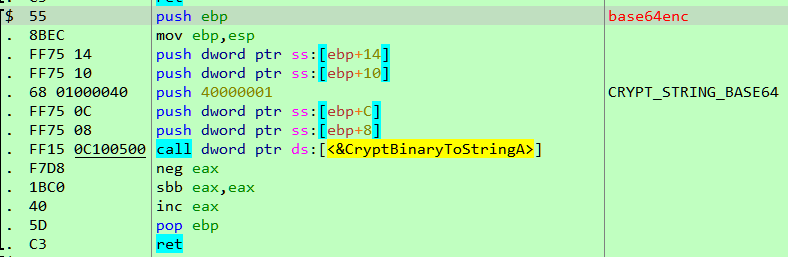
Next, it allocates a page of 0x1000 bytes in size and copies a function do_vmcall to the newly allocated region.
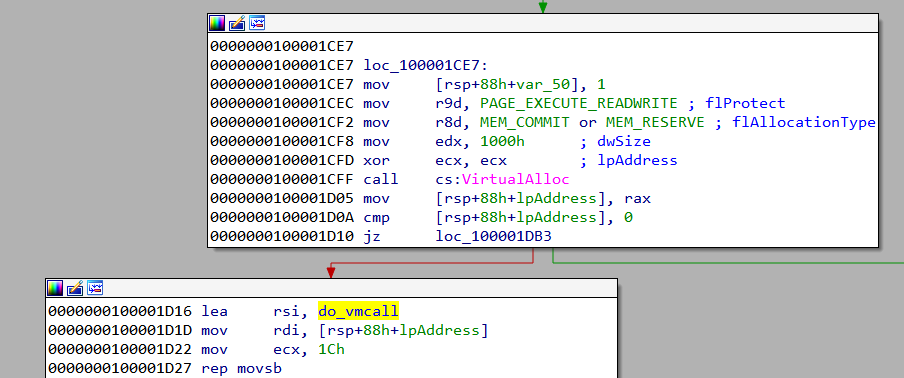
The disassembly of do_vmcall looks like
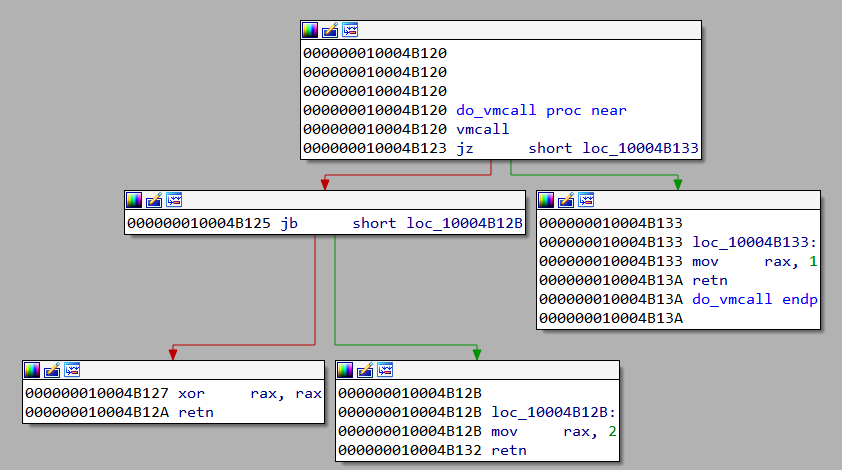
The VMCALL instruction makes a call to the hypervisor. It's a part of Intel Virtualization Technology (VT-x). Support for VT-x is processor and vendor specific. For example, the equivalent of VT-x for AMD processors is AMD-V.
golf.exe requires a command line argument which is the flag. This along with the address of the allocated page containing the do_vmcall code is used in the call to the function check_flag_part1.
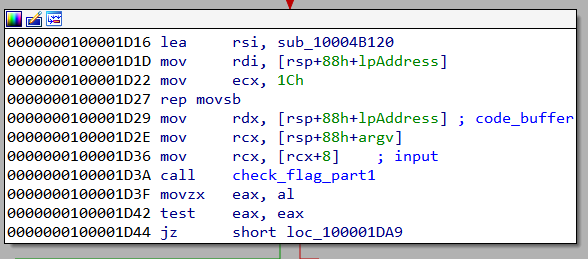
If check_flag_part1 returns non-zero it calls check_flag_part2, check_flag_part3, and check_flag_part4. For success, the return value must be non-zero in each case.
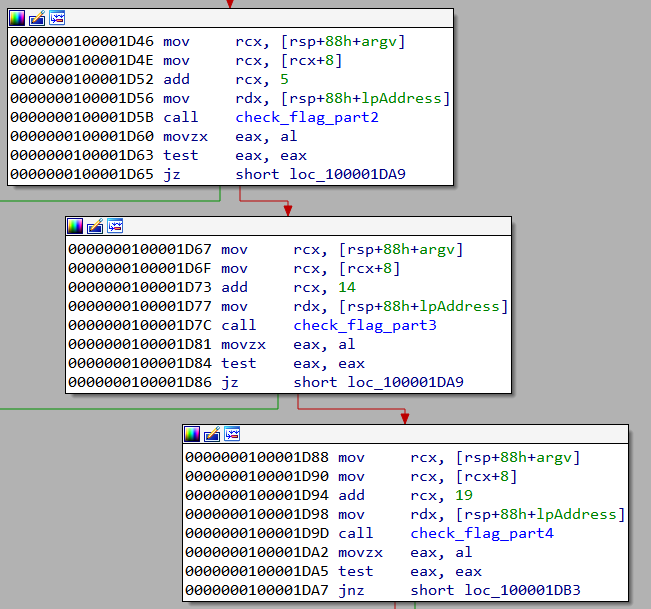
Inspecting the arguments passed to the check_flag_part functions we can infer:
check_flag_part1checks characters from position 0-4check_flag_part2checks characters from position 5-13check_flag_part3checks characters from position 14-18.check_flag_part4checks characters from position 19-24.
Analyzing a flag check function
Let's analyze check_flag_part1.
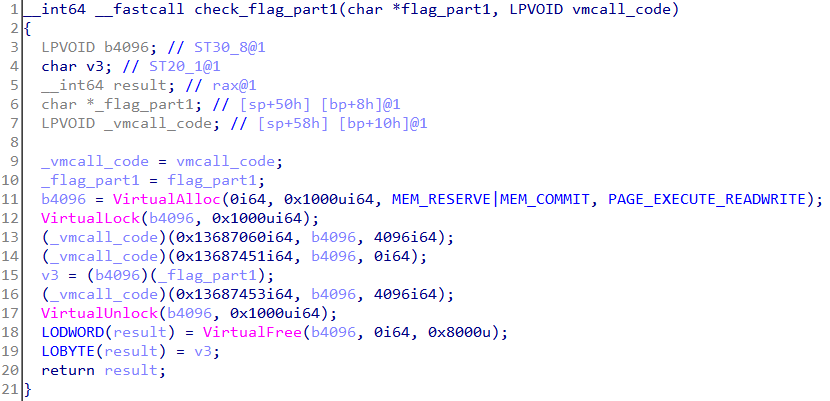
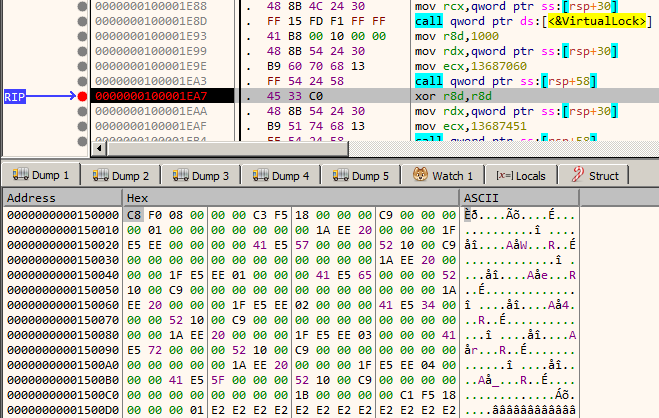
A page of size 0x1000 is allocated and locked using VirtualLock. A locked page is always kept in RAM and never paged out. This is to ensure further access to the page does not trigger a page fault.
At lines 13 & 14, the buffer containing the code of do_vmcall is used to make a function call. The arguments of the function call include the locked page just allocated.
Next, at line 15, the locked page is used to make a function call with the flag_part1 being the argument. The return value of this call must be non-zero.
A point to note is that the newly allocated and locked page will be empty. But it's still used to make a function call. This means the hypervisor would fill the page with some data at lines 13 & 14.
Running the challenge binary
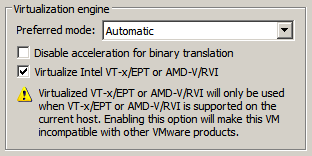
To find out what data is filled in the page let's switch to dynamic analysis. It would be prudent to run this in a Virtual Machine and not on our host. VMware supports nested virtualization i.e. running a VM (the hypervisor) within another VM. This requires the processor to support Extended Page Tables (EPT) also known as Second Level Address Translation (SLAT). Almost all recent Intel Processors have this capability.
Before powering on the VM ensure that the option "Virtualize Intel VT-x/EPT" is checked under processor settings in VMware. This is necessary for nested virtualization.
With the VM up and running, we can debug golf.exe in x64dbg as we would do normally. At first, set a breakpoint on load_driver so that we can copy C:\fhv.sys before it's deleted.
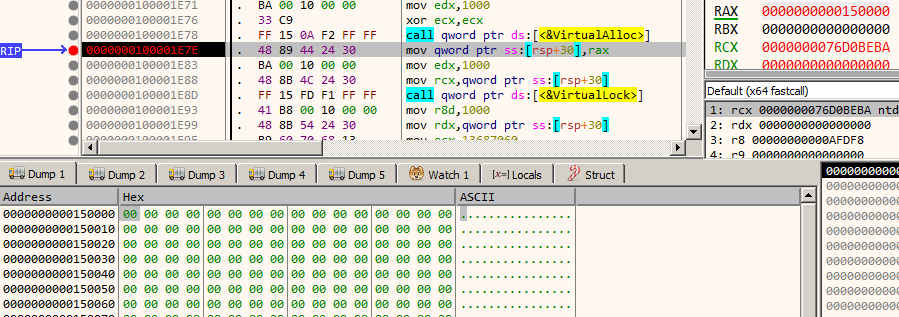
Now, let's focus on check_flag_part1. Set a breakpoint after the VirtualAlloc call at 100001E7E. When the breakpoint hits keep a note of the address of the allocated page in RAX which in our case is 150000. It's filled with zeros as we can see.
Single step until we reach 100001EA7. Notice that the page is now filled with some data.
The data doesn't look to contain proper instructions as evident by its disassembly below.
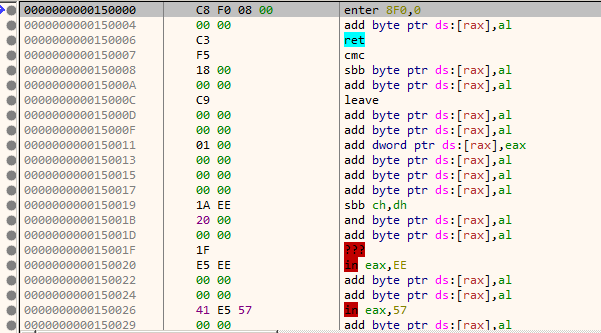
However, this page which looks to contain junk data is used to make a function call as we saw earlier in the decompiled listing. This is intriguing, isn't it? How can the processor execute garbage instructions without throwing an exception?
Analyzing the hypervisor - fhv.sys
We need a starting point from where we would begin reversing. Let's find out how the hypervisor is filling the empty page with the data. We have seen that the page is filled after a vmcall to the hypervisor with 0x13687060 as an argument. Let's search for this constant in fhv.sys. There's exactly one hit.
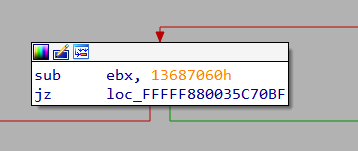
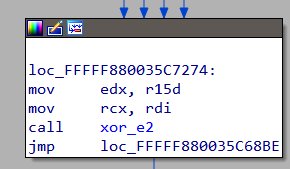
Following the jz branch we arrive at
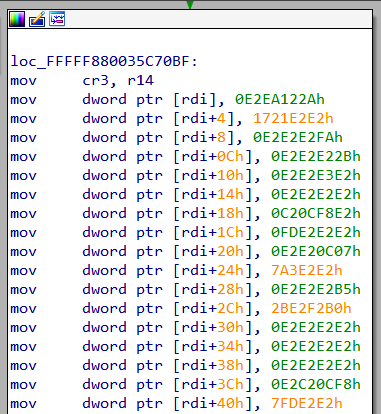
This looks to be the place where the page is filled. However, there is one discrepancy. In x64dbg memory dump window, the data started with the bytes C8 F0 08 00 which is different from what we see in IDA.
A little down, the values are XORed with 0xe2 which gives back the same data as we saw in x64dbg.
This explains how the data is filled in the page but we still need to figure out how these supposed junk bytes are executed.
The hypervisor and guest are executing on the same processor. There must be a mechanism to determine when to switch control from the hypervisor (root mode) to the guest(non-root mode) and vice-versa. This is achieved by means of the Virtual Machine Control Structure (VMCS).
The VMCS contains various fields that describe the state of the guest. Additionally, it also contains other fields that the processor uses to decide when to relinquish control to the hypervisor. This is called a VM Exit event. The hypervisor examines the reason for VM Exit, modify the guest state as necessary and set it on its own merry way. During the entire process, the guest has not even the slightest hint that it was interrupted and a hypervisor has changed its state in between. This makes VT-x an extremely powerful tool which in the wrong hands (read malware) can wreak havoc without ever being detected.
To read and write data to the VMCS the vmread and vmwrite instructions are used respectively. Our hypervisor must also use the same. Searching for these instructions in IDA we find the following. We can rename the corresponding functions to vmx_vmread and vmx_vmwrite respectively.
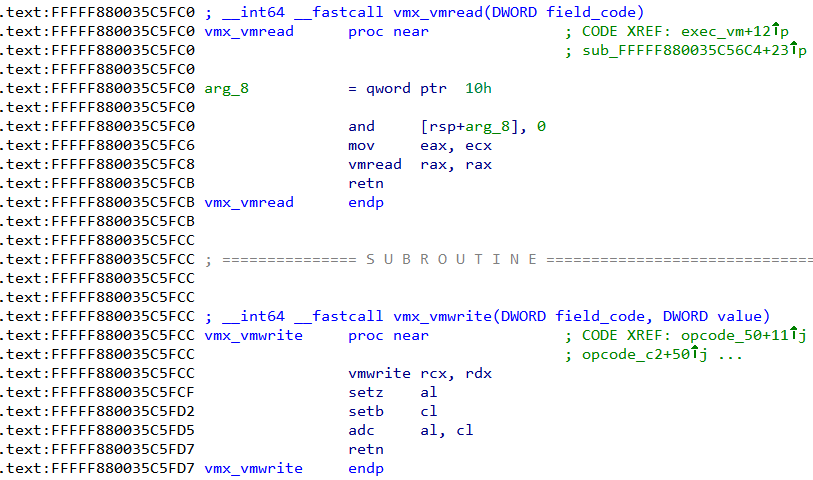
vmx_vmread takes one parameter - the field code to read from. vmx_vmwrite takes two parameter - the field code and the value to write. The list of field codes can be found in vmcs.h. Searching for xreferences to these two functions we can find all the locations from where they are called.
The field code for VMCS_EXIT_REASON is 0x4402. There's exactly one occurrence of this constant.

The hypervisor checks the reason for VM exit.
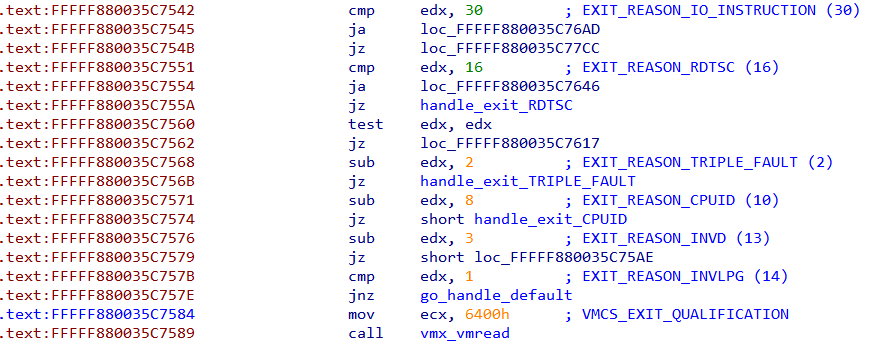
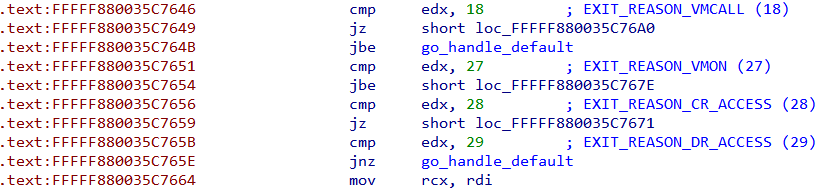
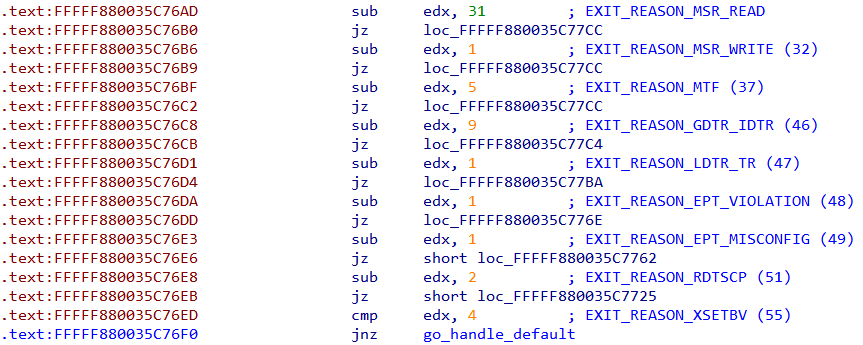
Following the handler for EXIT_REASON_EPT_VIOLATION we come to this piece of code.

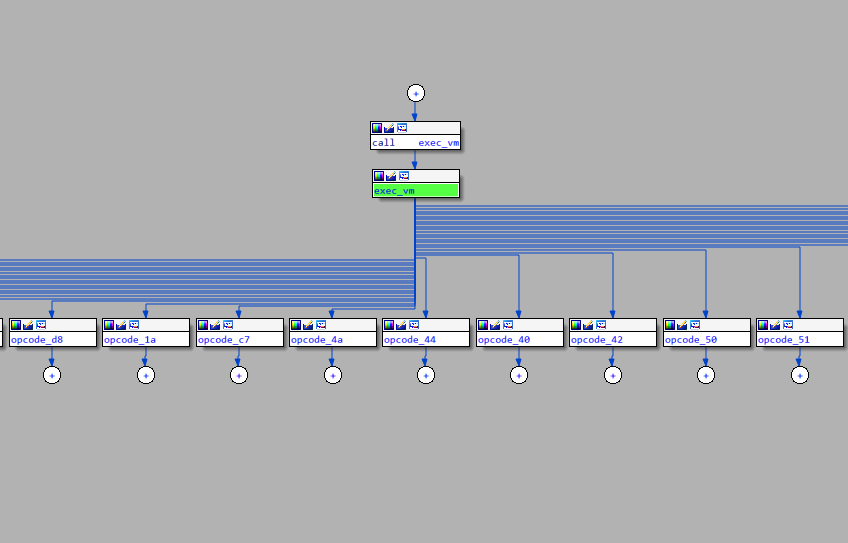
Field VMCS_EXIT_INSTRUCTION_LENGTH is read and compared to 1. If they match exec_vm is called. exec_vm has a cascading waterfall like structure resembling a chain of if..else if statements.
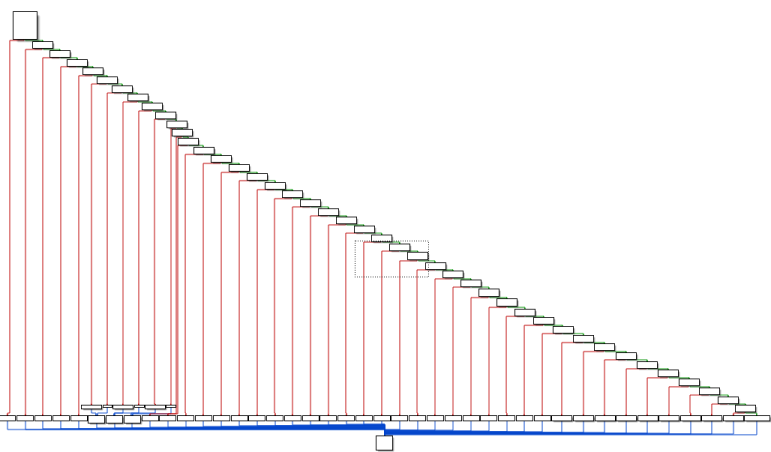
Inspecting the conditions we can find al is compared to various constants and based on that a corresponding function is called.
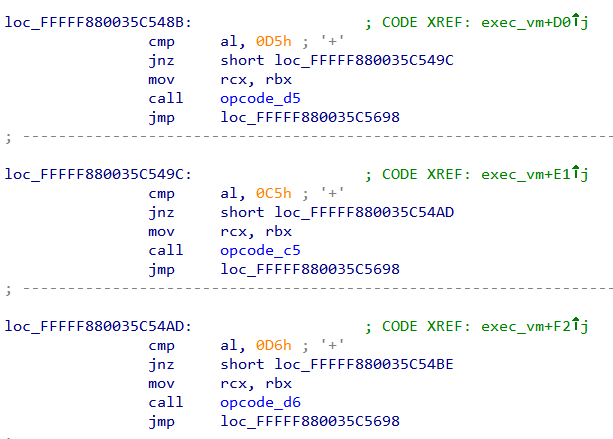
This pattern is reminiscent of VM based obfuscators. In fact, the junk bytes which we found earlier are actually opcodes for this VM. The opcode_ functions do the work of "executing" the instruction.
Now we can understand the logic of this challenge. The characters of the flag are checked by a custom VM implemented entirely in software. To solve this challenge we need to understand the semantics of the opcodes.
Deciphering the 1st VM
Instead of trying to understand the semantics of all the opcodes we can take a shortcut and only analyze opcodes which perform a comparison between two values.
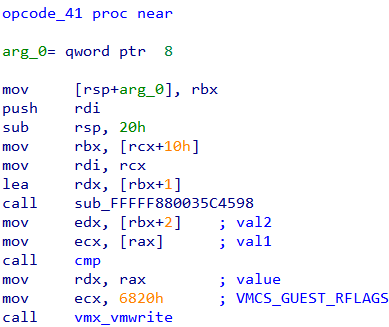
There are three such opcodes - 0x40, 0x41 and 0x42.
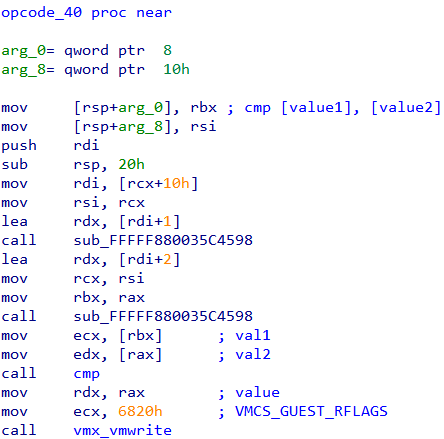
The idea is that the VM must compare the characters from the flag to some other value. We can find out the value by debugging the hypervisor. In this way, we may be able to find out the correct character which passes the check.
To prepare our VM for kernel debugging using VirtualKD check this post. Set a breakpoint on call cmp in the three opcode_ functions and run the challenge binary with a known input

The breakpoint at opcode_41 is hit five times corresponding to characters 0-4 of the flag.


RCX and RDX are compared. RCX holds the character from our flag. RDX holds the correct value. Thus the first 5 characters of the flag are 0x57, 0x65, 0x34, 0x72, 0x5F or We4r_.
Deciphering the 2nd VM
Run with the known first 5 characters
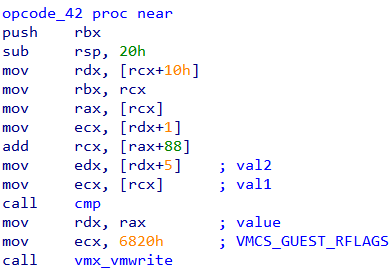
Both the breakpoints at opcode_40 and opcode_42 are hit but we can ignore the latter as it seems to compare a loop counter to check that it's within range.
Tracking the values in RCX and RDX respectively we can find that
(0x33, 0x32, 0x3d, 0x3c, 0x3f, 0x3e, 0x39, 0x38, 0x3b)
is compared to
(0x0, 0x7, 0x2a, 0x3, 0x44, 0x6, 0x45, 0x7, 0x2a)
The corresponding characters in our flag is FGHIJLKLMN or (0x46, 0x47, 0x48, 0x49, 0x4a, 0x4b, 0x4c, 0x4d, 0x4e). These don't match with those in RCX. However, if we XOR these with those in RCX we get.
>>> l1=(0x33, 0x32,  0x3d, 0x3c, 0x3f, 0x3e, 0x39, 0x38, 0x3b)
>>> l2=(0x46, 0x47, 0x48, 0x49, 0x4a, 0x4b, 0x4c, 0x4d, 0x4e)
>>> map(lambda x:hex(x[0]^x[1]), zip(l1, l2))
['0x75', '0x75', '0x75', '0x75', '0x75', '0x75', '0x75', '0x75', '0x75']
This implies the character in the flag was XORed with 0x75 before being compared. To get back the correct characters we simply XOR the values in RDX with 0x75
>>> l=(0x0, 0x7, 0x2a, 0x3, 0x44, 0x6, 0x45, 0x7, 0x2a)
>>> ''.join(map(lambda x:chr(x^0x75), l))
'ur_v1s0r_'
Characters from 5-13 are ur_v1s0r_. The flag obtained till now: We4r_ur_v1s0r_.
Deciphering the 3rd VM
Run with

This is a bit tricky as (0x9d, 0xa5, 0x50, 0x51, 0x52, 0x53) is compared with (0xa5, 0xb1, 0x2, 0x4c, 0xc5) which does not give any proper pattern.
Tracing through the VM execution and inspecting the way in which the opcode handlers are called we can deduce that a value is added to the flag, then XORed with another constant before being compared. The algorithm is something like:
xor_val  = 0x80
target = {0xa5, 0xb1, 0x2, 0x4c, 0xc5}

for i from 0 to 5
{
    Compare (pw[i] ^ xor_val ^ 0x52, target[i])
    xor_val += 0x52
}
To find out the correct characters we can simply XOR with the target values.
target = bytearray([0xa5, 0xb1, 0x2, 0x4c, 0xc5])
xor_val  = 0x80
flag = ''

for i in xrange(len(target)):
    flag += chr(target[i] ^ xor_val ^ 0x52)
    xor_val = (xor_val + 0x52) & 0xFF

print flag
Running we get w1th_. The flag obtained till now: We4r_ur_v1s0r_w1th_.
Deciphering the 4th VM
The last 5 characters seem to be FLARE. As usual set a breakpoint on the call cmp instruction in opcode_40, opcode_41, opcode_42. We will try with various combinations of the word and attempt to deduce the algorithm from the comparisons.
Attempt 1
We4r_ur_v1s0r_w1th_FlAB3
ASCII Values (last 5): 70, 108, 65, 66, 51
Checks (RCX/RDX):
- 70 == 70
- 51 == 51
- 360 == 363
- 131 == 134
- 173 == 160
Let's try just changing a single character FlAB3 -> FlAr3
Attempt 2
We4r_ur_v1s0r_w1th_FlAr3
ASCII Values (last 5): 70, 108, 65, 114, 51
Checks (RCX/RDX):
- 70 == 70
- 51 == 51
- 408 == 363
- 179 == 134
- 173 == 160
We just changed a single character but both Comparison 3 and 4 have changed. This implies the check is not character by character but rather multi-character.
Attempt 3
We4r_ur_v1s0r_w1th_Fl4r3
ASCII Values (last 5): 70, 108, 52, 114, 51
Checks (RCX/RDX):
- 70 == 70
- 51 == 51
- 395 == 363
- 166 == 134
- 160 == 160
Attempt 4
We4r_ur_v1s0r_w1th_FA4B3
ASCII Values (last 5): 70, 65, 52, 66, 51
Checks (RCX/RDX):
- 70 == 70
- 51 == 51
- 304 == 363
- 118 == 134
- 117 == 160
We have got plenty of test cases. Let's try to deduce the algorithm.
Its evident, checks 1 and 2 are checking the first and the last character of the flag respectively. So the first character is F and last is 3.
Check 3 is varying in all of the test cases and also has the greatest numerical value. It equals the sum of the ASCII value of the characters.
Similarly, Check 4 is comparing the sum of 3rd and 4th character.
Check 5, is comparing the sum of 2nd and 3rd characters.
Thus if c1, c2, c3, c4, c5 are the characters of the flag, we have.
c1 = 70
c5 = 51
c1 + c2 + c3 + c4 + c5 = 363
c3 + c4 = 134
c2 + c3 = 160
Solving this system of equations we get a unique solution.
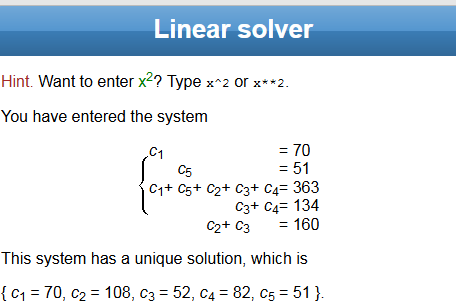
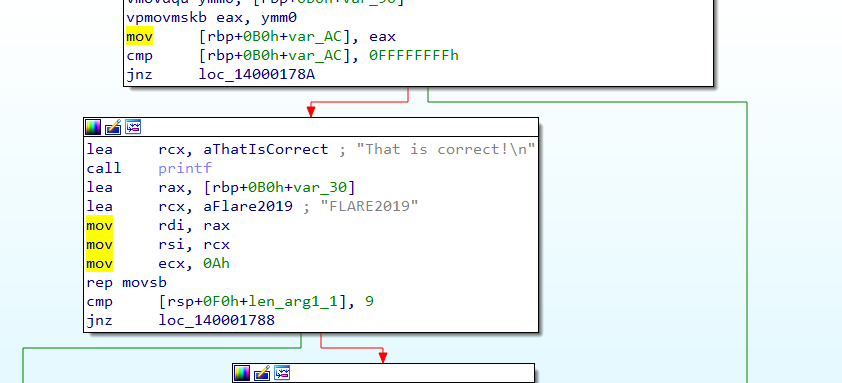
Converting the ASCII values to char code we get the word Fl4R3. Trying with We4r_ur_v1s0r_w1th_Fl4R3 on the challenge we get the final flag.

FLAG: We4r_ur_v1s0r_w1th_Fl4R3@flare-on.com
Continue to the next part: Flare-on 5 CTF Write-up (Part 8)

)
)
)
)